
Sequence of work
1. Remove a lateral protective upholstery in a luggage carrier.

Pic. 7.12. Loosen the upper shock mount. Use a suitable wrench to hold the stem when unscrewing
2. After removing the side upholstery, it is necessary to loosen the upper mounting of the shock absorber. Use a suitable wrench to hold the stem when unscrewing (pic. 7.12). At a branded service station, a special SW 17 head is used for this with a handle welded on top, in which another key is installed to hold the shock absorber rod. If necessary, you can make such a key yourself.
3. Remove the top cup and rubber support.
4. Remove the wheel. Tip: The car must be on wheels, or if it is raised, place jack stands under the appropriate wheel.
5. Turn away a bolt of fastening on the lever. Remove the cover first.
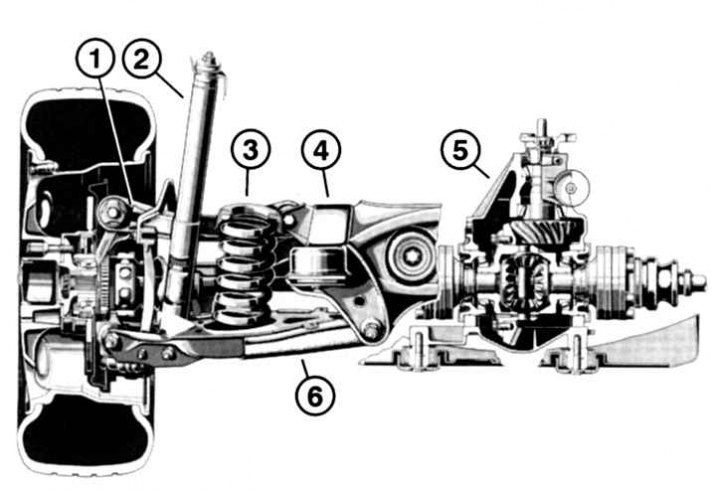
Pic. 7.13. Rear suspension and its drive in section: 1 - upper transverse lever; 2 - shock absorber; 3 - twisted spring; 4 - subframe; 5 - rear axle gearbox (differential); 6 - lower transverse lever
6. Lower the wheel suspension slightly on a secure support (e.g. rolling jack) and take out shock absorber 2 (pic. 7.13).
7. Install the shock absorber in the reverse order, using new self-locking nuts.
8. Install the shock absorber so that its color marking is visible. Install the shock absorber top pieces.
9. Tighten the lower fastening with a torque of 55 Nm.
10. Tighten the first top nut until it reaches the distance sleeve, then tighten it to 15 Nm.
11. Lock the first nut with the top nut and tighten it to 30 Nm while holding the first nut with a SW 17 wrench.
12. Install the wheel, tighten the fastening bolts with a torque of 110 Nm.