
Attention! A lifting gear must be used when removing the drive chain cover. When installing the cover, the use of sealant is necessary.
Removing
Location of the two bolts at the front of the fuel filter and thermostat

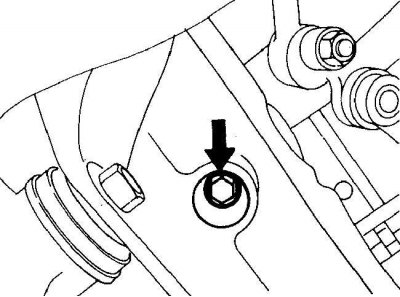
The location of the lower bolt of fastening of the support of the power unit
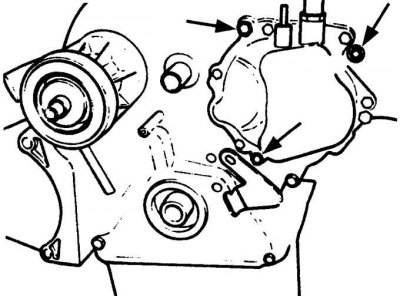
The location of the bolts of the high pressure fuel pump to the cover of the drive chain
Arrangement of bolts of fastening of a cover of a driving chain to a head of the block of cylinders

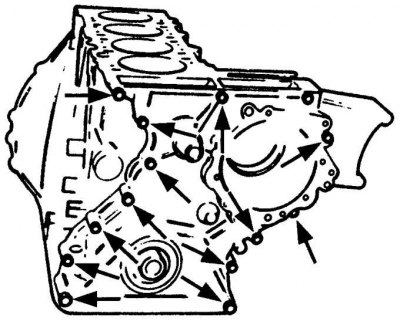
Arrangement of bolts of fastening of a cover of a driving chain to the block of cylinders of the engine
1. Remove the ground wire from the battery.
2. Open the hood and place it in a vertical position.
3. Remove the lower engine mudguard.
4. Remove the heatsink and heatsink fan assembly.
5. Remove the crankshaft pulley/vibration damper and hub.
6. Remove the auxiliary drive belt tensioner by doing the following:
- a - remove the plastic plug, unscrew the bolt and remove the intermediate pulley of the auxiliary drive belt;
- b - unscrew the bolts and remove the radiator fan pulley;
- c - unscrew the bolts and remove the shock absorber strut of the tension mechanism;
- d - remove the spring of the tension mechanism;
- e - remove the auxiliary drive belt tensioner.
7. Remove the vacuum pump for the brake system.
8. Remove the power steering pump.
9. Remove the self-levelling rear suspension pump from the cylinder head.
10. Remove the generator.
11. Drain the engine oil from the engine.
12. Remove the cylinder head cover.
13. On models with air conditioning, cover the condenser with thick cardboard to prevent further damage.
14. Remove the two bolts at the front of the fuel filter and thermostat assembly (see fig. Location of the two bolts at the front of the fuel filter and thermostat).
15. Unscrew the oil dipstick tube from the cylinder head.
16. Unscrew bolts and remove an arm of fastening of the generator.
17. Mark the location and unscrew the crank angle sensor bracket and move the sensor to the side.
18. Hook a hoist onto the front eye to lift the engine.
19. Working under the vehicle on both sides of the engine, remove the lower powertrain mounting bolts (see fig. The location of the lower bolt of fastening of the support of the power unit).
20. Raise the engine and unscrew the bolts securing the oil pan to the drive chain cover and loosen the remaining bolts securing the oil pan.
21. Lower the engine.
22. Remove the three bolts securing the high pressure fuel pump to the timing chain cover (see fig. The location of the bolts of the high pressure fuel pump to the cover of the drive chain).
23. Through the hole in the top of the cylinder head, unscrew the two bolts securing the cylinder head to the timing chain cover (see fig. Arrangement of bolts of fastening of a cover of a driving chain to a head of the block of cylinders).
24. Unscrew the remaining drive chain bolts and remove the cover (see fig. Arrangement of bolts of fastening of a cover of a driving chain to the block of cylinders of the engine).
Attention! A lifting gear must be used when removing the drive chain cover. When installing the cover, the use of sealant is necessary.
25. When removing the timing chain cover, be careful not to damage the cylinder head and oil pan gaskets.
Installation
1. Clean the mating surfaces of the timing chain cover, cylinder head and cylinder block.
2. Check the condition of the cylinder head gasket. If the gasket is damaged, the cylinder head must be removed and the gasket replaced.
3. Check the condition of the oil pan gasket. If the gasket is damaged, the oil pan must be removed and the gasket replaced. If necessary, replace the crankshaft front O-ring.
4. To prevent damage to the working edges of the crankshaft sealing ring, wrap the front end of the crankshaft with adhesive tape.
5. Apply a thin layer of sealant to the surface of the cylinder block mating with the timing chain cover.
6. Lubricate the seal lips of the front crankshaft seal with clean engine oil and carefully install the timing chain cover on the engine.
7. Screw in bolts of fastening of a cover of a driving chain and tighten them the demanded moment.
8. Through the holes in the upper part of the cylinder head, install the bolts securing the cylinder head to the drive chain cover and tighten them to the required torque.
9. Remove the adhesive tape from the front end of the crankshaft.
10. Screw in and tighten the bolts and nuts securing the high pressure fuel pump to the required torque.
11. Raise the engine, screw in the bolts securing the oil pan to the drive chain cover and tighten them to the required torque.
12. Lower the engine and screw in the lower bolts of fastening of support of the power unit.
13. In accordance with the previously made marks, install the crankshaft angle sensor bracket.
14. Install the alternator mounting bracket.
15. Attach the dipstick tube to the cylinder head.
16. Install the fuel filter.
17. Install the cylinder head cover.
18. Install the generator.
19. Install the self-levelling rear suspension pump to the cylinder head.
20. Install the power steering pump.
21. Install the brake vacuum pump.
22. Install the auxiliary drive belt tensioner in the reverse order of removal.
23. Install the hub and crankshaft pulley/vibration damper.
24. Install the radiator fan assembly and radiator.
25. Install the lower engine mudguard.
26. Fill engine oil into the engine.
27. Connect ground wire to battery.