
Cars BMW Cars Volkswagen Cars Chevrolet Cars Land Rover Cars Lada Cars Honda Cars Peugeot
English Русский
Български
Беларускі
Український
Српски
Hrvatski
Română
Polski
Slovenský
Magyar
Bookmark News and articles Sitemap Feedback Site search
MercedesMan.ru


A-Class C-Class E-Class G-Class M-Class S-Class Others
W123 (1976-1985) W124 (1984-1995) W210 (1996-2002)
  • Main
  • E-Class
  • W124 (1984-1995)
  • Power unit
  • Diesel engines
  • Chain Tensioners — Removal, Checking and Installation

Chain Tensioners — Removal, Checking and Installation (Mercedes-Benz E-Class W124)

0
Contents: Tensioner shoe ↡ Upper chain guide ↡ Lower chain guide ↡
Attention! To remove the upper chain guide, you must use an inertia hammer with an adapter.


The location of the fastening brackets connecting the outer and inner parts of the chain guide
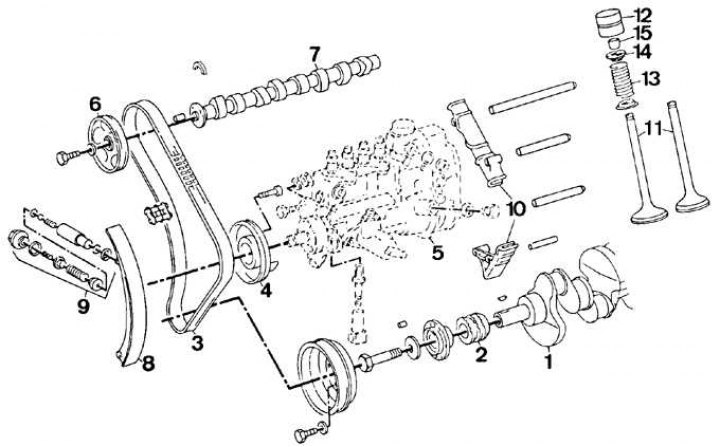


1 – crankshaft; 2 – pulley; 3 – drive chain; 4 – high pressure fuel pump sprocket; 5 – high…

1 – crankshaft; 2 – pulley; 3 – drive chain; 4 – high pressure fuel pump sprocket; 5 – high pressure fuel pump; 6 – camshaft sprocket; 7 – camshaft; 8 – tension mechanism shoe; 9 – tension mechanism; 10 – chain tensioners; 11 – valves; 12 – hydraulic pusher; 13 – spring; 14 – spring support plate; 15 – crackers


Tensioner shoe


Removal


1. Remove the cylinder head.

2. Remove the drive chain cover.

3. Unscrew the drive chain tensioner mechanism.

4. Remove the tensioner shoe.

Examination


1. Check the tensioner shoe for wear or damage and replace it if necessary.

Installation


1. Install the tensioner shoe.

2. Screw in the drive chain tensioner.

3. Install the drive chain cover.

4. Install the cylinder head.

Upper chain guide


Removal


Upper chain guide elements
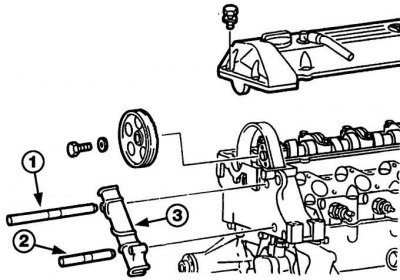


1 – Upper mounting pin;

1 – Upper mounting pin;
2 – lower mounting pin;
3 – upper drive chain guide


Using an inertia hammer with an adapter to remove the upper chain guide mounting pin
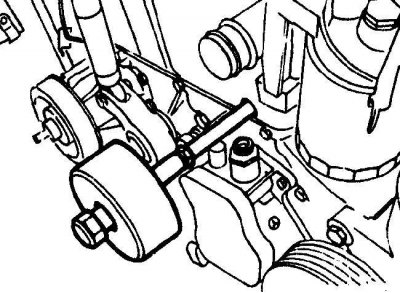


Using an inertia hammer with an adapter to remove the upper chain guide mounting pin


1. Remove the camshaft sprocket.

2. Screw an additional bolt into one of the upper chain guide mounting pins and, using an inertia hammer with an adapter, remove the chain guide mounting pin by the head of the additional bolt (see Fig. Upper chain guide components, Using an inertia hammer with an adapter to remove the upper chain guide mounting pin).

3. Remove the second locating pin in the same manner.

4. Remove the upper chain guide from the cylinder head.

Examination


1. Check the tensioner shoe for wear or damage and replace it if necessary.

Installation


1. Install the upper chain guide into the cylinder head and insert the dowel pins halfway.

2. Apply a thin layer of sealant to the raised surface of the dowel pins and press the dowel pins into the cylinder head completely.

3. Install the camshaft sprocket.

Lower chain guide


Removal


1. Remove the drive chain cover.

2. Unscrew the drive chain tensioner mechanism.

3. Remove the lower chain guide from the pivot pin.

Examination


1. Check the condition of the lower chain guide for wear and damage and replace it if necessary.


Installation


1. Install the lower drive chain guide onto the pivot pin.

2. Screw in the drive chain tensioner.

3. Install the drive chain cover.
This article is available at: russian, bulgarian, belarusian, ukrainian, serbian, croatian, romanian, polish, slovak, hungarian
The article has been verified: Levin Kirill Glebovich
Share with friends:
◀ Previous
E-Class W124 / Diesel engines
Next ▶

Camshaft and crankshaft sprocket
Drive chain tensioning mechanism
Drive chain — checking and replacing
Timing Chain Cover — Removal and Installation
Crankshaft Pulley/Vibration Damper and Hubs
Camshafts and tappets
Checking hydraulic tappets
Camshafts — Installation
Cylinder head — removal and installation
Oil pan — removal and installation
More similar articles for repairing other models

☛ Checking the engine oil level using a dipstick Mercedes W168 (1997-2004)
☛ Camshaft Drive Chain — Checking and Replacing Mercedes 190 (W201) (1982-1993)
☛ Checking the condition of the timing chain on the M628 engine Mercedes W463 (1999-2019)
☛ Checking fluid levels, leak control Mercedes W163 (1997-2005)
☛ Checking fluid levels, leak control Mercedes W140 (1991-1998)
☛ Checking the engine oil level Mercedes Sprinter (1995-2000, diesel)
Link in different formats to this article
Comments and feedback from visitors
No comments yet


How much will 12 + 11 ?


W210 (1996-2002) 
  • General information
  • Vehicle description
  • Working conditions and tools
  • Car care
  • Diesel engines
  • Engine repair
  • Lubrication system
  • Cooling system
  • Injection system
  • Supply system
  • Exhaust system
  • Gasoline engines
  • Engine repair
  • Lubrication system
  • Cooling system
  • Control system
  • Power and exhaust system
  • Transmission
  • Clutch
  • Mechanical gearbox
  • Automatic gearbox
  • Drive shafts
  • Chassis
  • Car suspension
  • Steering
  • Tires and wheels
  • Brake system
  • Body
  • Exterior (external elements)
  • Interior (internal elements)
  • Doors and windows
  • Heating and ventilation
  • Electrical equipment
  • Equipment and devices
  • Power devices
  • Lighting and signaling
  • Electrical circuits
W124 (1984-1995) 
  • General information
  • Governing bodies
  • Driving and operation
  • Weekly care
  • Maintenance (gasoline)
  • Maintenance (diesel)
  • Troubleshooting
  • Power unit
  • I4 petrol engine
  • V6 petrol engine (SOHC)
  • V6 petrol engine (DOHC)
  • Diesel engines
  • Engine overhaul
  • Cooling system
  • Heating and ventilation
  • Fuel system (carburetor)
  • Injection system «Bosch CIS-E»
  • Injection system «Bosch HFM»
  • Diesel fuel system
  • Supply system
  • Starting and charging system
  • Ignition system (I4)
  • Ignition system (V6)
  • Preheating
  • Transmission
  • Clutch
  • Mechanical gearbox
  • Automatic gearbox
  • Drive shafts
  • Chassis
  • Brake system
  • Car suspension
  • Steering
  • Body
  • Exterior (external elements)
  • Interior (internal elements)
  • Doors, locks and windows
  • Electrical equipment
  • Equipment and devices
  • Switches
  • Headlights and lighting
  • Electrical circuits
W123 (1976-1985) 
  • General information
  • Introduction to the guide
  • Power unit
  • Engine device
  • Repair M102 engines
  • Repair M110 and M123 engines
  • Cooling and lubrication (M102)
  • Cooling (M110 and M123)
  • Ignition system
  • Power system «Stromberg»
  • Power system «Solex 4A1»
  • Fuel injection «K-Jetronic»
  • Fuel injection «L-Jetronic»
  • Transmission
  • Clutch
  • Mechanical gearbox
  • Automatic gearbox
  • Cardan and rear axle
  • Chassis
  • Front suspension
  • Rear suspension
  • Steering
  • Brake system
  • Body
  • Exterior (external elements)
  • Interior (internal elements)
  • Doors, locks and windows
  • Electrical equipment
  • Equipment and devices
  • Power devices
  • Electrical circuits
 
MercedesMan.ru © 2017–2026 · Mobile version · Read about Mercedes · Sitemap: EN BG BY UA RS HR RO PL SK HU · Feedback · Site search · Bookmark A-Class (W168) · C-Class (W201) · C-Class (W202) · C-Class (W203) · E-Class (W123) · E-Class (W124) · E-Class (W210) · G-Class (W463) · M-Class (W163) · S-Class (W116, petrol) · S-Class (W126, petrol) · S-Class (W140) · S-Class (W220) · Sprinter · Vito 1 · Vito 2 · Vario 814D ·
 
We only use cookies without which some of the site's features may not be available.