
4-speed gearshift cover of early model years
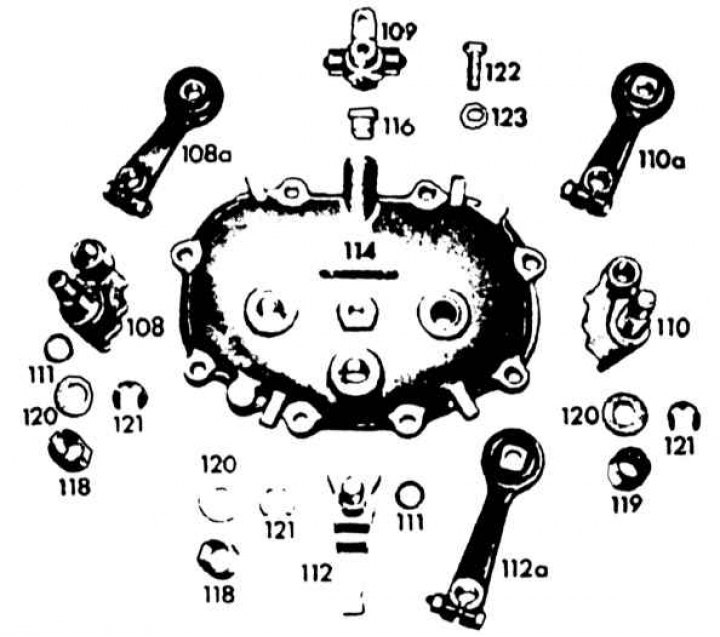
108 - stock III and IV gears; 108a - shift lever; 109 - locking mechanism; 110 - stock I and II gears; 111 - sealing ring; 112 - reverse gear rod; 112a - reverse gear lever; 114 - gearshift cover; 116 - breather; 118 - sleeve; 119 - needle bearing; 120 - washer; 121 - lock washer; 122 - bolt; 123 - spring washer
Gear shift cover of recent model years
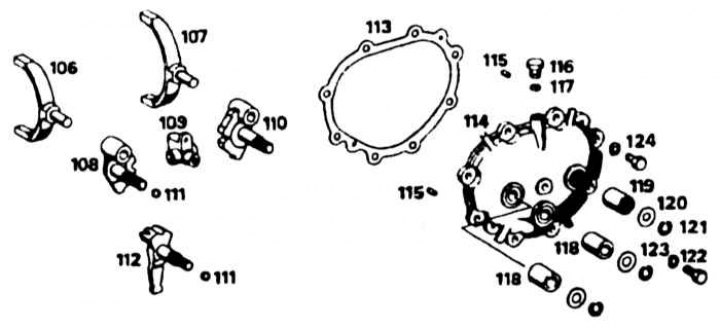
106 - fork III and IV gears; 107 - fork I and II gears; 108 - stock III and IV gears; 109 - locking mechanism; 110 - stock I and II gears; 111 - sealing ring; 112 - reverse gear rod; 113 - gasket; 114 - cover of the switching mechanism; 115 - hairpin; 116 - breather; 117 - spring washer; 118 - sleeve; 119 - needle bearing; 120 - washer; 121 - lock washer; 122 - bolt; 123 - locking or spring washer; 124 - bolt
1. Check (scriber) the position of the gear levers relative to the shafts, and then remove them from the splines.
2. Remove C-rings and washers from shafts.
3. Remove the leashes and shift fingers.
4. Bend the tab of the lock washer (if it is installed), unscrew the central bolt and remove the retaining clip. Fix the relative position of the pin in the cover.
5. Wash all parts in solvent (kerosene) and dry. Carry out fault detection, replace parts if necessary. If the shaft bearings are worn, press them out with a soft metal drift and install new ones. Replace o-rings.
6. Assembly is made in the reverse order of removal. Pre-lubricate the shafts with gear oil.
Inspection of crankcases and bearings
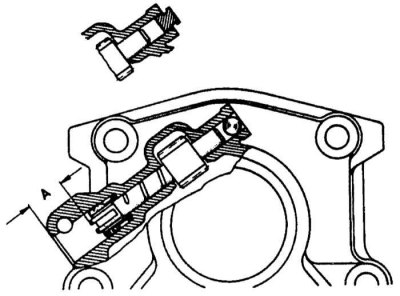
Cross section of speedometer drive mechanism
A - the gap between the speedometer drive shaft and the gearbox cover
1. Check crankcases for wear, cracks and damage. Check the bearings for wear by turning them by hand. In case of difficult or uneven rotation, replace the bearings.
2. Replace all seals and gaskets. To replace the front cover oil seal, remove the clutch release bearing guide tube bolts, then press the oil seal out with a metal tube. The new oil seal must be pressed flush with the body. Lubricate the threads of the guide tube bolts with sealant and install them, but do not fully tighten until you have reassembled the gearbox and reinstalled the clutch housing.
3. To replace the rear cover seal, pry it off with a screwdriver. Press the new oil seal into place with a hammer and block of wood until it is flush with the housing.
4. Check the speedometer drive gear in the back cover for wear and replace if necessary. In order to remove the wheel, it is necessary to drive the shaft through it and the cover using a soft metal beard. Note that this will also push the sealing ball out (or cork), which can be pulled out in advance with a screwdriver. Pull out the oil seal by screwing the bolt into it and pulling the bolt out. Installation of details is made in an order, the return to removal. Before installing the sealing plug, coat it with sealant.