
Cars BMW Cars Volkswagen Cars Chevrolet Cars Land Rover Cars Lada Cars Honda Cars Peugeot
English Русский
Български
Беларускі
Український
Српски
Hrvatski
Română
Polski
Slovenský
Magyar
Bookmark News and articles Sitemap Feedback Site search
MercedesMan.ru


A-Class C-Class E-Class G-Class M-Class S-Class Others
W123 (1976-1985) W124 (1984-1995) W210 (1996-2002)
  • Main
  • E-Class
  • W123 (1976-1985)
  • Transmission
  • Mechanical gearbox
  • Assembly of a five-speed gearbox

Assembly of a five-speed gearbox (Mercedes-Benz E-Class W123)

0

Adjustment dimensions of the position of the gear shift levers of the 5-speed gearbox*
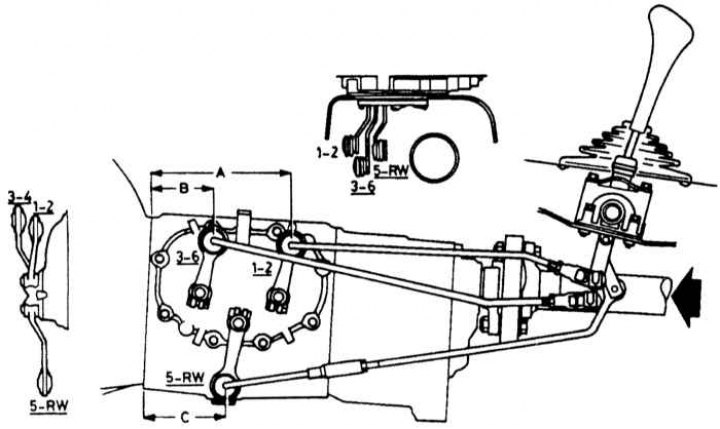


A = 168.0 mm

A = 168.0 mm
B = 86.0 mm
C = 95.0 mm
* The gear shift lever is in neutral position.
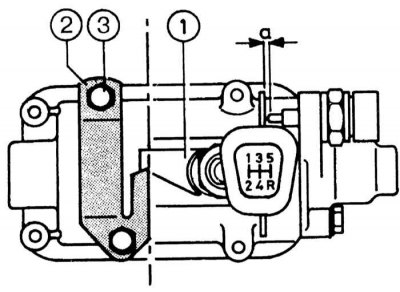

Adjusting the position of the gear shift lever of a 5-speed gearbox

Adjusting the position of the gear shift lever of a 5-speed gearbox
1 - thrust finger
2 - thrust plate
3 - bolt


1. Insert the primary shaft and engage it with the secondary shaft.

2. While your assistant lifts the secondary and primary shafts, lift the intermediate shaft and (on boxes with tapered roller bearings) move it forward so that the bearing rests against the crankcase wall. Install the rear (and front) intermediate shaft bearing, pressing them into the crankcase with a mandrel.

3. Install the oil deflector ring and bearing on the primary shaft, then use a drift to press the bearing into the crankcase wall until it stops. When installing the bearing, support the secondary shaft and make sure that the 4th gear synchronizer ring remains in place.


4. Place the inner snap ring on the input shaft.

5. Remove the pipe from the secondary shaft and, supporting the primary shaft, install the rear bearing into the crankcase using a drift.

6. Set the synchronizer clutches to the position of engaging two gears simultaneously, then screw the bearing nut onto the front end of the intermediate shaft and tighten it to a torque of 8.0 kgf·m. If provided, pin the flange of the nut into the groove of the shaft.

7. Engage neutral gear, then install the end play adjusting shims and pressure plate into the rear wall of the crankcase and tighten the bolts. If replacing the bearing, adjust the end clearance of the outer bearing ring within 0.0-0.05 mm. To determine the clearance, use a vernier caliper to measure the distance between the bearing retaining ring and the shoulder of the pressure plate and the mating surface. If provided, lock the bolts with the tabs of the lock washers.

8. Place spacers on the intermediate shaft and press the reverse gear onto the splines, then hammer the prismatic key into the slot.

9. Use a hammer to press the segment keys into the secondary shaft grooves.

10. Using a mandrel, press the reverse gear onto the secondary shaft, then install the spacer washer. The required thickness of the spacer washer is selected depending on the length of the gear selection rod according to the table below.

Gear Selector Rod Marking (at the end of the fork)Thickness of spacer washer, mm
Red Mark3,8
No tag3,9
White mark4,0

1. Insert the fork of the reverse gear selection rod and the 5th gear into the groove of the 5th gear synchronizer sleeve, then move them into the crankcase and onto the secondary shaft. At the same time, install the lock on the gear selection rod through the crankcase window.


2. Heat the V gear needle bearing ring (the warmth of the hand is enough) and place it on the secondary shaft until it stops against the synchronizer unit, pulling the secondary shaft back.

3. Place the synchronizer locking ring on the cone of the 5th gear.

4. Install the reverse idler gear into the shift fork, then insert the idler gear shaft into the gear and into the crankcase.

5. Place the reverse and 5th gear selection rod in the center position and insert the ball and the retainer spring, applying a thin layer of grease to them. Insert the retainer into the retained crankcase.

6. Align the retainer with the hole in the gear selector shaft and insert the cylindrical cotter pin into this hole.

7. Install the intermediate case with a new gasket. Apply sealant to the bolt threads, screw them in and tighten them by hand. The installation pin of the reverse intermediate gear shaft must be on the outside to install it in the cutout of the case.

8. The intermediate case must be centered relative to the intermediate plate before final tightening of the bolts. To do this, remove the bearings from the plate, install the plate on the case and make sure that the bearings fit freely into the plate seats. Replace the case and tighten the outer bolts. Remove the intermediate plate and bearings and tighten the inner bolts.

9. Using a mandrel, press the 5th gear onto the end of the intermediate shaft.

10. Place a new gasket on the intermediate plate, installing the bearings on it, then place the plate on the dowel pins, passing the secondary and intermediate shafts through it, install and tighten the bolts.


11. Temporarily lock the intermediate shaft by engaging two gears simultaneously, then screw the nut onto the intermediate shaft and tighten it to a torque of 8.0 kgf·m. If provided, counter-lock the nut with a coin.

12. Insert the gear shift forks into the grooves of the synchronizer clutches through the side window of the crankcase.

[Original material on the website: www.mercedesman.ru]
This article is available at: russian, bulgarian, belarusian, ukrainian, serbian, croatian, romanian, polish, slovak, hungarian
The article has been verified: Levin Kirill Glebovich
Share with friends:
◀ Previous
E-Class W123 / Mechanical gearbox
Next ▶

Assembly of a four-speed gearbox
Gearbox assembly
Disassembling and assembling the gearshift cover
Disassembly and assembly of the secondary shaft
Disassembling the primary and intermediate shafts
Assembly of four-speed and five-speed gearboxes
Adjusting the gear shift drive (from the lever on the body floor tunnel)
More similar articles for repairing other models

☛ Cruise control with Speedtronic speed limiter Mercedes W168 (1997-2004)
☛ Gearbox / final drive Mercedes W202 (1993-2000)
☛ Speed control systems (Tempostat / Speedtronic) Mercedes W463 (1999-2019)
☛ Speed control systems (Tempostat / Speedtronic) Mercedes W163 (1997-2005)
☛ Speed control systems (tempostat) and Speedtronic Mercedes W140 (1991-1998)
☛ Idle speed adjustment Mercedes Sprinter (1995-2000, diesel)
Link in different formats to this article
Comments and feedback from visitors
No comments yet


How much will 13 + 49 ?


W210 (1996-2002) 
  • General information
  • Vehicle description
  • Working conditions and tools
  • Car care
  • Diesel engines
  • Engine repair
  • Lubrication system
  • Cooling system
  • Injection system
  • Supply system
  • Exhaust system
  • Gasoline engines
  • Engine repair
  • Lubrication system
  • Cooling system
  • Control system
  • Power and exhaust system
  • Transmission
  • Clutch
  • Mechanical gearbox
  • Automatic gearbox
  • Drive shafts
  • Chassis
  • Car suspension
  • Steering
  • Tires and wheels
  • Brake system
  • Body
  • Exterior (external elements)
  • Interior (internal elements)
  • Doors and windows
  • Heating and ventilation
  • Electrical equipment
  • Equipment and devices
  • Power devices
  • Lighting and signaling
  • Electrical circuits
W124 (1984-1995) 
  • General information
  • Governing bodies
  • Driving and operation
  • Weekly care
  • Maintenance (gasoline)
  • Maintenance (diesel)
  • Troubleshooting
  • Power unit
  • I4 petrol engine
  • V6 petrol engine (SOHC)
  • V6 petrol engine (DOHC)
  • Diesel engines
  • Engine overhaul
  • Cooling system
  • Heating and ventilation
  • Fuel system (carburetor)
  • Injection system «Bosch CIS-E»
  • Injection system «Bosch HFM»
  • Diesel fuel system
  • Supply system
  • Starting and charging system
  • Ignition system (I4)
  • Ignition system (V6)
  • Preheating
  • Transmission
  • Clutch
  • Mechanical gearbox
  • Automatic gearbox
  • Drive shafts
  • Chassis
  • Brake system
  • Car suspension
  • Steering
  • Body
  • Exterior (external elements)
  • Interior (internal elements)
  • Doors, locks and windows
  • Electrical equipment
  • Equipment and devices
  • Switches
  • Headlights and lighting
  • Electrical circuits
W123 (1976-1985) 
  • General information
  • Introduction to the guide
  • Power unit
  • Engine device
  • Repair M102 engines
  • Repair M110 and M123 engines
  • Cooling and lubrication (M102)
  • Cooling (M110 and M123)
  • Ignition system
  • Power system «Stromberg»
  • Power system «Solex 4A1»
  • Fuel injection «K-Jetronic»
  • Fuel injection «L-Jetronic»
  • Transmission
  • Clutch
  • Mechanical gearbox
  • Automatic gearbox
  • Cardan and rear axle
  • Chassis
  • Front suspension
  • Rear suspension
  • Steering
  • Brake system
  • Body
  • Exterior (external elements)
  • Interior (internal elements)
  • Doors, locks and windows
  • Electrical equipment
  • Equipment and devices
  • Power devices
  • Electrical circuits
 
MercedesMan.ru © 2017–2026 · Mobile version · Read about Mercedes · Sitemap: EN BG BY UA RS HR RO PL SK HU · Feedback · Site search · Bookmark A-Class (W168) · C-Class (W201) · C-Class (W202) · C-Class (W203) · E-Class (W123) · E-Class (W124) · E-Class (W210) · G-Class (W463) · M-Class (W163) · S-Class (W116, petrol) · S-Class (W126, petrol) · S-Class (W140) · S-Class (W220) · Sprinter · Vito 1 · Vito 2 · Vario 814D ·
 
We only use cookies without which some of the site's features may not be available.