
Cars BMW Cars Volkswagen Cars Chevrolet Cars Land Rover Cars Lada Cars Honda Cars Peugeot
English Русский
Български
Беларускі
Український
Српски
Hrvatski
Română
Polski
Slovenský
Magyar
Bookmark News and articles Sitemap Feedback Site search
MercedesMan.ru


A-Class C-Class E-Class G-Class M-Class S-Class Others
Sprinter (1995-2000, diesel) Vito 1 (1996-2003) Vito 2 (2003-2014, diesel) Vario 814D (1996-2003, diesel)
  • Main
  • Mercedes-Benz
  • Sprinter (1995-2000)
  • Transmission
  • Front axle
  • Installing the front axle

Installing the front axle (Mercedes-Benz Sprinter 903)

0
The front axle installation must be carried out as follows:
  • slowly raise the jack and bring the front axle to its attachment points. The bridge should fit into the guide pins. At the top of the shock absorber strut, insert it into the corresponding holes in the body. First install rubber supports on the racks. Raise the bridge to the end;
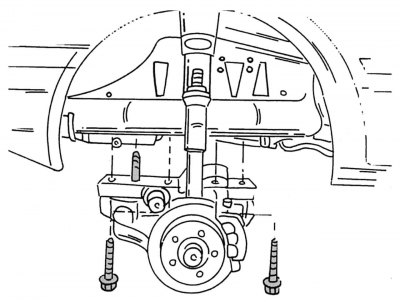
Figure 204. Removing the front axle
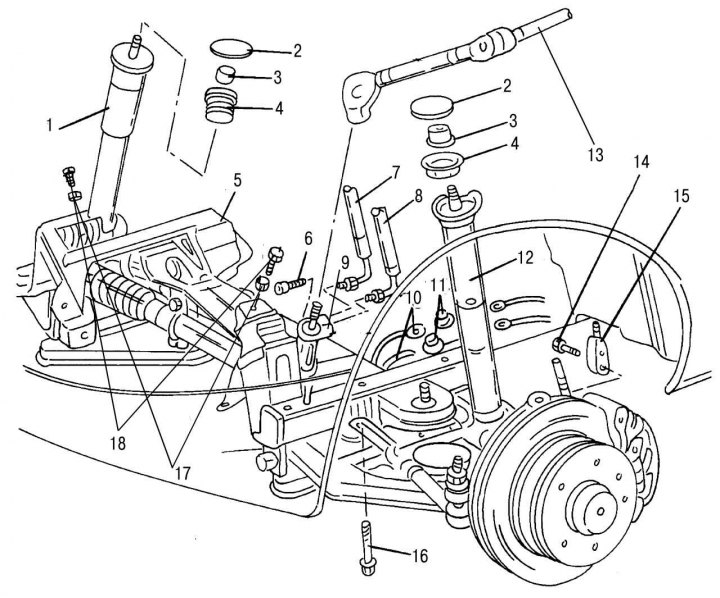
Figure 204. Removing the front axle


Figure 198. Front axle assembly: 1 — shock absorber strut right; 2 - lid; 3 — rack mounting nut,…

Figure 198. Front axle assembly: 1 — shock absorber strut right; 2 - lid; 3 — rack mounting nut, 90–110 N·m; 4 - Upper rubber support of the rack; 5 - front axle; 6 — bolt (with internal hexagon) steering joint mounts, 30–35 Nm; 7 — power steering hose; 8 — power steering return line hose; 9 - rack and pinion steering mechanism; 10 — brake system hose; 11 — tee of brake system pipelines; 12 — shock absorber strut left; 13 — intermediate steering shaft with joint; 14 — bolt for fastening the brake pad wear sensor wire; 15 — brake pad wear sensor wire; 16 — connecting bolt for fastening the bridge to the cross beam, 90–100 N·m; 17 — engine mounting bolt washers; 18 — engine mounting bolts, 80–90 Nm


  • both shown in the picture 204 bolts (pos. 16 in figure 198) insert into the holes and tighten the bolts and their fasteners evenly in several stages with a torque of 90–100 N·m;
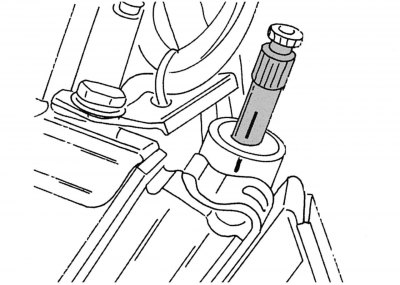
Figure 205. Marks on the pinion and housing of the rack and pinion steering mechanism indicating…

Figure 205. Marks on the pinion and housing of the rack and pinion steering mechanism indicating the position of the wheels straight ahead

  • set the wheels straight. In this case, the marks on the rack and pinion gear and its housing must match, as shown in the figure 205;
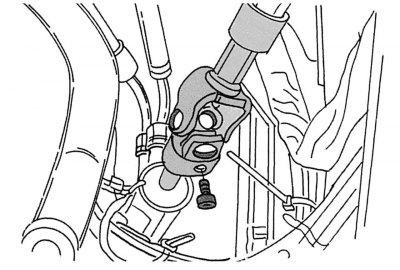
Figure 201. Intermediate steering shaft with hinge

Figure 201. Intermediate steering shaft with hinge

  • install the intermediate shaft joint onto the gear (see figure 201), tighten the bolt (pos. 6 in figure 198) and tighten it to a torque of 25–30 N·m;
  • slowly lower the engine onto the supports, tighten the mounting bolts to 85 N·m. Remove the lifting device;
  • install air duct;
  • screw on the union nuts of the power steering hoses and tighten them (it is essential to remove the clamps previously installed on the hoses);
  • tighten the shock absorber strut mounting nuts to a torque of 90–110 N·m and close the caps;
  • connect the brake hoses to the tees and tighten to a torque of 12–16 N·m;
  • connect the brake pad wear sensor wire and tighten it to 10 N·m. Check if the wire is routed correctly;
  • install the wheels and tighten the mounting bolts by hand. After lowering the vehicle, tighten the wheel mounting bolts to a torque of 160–180 N·m;
  • install caps;
  • bleed the brakes (see the relevant section);
  • start the engine and let it run for a while. Turn the steering wheel several times from one extreme position to the other. Stop the engine and check the fluid level in the power steering reservoir. Add liquid if necessary.

Text republished from the website (Mercedesman.ru)
This article is available at: russian, bulgarian, belarusian, ukrainian, serbian, croatian, romanian, polish, slovak, hungarian
The article has been verified: Levin Kirill Glebovich
Share with friends:
◀ Previous
Mercedes Sprinter / Front axle
Next ▶

Removal the front axle
Front axle design
General description of the front axle
Removal the lower control arm
Installing the transverse arm
Replacing the ball joint
Replacing the silent blocks of the transverse levers
Removal and installation the steering knuckle
More similar articles for repairing other models

☛ Front axle beam — removal and installation Mercedes W168 (1997-2004)
☛ Front axle / steering Mercedes W202 (1993-2000)
☛ Diagram 2. Front axle speed signal (GES) (engines 104, 111, 602, 604,… Mercedes W210 (1996-2002)
☛ Checking the grease packing of the pivot housings of the front axle… Mercedes W463 (1999-2019)
☛ Removal and installation the front axle assembly Mercedes W163 (1997-2005)
☛ Installing a roof rack Mercedes W140 (1991-1998)
Link in different formats to this article
Comments and feedback from visitors
No comments yet


How much will 37 + 35 ?


Vario 814D (1996-2003, diesel) 
  • General information
  • Maintenance
  • Power unit
  • Engines 602.984/985
  • Engines 904.908/914/923/936
  • Transmission
  • Clutch
  • Manual gearbox 711.613
  • Manual gearbox 710.64/66
  • Manual gearbox 715.051
  • Automatic gearbox 723.345
  • Power take-off box
  • Chassis
  • Front suspension
  • Rear suspension
  • Steering
  • Brake system
  • Body and electrical equipment
  • Interior (internal elements)
  • Exterior (external elements)
  • Heater and air conditioner
  • Electrical diagrams
Vito 2 (2003-2014, diesel) 
  • General information
  • User manual
  • Maintenance
  • Diesel engine OM646
  • Engine repair
  • Cooling and lubrication system
  • Power and exhaust system
  • Transmission
  • Clutch
  • Car gearbox
  • Chassis
  • Front suspension
  • Rear suspension
  • Steering
  • Brake system
  • Body
  • Body elements
  • Electrical equipment
  • Equipment and devices
  • Security systems
  • Electrical circuits
Vito 1 (1996-2003) 
  • General information
  • User manual
  • Maintenance
  • Petrol engines 2.0 l
  • Engine repair
  • Lubrication system
  • Cooling system
  • Power and control system
  • Petrol engines 2.8 l
  • Engine repair
  • Lubrication system
  • Cooling system
  • Power and control system
  • Diesel engines 2.3 l
  • Engine repair
  • Cooling system
  • Lubrication system
  • Turbocharging and recycling
  • Power and control system
  • Diesel engines 2.2 l
  • Engine repair
  • Cooling system
  • Lubrication system
  • Turbocharging and recycling
  • Power and control system
  • Transmission
  • Clutch
  • Mechanical gearbox
  • Automatic gearbox
  • Chassis
  • Front suspension and wheels
  • Rear suspension
  • Steering
  • Brake system
  • Body
  • Exterior (external elements)
  • Interior (internal elements)
  • Electrical equipment
  • Equipment and devices
  • Heater and air conditioner
  • Electrical circuits
Sprinter (1995-2000, diesel) 
  • General information
  • Introduction to the guide
  • Maintenance
  • Power unit
  • Engine repair
  • Lubrication system
  • Cooling system
  • Power and exhaust system
  • Transmission
  • Clutch
  • Mechanical gearbox
  • Automatic gearbox
  • Front axle
  • Rear axle and cardan
  • Chassis
  • Car suspension
  • Steering
  • Brake system
  • Tires and wheels
  • Electrical equipment
  • Equipment and devices
  • Headlights and lighting
  • Power devices
  • Electrical circuits
 
MercedesMan.ru © 2017–2026 · Mobile version · Read about Mercedes · Sitemap: EN BG BY UA RS HR RO PL SK HU · Feedback · Site search · Bookmark A-Class (W168) · C-Class (W201) · C-Class (W202) · C-Class (W203) · E-Class (W123) · E-Class (W124) · E-Class (W210) · G-Class (W463) · M-Class (W163) · S-Class (W116, petrol) · S-Class (W126, petrol) · S-Class (W140) · S-Class (W220) · Sprinter · Vito 1 · Vito 2 · Vario 814D ·
 
We only use cookies without which some of the site's features may not be available.