
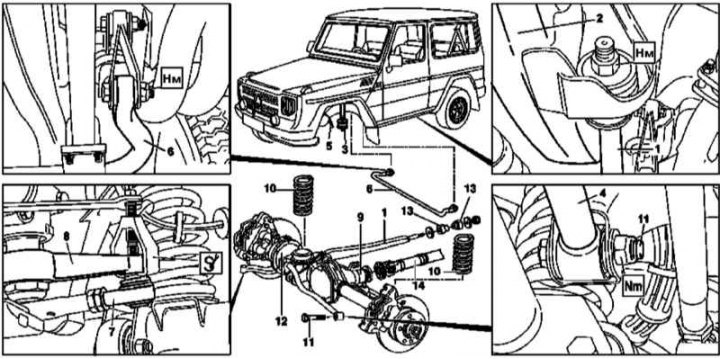
Front axle installation details
1 - Trailing arm; 2 - Frame; 3 - Shock absorber; 4 - Diagonal bar; 5 - Brake line; 6 - Anti-roll bar; 7 - Tie rod; 8 - steering bipod; 9 - Reducer (differential); 10 - Helical springs; 11 - Bolts; 12 - Assembly of the front axle; 13 - Rubber bushings; 14 - Cardan shaft
Removing
1. Drain the oil from the front differential (see chapter Ongoing care and maintenance).
2. Separate the cardan shaft (14) from the connecting flange of the final drive gear and tie it to the frame.
3. Give nuts of fastening of the bottom support of shock-absorbers (3).
4. Loosen the diagonal rod (4) to the frame.
5. Disconnect brake lines (5), - plug the open ends of the lines immediately to minimize the loss of hydraulic fluid.
6. Disconnect (and seal immediately) hydraulic lines from the differential lock slave cylinder.
7. Disconnect the electrical wiring from the differential lock pressure switch.
8. Turn out contact pads of gauges of wear of brake pads.
9. Remove the wheel sensors and the electrical wiring routed near the front axle assembly.
10. Remove the anti-roll bar (6) complete with racks.
11. Remove the cotter pin and loosen the castellated nut of the steering tie rod (7).
12. Press out the tie rod (7) from the steering arm (8).
13. Detach from frame (2) trailing arms (1) pendants.
14. Hang the car so that you can remove the coil springs (10) (see Section Removal and installation of front suspension springs).
15. Remove the bolt (11) diagonal bar attachment (4), then feed the bridge assembly (12) forward and remove it from under the car.
Installation
1. Start the bridge assembly from the front (12) under the car.
2. Install coil springs (10) (see Section Removal and installation of front suspension springs).
3. Install (but don't delay) bolt (11) diagonal bar attachment (4).
4. Lower the car so that the trailing arms can be seated (1) into the frame.
5. Install rubber bushings (13) and tighten the nuts.
6. Install shock absorbers (3) and tighten their fixing nuts.
7. Tighten the anti-roll bars (6).
8. Tighten the bolt (11) diagonal bar attachment (4) to the frame (2).
9. Connect the tie rod (7) and tighten the slotted nut to secure it. Secure the nut with a cotter pin.
10. Connect brake lines (6), - make sure that the lines pass at a distance of at least 20 mm from the springs in any position of the front wheels.
11. Connect the hydraulic lines and wiring to the differential lock slave cylinder.
12. Connect the electrical wiring to the contact pads and wear sensors of the friction linings of the brake pads.
13. Connect the cardan shaft (14), - ensure that the NEW self-locking nuts are tightened to the correct torque.
14. Fill differential oil (see chapter Ongoing care and maintenance).
15. Bleed the brake system (see chapter Brake and auxiliary systems) and check the proper functioning of the brakes.