
Warning! Clutch operation generates dust that contains asbestos, which is harmful to health, so when cleaning the clutch, do not use compressed air or inhale the dust. Clean the clutch parts from dust using brake fluid or methyl alcohol. After cleaning the clutch parts with methanol or brake fluid, wipe the parts dry.
Clutch
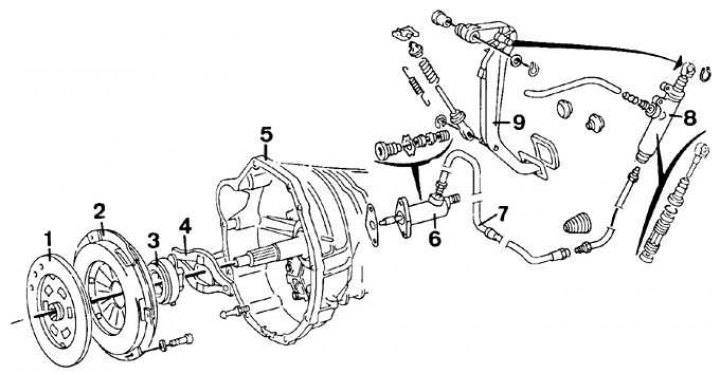
1 - clutch disc; 2 - leading clutch assembly with a pressure plate; 3 - release bearing; 4 - clutch release fork; 5 - clutch housing; 6 - clutch slave cylinder; 7 - hydraulic tubes; 8 - clutch master cylinder; 9 - clutch pedal
Removing
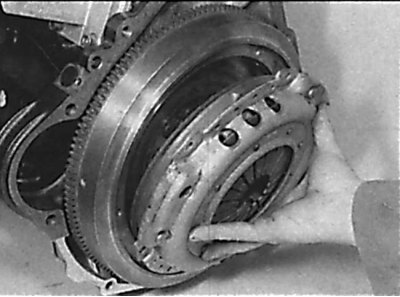
Removing the clutch drive from the flywheel
1. Remove the gearbox.
2. Mark the position of the clutch master assembly in relation to the flywheel using a marker or paint.
3. Gradually, in a diagonal sequence, loosen the master clutch mounting bolts by turning each bolt half a turn until the spring action stops and the bolts can be unscrewed by hand.
4. Remove the clutch master assembly and clutch disc from the flywheel (see fig. Removing the clutch drive from the flywheel). When removing, be careful, as the clutch disc may fall out of the leading part of the clutch. Note the orientation of the clutch disc in relation to the flywheel. The larger protrusion of the clutch disc hub must point towards the gearbox.
Examination
1. Check the clutch disc linings for wear, mechanical damage or oil contamination.
2. If these defects are present, the clutch disc must be replaced.
3. If the friction linings are in good condition and not worn to the grooves, the damper springs are securely fastened and the rivet connections are not loose, then the clutch disc can be installed in the car.
4. If the clutch disc is contaminated with oil, check the left crankshaft or transmission input shaft oil seal. If necessary, replace the O-rings before installing a new clutch disc.
5. Check the drive plate assembly for wear on the pressure plate, mechanical damage, reliability of the rivet connection, damage to the clutch diaphragm spring. If the diaphragm spring is worn or damaged, or there is a suspicion that the spring elasticity has changed, then the drive disc assembly must be replaced.
6. Check the working surfaces of the pressure plate and flywheel mating with the clutch disc linings. They must be clean, flat and free of scratches and dings.
7. Check the thrust bearing, which should rotate easily, evenly and silently. The working surface of the bearing acting on the pressure spring must be smooth, without cracks, local corrosion or wear.
Installation
Installing the clutch disc on the flywheel
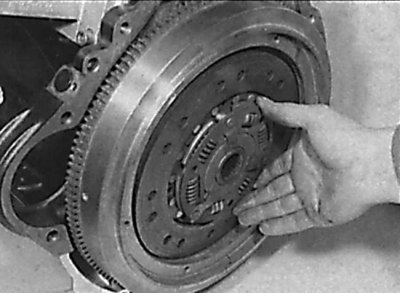
When installing the clutch disc on the flywheel, the inscription on the disc "engine side" or the smaller side of the hub should point towards the flywheel.
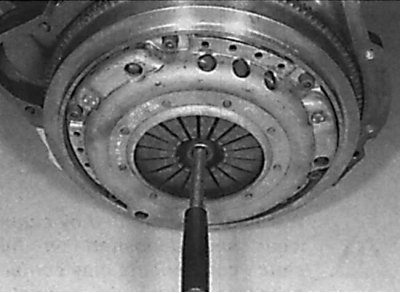
Using a mandrel to center the clutch disc
1. When installing new clutch discs or clutch pressure plate, remove the anti-corrosion protection from them.
2. When installing the clutch disc, make sure that even small amounts of oil do not get on its friction lining. Therefore, before installing the clutch disc, wipe the mating surface of the flywheel and the surface of the pressure plate with a clean rag, and install the clutch disc with clean hands.
3. Lubricate the splines in the clutch disc hub with a thin layer of special grease based on molybdenum disulphide. Install the clutch disc on the flywheel so that the inscription on the clutch disc "engine side" or the smaller side of the hub were directed towards the flywheel (see fig. Installing the clutch disc on the flywheel). When installing the clutch drive, press the clutch disc against the flywheel.
4. Install the clutch driver, matching the marks on the flywheel and clutch driver. Check that the alignment holes on the clutch driver line up with the alignment pins on the flywheel. Tighten the bolts of the leading part of the clutch so that the clutch disc is pressed, but, at the same time, can still move to the sides.
5. Using a drift or an old transmission input shaft, center the clutch disc on the flywheel (see fig. Using a mandrel to center the clutch disc).
6. After centering the clutch disc, gradually and in a diagonal sequence, tighten the bolts securing the leading part of the clutch to the required torque. Remove the mandrel from the clutch disc.
7. Lubricate the spline of the gearbox input shaft and the release bearing guide bushing with a thin layer of special grease based on molybdenum disulphide.
Attention! The lubrication layer must be thin and even, otherwise, during clutch operation, excess lubricant will be thrown onto the working surfaces of the clutch, which can disrupt its operation.
8. Install the gearbox.