
Cars BMW Cars Volkswagen Cars Chevrolet Cars Land Rover Cars Lada Cars Honda Cars Peugeot
English Русский
Български
Беларускі
Український
Српски
Hrvatski
Română
Polski
Slovenský
Magyar
Bookmark News and articles Sitemap Feedback Site search
MercedesMan.ru


A-Class C-Class E-Class G-Class M-Class S-Class Others
W123 (1976-1985) W124 (1984-1995) W210 (1996-2002)
  • Main
  • E-Class
  • W124 (1984-1995)
  • Transmission
  • Clutch
  • Clutch Master Cylinder — Removal, Repair and Installation

Clutch Master Cylinder — Removal, Repair and Installation (Mercedes-Benz E-Class W124)

0
Contents: Removal ↡ Disassembly and assembly ↡ Installation ↡
Warning! The brake fluid used in the hydraulic clutch system is poisonous, so if it gets on your skin, immediately rinse the area with plenty of water. If the fluid gets into your eyes or inside your body, you should immediately consult a doctor. Some fluids are highly flammable and can catch fire even from contact with hot vehicle components. In addition, the fluid used in the hydraulic clutch system dissolves paint and plastic, so if the fluid gets on your vehicle's paintwork, rinse it with plenty of water. This fluid is also hygroscopic, i.e. it absorbs moisture from the air, and therefore it is not recommended to use the fluid if it has been stored in an open container for a long time.


Removal


Clutch master cylinder
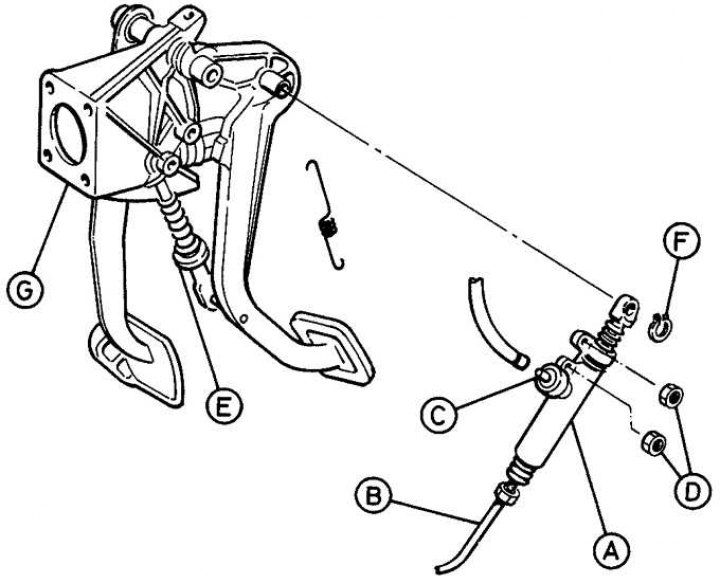


A – clutch master cylinder; B – rubber hose coupling; C – connecting hose; D – nuts; E – clutch…

A – clutch master cylinder; B – rubber hose coupling; C – connecting hose; D – nuts; E – clutch pedal servo spring; F – retaining ring; G – pedal bracket


Removal the servo spring socket from the pushrod, servo spring and washer
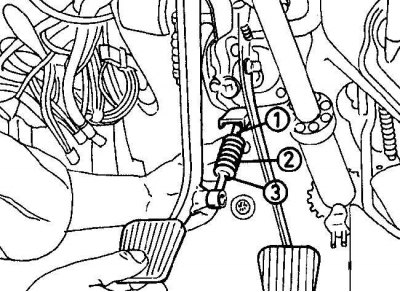


Removal the servo spring socket from the pushrod, servo spring and washer


After raising the clutch pedal, remove the servo spring socket (1), servo spring (2) and washer (3) from the push rod.


1. The clutch master cylinder is mounted on the clutch and brake pedal bracket (see fig. Clutch master cylinder). Fluid is supplied to the clutch master cylinder through a flexible rubber hose from the brake fluid reservoir located in the engine compartment.

2. Remove the ground cable from the battery.

3. Remove the lower instrument panel trim on the driver's side.

4. Pull back the carpet under the pedals and cover the floor with rags to collect any fluid that has leaked from the hydraulic clutch system.

5. To reduce fluid loss, use a clean syringe to pump out as much fluid as possible from the corresponding chamber of the brake system reservoir so that the fluid level drops below the connection of the clutch master cylinder feed hose.

6. Place a suitable container under the clutch master cylinder.

7. Unscrew the fasteners and disconnect the hydraulic pipe from the clutch master cylinder. Plug the hole in the pipe and the clutch master cylinder to prevent contamination and reduce fluid loss.

8. Remove the two nuts securing the clutch master cylinder to the pedal bracket.

9. Raise the clutch pedal and remove the servo spring socket, servo spring and washer from the pushrod (see fig. Removing the servo spring socket from the pusher servo spring and washer).

10. Using a screwdriver blade, remove the retaining ring securing the clutch master cylinder pushrod to the pedal.

11. Disconnect the feed hose from the clutch master cylinder and remove the clutch master cylinder from the vehicle.

Disassembly and assembly


Attachment point of the pushrod dust cover to the clutch master cylinder housing
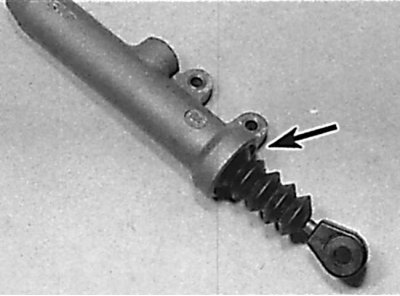


Attachment point of the pushrod dust cover to the clutch master cylinder housing


Removal the retaining ring from the clutch master cylinder
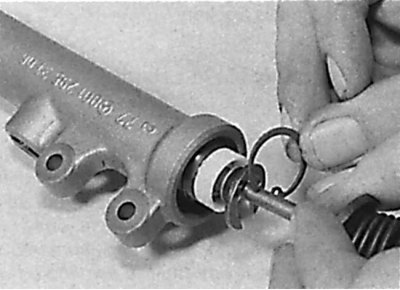


Removal the retaining ring from the clutch master cylinder


Removal the washer from the clutch master cylinder
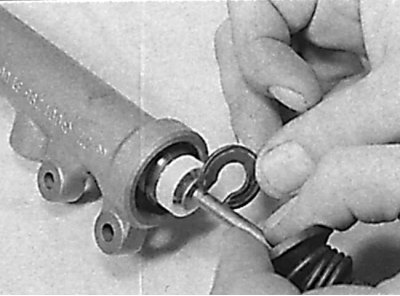


Removal the washer from the clutch master cylinder


Removal the push rod and piston from the clutch master cylinder housing
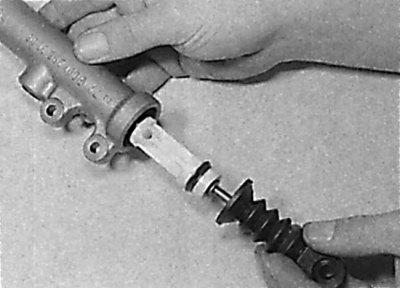


Removal the push rod and piston from the clutch master cylinder housing


Removal the spring from the clutch master cylinder housing
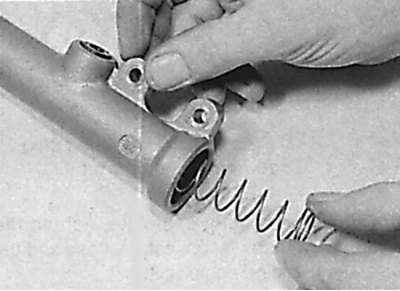


Removal the spring from the clutch master cylinder housing


(Material taken from a web resource: www.MercedesMan.ru)


Removal the plug and check valve from the end of the piston
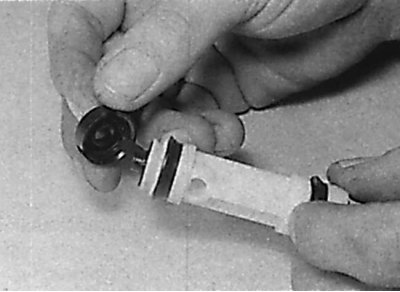


Removal the plug and check valve from the end of the piston


1. Remove the pushrod dust boot from the clutch master cylinder housing (see Fig. Attachment location of the pushrod dust cover to the clutch master cylinder housing).

2. Using special pliers, remove the retaining ring and take out the washer (see Fig. Removing the Clutch Master Cylinder Snap Ring, Removing the Clutch Master Cylinder Washer).

3. Remove the push rod and piston together with the spring from the clutch master cylinder channel (see fig. Removing the pusher and piston from the clutch master cylinder housing, Removing the spring from the clutch master cylinder housing).

4. Remove the plug and check valve from the end of the piston (see fig. Removing the plug and check valve from the end of the piston).

5. Wash all clutch master cylinder parts in clean brake fluid and check their condition.

6. Check the clutch master cylinder bore and piston for wear and tear. If the clutch master cylinder bore is worn or has deep scratches, replace the clutch master cylinder assembly. If the clutch master cylinder components are in satisfactory condition, replace the rubber sealing rings.


7. Carefully remove the old O-ring from the piston. Dip the new O-ring in clean brake fluid and carefully install it on the piston so that the working lips of the new O-ring are on the spring side of the piston.

8. Lubricate the clutch master cylinder bore and piston with clean brake fluid and insert the spring into the cylinder.

9. Install the check valve and plug onto the piston and carefully insert the piston into the clutch master cylinder bore.

10. Press the push rod slightly into the clutch master cylinder, install the washer and snap ring into the groove of the clutch master cylinder bore.

11. Install the tappet dust boot in place and secure it to the clutch master cylinder housing.

Installation


1. Installation is carried out in the reverse order of removal, taking into account the following points.

2. Install the washer, servo spring, servo spring socket onto the pushrod, insert the pushrod into the pedal bracket guide while pressing the clutch pedal.

3. Check that the clutch master cylinder push rod eye is facing the clutch pedal with the flange facing the clutch pedal.

4. Do not install the driver's side lower instrument panel trim until the pushrod adjustment has been completed.

5. Fill the hydraulic clutch system with fluid and bleed the air from it.

6. Check the tappet adjustment.
This article is available at: russian, bulgarian, belarusian, ukrainian, serbian, croatian, romanian, polish, slovak, hungarian
The article has been verified: Levin Kirill Glebovich
Share with friends:
◀ Previous
E-Class W124 / Clutch
Next ▶

Clutch slave cylinder — removal and installation
Clutch release lever — removal, inspection and installation
Release bearing — removal, inspection and installation
Clutch assembly — removal, inspection and installation
General information about the clutch
Adjusting the Clutch Master Cylinder Pusher
Bleeding the hydraulic clutch system
Clutch pedal — removal and installation
More similar articles for repairing other models

☛ Cylinder head — removal and installation Mercedes W168 (1997-2004)
☛ Master Cylinder — Removal, Repair and Installation Mercedes 190 (W201) (1982-1993)
☛ Removal and installation the brake fluid reservoir and the brake… Mercedes W463 (1999-2019)
☛ Removal and installation the master cylinder Mercedes W163 (1997-2005)
☛ Removal and installation the clutch master cylinder Mercedes W140 (1991-1998)
☛ Clutch master cylinder Mercedes Vito 1 (1996-2003)
Link in different formats to this article
Comments and feedback from visitors
No comments yet


How much will 48 + 32 ?


W210 (1996-2002) 
  • General information
  • Vehicle description
  • Working conditions and tools
  • Car care
  • Diesel engines
  • Engine repair
  • Lubrication system
  • Cooling system
  • Injection system
  • Supply system
  • Exhaust system
  • Gasoline engines
  • Engine repair
  • Lubrication system
  • Cooling system
  • Control system
  • Power and exhaust system
  • Transmission
  • Clutch
  • Mechanical gearbox
  • Automatic gearbox
  • Drive shafts
  • Chassis
  • Car suspension
  • Steering
  • Tires and wheels
  • Brake system
  • Body
  • Exterior (external elements)
  • Interior (internal elements)
  • Doors and windows
  • Heating and ventilation
  • Electrical equipment
  • Equipment and devices
  • Power devices
  • Lighting and signaling
  • Electrical circuits
W124 (1984-1995) 
  • General information
  • Governing bodies
  • Driving and operation
  • Weekly care
  • Maintenance (gasoline)
  • Maintenance (diesel)
  • Troubleshooting
  • Power unit
  • I4 petrol engine
  • V6 petrol engine (SOHC)
  • V6 petrol engine (DOHC)
  • Diesel engines
  • Engine overhaul
  • Cooling system
  • Heating and ventilation
  • Fuel system (carburetor)
  • Injection system «Bosch CIS-E»
  • Injection system «Bosch HFM»
  • Diesel fuel system
  • Supply system
  • Starting and charging system
  • Ignition system (I4)
  • Ignition system (V6)
  • Preheating
  • Transmission
  • Clutch
  • Mechanical gearbox
  • Automatic gearbox
  • Drive shafts
  • Chassis
  • Brake system
  • Car suspension
  • Steering
  • Body
  • Exterior (external elements)
  • Interior (internal elements)
  • Doors, locks and windows
  • Electrical equipment
  • Equipment and devices
  • Switches
  • Headlights and lighting
  • Electrical circuits
W123 (1976-1985) 
  • General information
  • Introduction to the guide
  • Power unit
  • Engine device
  • Repair M102 engines
  • Repair M110 and M123 engines
  • Cooling and lubrication (M102)
  • Cooling (M110 and M123)
  • Ignition system
  • Power system «Stromberg»
  • Power system «Solex 4A1»
  • Fuel injection «K-Jetronic»
  • Fuel injection «L-Jetronic»
  • Transmission
  • Clutch
  • Mechanical gearbox
  • Automatic gearbox
  • Cardan and rear axle
  • Chassis
  • Front suspension
  • Rear suspension
  • Steering
  • Brake system
  • Body
  • Exterior (external elements)
  • Interior (internal elements)
  • Doors, locks and windows
  • Electrical equipment
  • Equipment and devices
  • Power devices
  • Electrical circuits
 
MercedesMan.ru © 2017–2026 · Mobile version · Read about Mercedes · Sitemap: EN BG BY UA RS HR RO PL SK HU · Feedback · Site search · Bookmark A-Class (W168) · C-Class (W201) · C-Class (W202) · C-Class (W203) · E-Class (W123) · E-Class (W124) · E-Class (W210) · G-Class (W463) · M-Class (W163) · S-Class (W116, petrol) · S-Class (W126, petrol) · S-Class (W140) · S-Class (W220) · Sprinter · Vito 1 · Vito 2 · Vario 814D ·
 
We only use cookies without which some of the site's features may not be available.