
Cars BMW Cars Volkswagen Cars Chevrolet Cars Land Rover Cars Lada Cars Honda Cars Peugeot
English Русский
Български
Беларускі
Український
Српски
Hrvatski
Română
Polski
Slovenský
Magyar
Bookmark News and articles Sitemap Feedback Site search
MercedesMan.ru


A-Class C-Class E-Class G-Class M-Class S-Class Others
Sprinter (1995-2000, diesel) Vito 1 (1996-2003) Vito 2 (2003-2014, diesel) Vario 814D (1996-2003, diesel)
  • Main
  • Mercedes-Benz
  • Vito 1 (1996-2003)
  • General information
  • Maintenance
  • Checking the brake system

Checking the brake system (Mercedes-Benz Vito W638)

0
Contents: Checking the brake fluid level ↡ Replacing brake fluid ↡ Checking the thickness of brake pads ↡

Checking the brake fluid level


1. Check the brake fluid level in the reservoir. It should be between the "MIN" and "MAX" marks (slightly above the "MIN" mark) (see figure 1.37). If the level constantly drops below the "MIN" mark, check for leaks in the brake system and, if found, eliminate them. Check the tightness and condition of all tubes and hoses. Check the condition of the tank, pneumatic and hydraulic units.
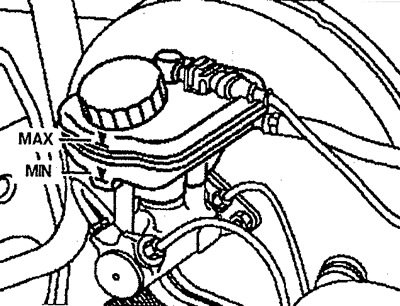
Figure 1.37. Checking the brake fluid level.

Figure 1.37. Checking the brake fluid level.


Attention! Do not fill the fluid level in the reservoir above the "MAX" mark, this will lead to excessive wear of the brake linings.


2. Adjust the fluid level.

Replacing brake fluid


3. Mark the fluid level in reservoir 1 using adhesive tape. If the reservoir is completely filled after changing the brake fluid, there is a risk of overflow or overfilling, for example after replacing the brake pads.

4. Reduce the brake fluid level in the reservoir by approximately 10 mm.

5. Attach the drain hose (arrow) (see figure 1.38).
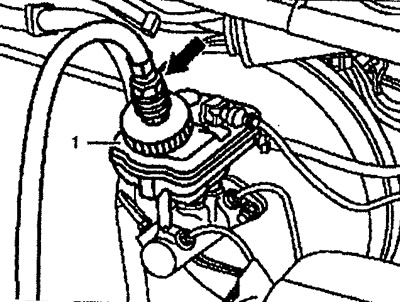


Figure 1.38. Connect the drain hose (arrow) to the tank.

Figure 1.38. Connect the drain hose (arrow) to the tank.


6. Set the automatic brake force regulator to the full load position.

7. Connect drain hose 2 to the brake caliper (see figure 1.39).

8. Loosen the drain bolt on each caliper until fresh fluid begins to flow out without air bubbles.
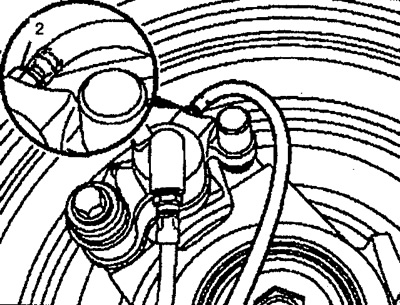
Figure 1.39. Connect the drain hose to the brake caliper.

Figure 1.39. Connect the drain hose to the brake caliper.


9. Replace the brake fluid in the clutch reservoir using bolt 3 (see figure 1.40). Loosen the drain bolt until fresh fluid starts to flow out without air bubbles.

Material taken from a web resource www.mercedesman.ru
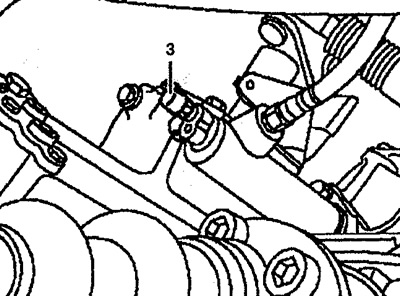
Figure 1.40. Replace the brake fluid in the clutch reservoir.

Figure 1.40. Replace the brake fluid in the clutch reservoir.


10. Set the automatic brake force regulator to its initial position.


11. Disconnect the drain hoses.

12. Adjust the fluid level in the tank.

Checking the thickness of brake pads


Single tires


13. Check the thickness of the brake linings through the hole in the wheel disk (see figure 1.41). Insert the feeler gauge into the hole until it stops and measure the thickness of the pad. The maximum permissible wear is 3 mm.
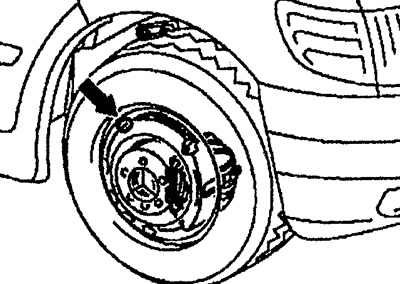
Figure 1.41. Checking the thickness of the brake linings (single tires).

Figure 1.41. Checking the thickness of the brake linings (single tires).


Twin tires


14. Check the position of marks A and B on the brake caliper when rotating relative to edge C (see figure 1.42). A - new gasket, B - remaining gasket about 5 mm. This test is only a rough check. If mark B approaches mark C, it is necessary to check by removing the wheel.
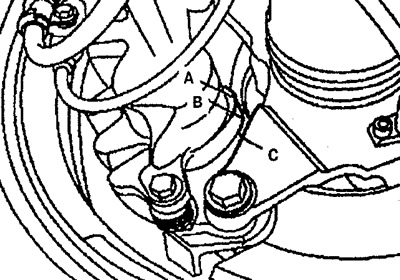
Figure 1.42. Checking the thickness of the brake linings (dual tires).

Figure 1.42. Checking the thickness of the brake linings (dual tires).
This article is available at: russian, bulgarian, belarusian, ukrainian, serbian, croatian, romanian, polish, slovak, hungarian
The article has been verified: Lukyanov Nikita Ilyich
Share with friends:
◀ Previous
Mercedes Vito 1 / Maintenance
Next ▶

Checking the steering
Automatic transmission oil change
Changing oil in a manual transmission
Checking the operation of indicator and signal lights, horn, multi-function switch, windscreen wipers and washers
Replacing the air filter element
Checking tire pressure
Front crankshaft oil seal
More similar articles for repairing other models

☛ Brake fluid — checking the level Mercedes W168 (1997-2004)
☛ Checking the brake system, adjusting the parking brake Mercedes W203 (2000-2007)
☛ Checking the brake system for leaks and damage Mercedes W210 (1996-2002)
☛ Checking the brake system Mercedes W463 (1999-2019)
☛ Checking the brake system Mercedes W163 (1997-2005)
☛ Checking the brake system Mercedes W140 (1991-1998)
Link in different formats to this article
Comments and feedback from visitors
No comments yet


How much will 25 + 21 ?


Vario 814D (1996-2003, diesel) 
  • General information
  • Maintenance
  • Power unit
  • Engines 602.984/985
  • Engines 904.908/914/923/936
  • Transmission
  • Clutch
  • Manual gearbox 711.613
  • Manual gearbox 710.64/66
  • Manual gearbox 715.051
  • Automatic gearbox 723.345
  • Power take-off box
  • Chassis
  • Front suspension
  • Rear suspension
  • Steering
  • Brake system
  • Body and electrical equipment
  • Interior (internal elements)
  • Exterior (external elements)
  • Heater and air conditioner
  • Electrical diagrams
Vito 2 (2003-2014, diesel) 
  • General information
  • User manual
  • Maintenance
  • Diesel engine OM646
  • Engine repair
  • Cooling and lubrication system
  • Power and exhaust system
  • Transmission
  • Clutch
  • Car gearbox
  • Chassis
  • Front suspension
  • Rear suspension
  • Steering
  • Brake system
  • Body
  • Body elements
  • Electrical equipment
  • Equipment and devices
  • Security systems
  • Electrical circuits
Vito 1 (1996-2003) 
  • General information
  • User manual
  • Maintenance
  • Petrol engines 2.0 l
  • Engine repair
  • Lubrication system
  • Cooling system
  • Power and control system
  • Petrol engines 2.8 l
  • Engine repair
  • Lubrication system
  • Cooling system
  • Power and control system
  • Diesel engines 2.3 l
  • Engine repair
  • Cooling system
  • Lubrication system
  • Turbocharging and recycling
  • Power and control system
  • Diesel engines 2.2 l
  • Engine repair
  • Cooling system
  • Lubrication system
  • Turbocharging and recycling
  • Power and control system
  • Transmission
  • Clutch
  • Mechanical gearbox
  • Automatic gearbox
  • Chassis
  • Front suspension and wheels
  • Rear suspension
  • Steering
  • Brake system
  • Body
  • Exterior (external elements)
  • Interior (internal elements)
  • Electrical equipment
  • Equipment and devices
  • Heater and air conditioner
  • Electrical circuits
Sprinter (1995-2000, diesel) 
  • General information
  • Introduction to the guide
  • Maintenance
  • Power unit
  • Engine repair
  • Lubrication system
  • Cooling system
  • Power and exhaust system
  • Transmission
  • Clutch
  • Mechanical gearbox
  • Automatic gearbox
  • Front axle
  • Rear axle and cardan
  • Chassis
  • Car suspension
  • Steering
  • Brake system
  • Tires and wheels
  • Electrical equipment
  • Equipment and devices
  • Headlights and lighting
  • Power devices
  • Electrical circuits
 
MercedesMan.ru © 2017–2026 · Mobile version · Read about Mercedes · Sitemap: EN BG BY UA RS HR RO PL SK HU · Feedback · Site search · Bookmark A-Class (W168) · C-Class (W201) · C-Class (W202) · C-Class (W203) · E-Class (W123) · E-Class (W124) · E-Class (W210) · G-Class (W463) · M-Class (W163) · S-Class (W116, petrol) · S-Class (W126, petrol) · S-Class (W140) · S-Class (W220) · Sprinter · Vito 1 · Vito 2 · Vario 814D ·
 
We only use cookies without which some of the site's features may not be available.