
Examination
1. When the bearing wears, characteristic noise and vibration appear. Remove the cardan shaft and check the condition of the bearing.
2. Check that the bearing rotates evenly and without binding and that there is no play in it. Replace bearing if defective. Check the condition of the rubber protective boot and replace if necessary.
Replacement
Attention! To replace the center bearing of the propeller shaft, the use of a puller and a hydraulic press, as well as appropriate mandrels, is necessary.
Elements of the central part of the cardan shaft
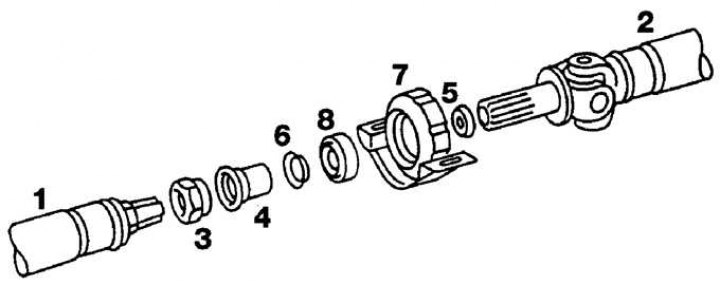
1 - front part of the cardan shaft; 2 – a back part of a cardan shaft; 3 - splined coupling nut; 4 - rubber protective cover; 5 - protective cover; 6 - protective cover; 7 – an arm of the central bearing; 8 - bearing
1. Remove the cardan shaft.
2. Apply alignment marks to the front and rear of the driveshaft. On some models, the cardan shaft already has alignment marks. The mark on the front of the driveshaft must be between the two marks on the universal joint on the rear of the driveshaft (see fig. Location of alignment marks on both parts of the drive shaft file).
3. Disconnect the rubber protective boot from the spline nut, then unscrew the nut and separate both halves of the driveshaft (see fig. Elements of the central part of the cardan shaft).
4. Remove the rubber protective cover from the cardan shaft.
5. Using a puller, remove the center bearing with bracket from the driveshaft, marking its location. Remove the front and rear center bearing caps.
6. Install the bracket with the bearing on the stand and, using a tubular mandrel of the appropriate diameter, push the bearing out of the bracket.
7. Check the condition of all parts and replace if necessary. The protective covers of the central bearing and the rubber protective boot must be replaced according to their condition.
8. Place the bearing bracket on the stand and, using the tubular mandrel that rests on the bearing outer race, press the new bearing into the bracket.
9. Clean the driveshaft and install a new rear protective cover.
10. Install the center bearing with bracket onto the propeller shaft using a tubular mandrel resting on the inner race of the bearing.
11. Install the front protective cover on the driveshaft and a new rubber protective boot, installing it in the grooves of the driveshaft.
12. Apply a thin coat of molybdenum disulphide grease to the splines of the driveshaft and connect the two parts of the driveshaft according to the marks made earlier.
13. Insert the rubber boot into the groove of the spline nut and install the driveshaft.