
Attention! When installing the drive shaft, it is necessary to use new nuts for securing the drive shaft to the rear wheel hub and new bolts for securing the drive shaft to the rear final drive flange.
Removing
Unscrewing the bolts securing the drive shaft to the flange of the rear final drive
1. Using a chisel or screwdriver, remove the hub nut cap. Using a punch and hammer, being careful, bend the collar of the hub nut out of the driveshaft groove. Loosen the driveshaft nut and wheel bolts.
2. Raise the rear of the car and secure it on stands.
3. Remove the corresponding rear wheel. When removing the left drive shaft, remove the exhaust pipe.
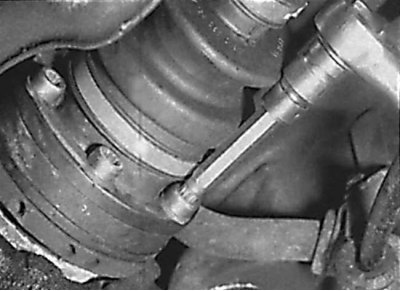
4. Unscrew the bolts and remove the mounting plate that secures the drive shaft to the rear final drive flange. Using a soft wire, hang the drive shaft from the bottom of the car (see fig. Unscrewing the bolts securing the drive shaft to the flange of the rear final drive).
Attention! Eliminate the possibility of free sagging of the drive shaft, as this can cause the outer joint of the drive shaft to equal angular velocities. When installing the drive shaft, it is necessary to use new bolts for fastening the inner joint of the drive shaft.
5. Unscrew the nut securing the drive shaft to the hub and remove the drive shaft from the hub. If the drive shaft is firmly seated in the hub, use a wooden mallet or a special tool bolted to the hub to remove it.
6. Remove the drive shaft from under the vehicle.
Installation
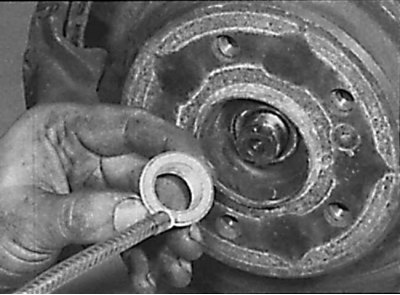
Applying a thin coat of engine oil to both the threads and side surface of the drive shaft-to-hub nut
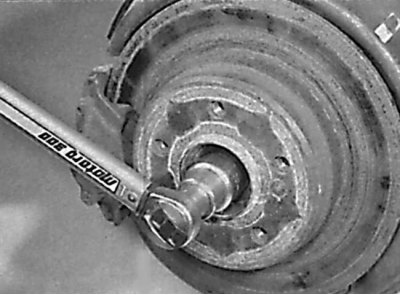
Screwing the nut securing the drive shaft to the hub
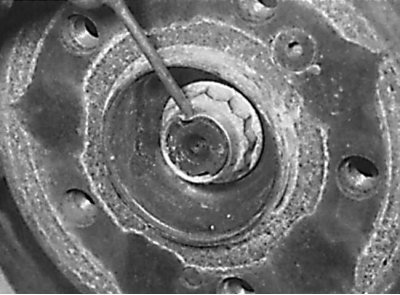
Coining the collar of the drive shaft fastening nut into the groove of the drive shaft
1. Installation is carried out in the reverse order of removal, taking into account the following points.
2. Lubricate the threads and flank of the new drive shaft mounting nut with clean engine oil before installing (see fig. Applying a thin coat of engine oil to both the threads and side surface of the drive shaft-to-hub nut).
3. Install new bolts securing the driveshaft inner joint to the rear final drive flange.
4. Tighten the nut securing the drive shaft to the hub to the required torque. Secure the nut against loosening, for which, using a hammer and a drift, caulk the collar of the nut into the groove of the drive shaft (see fig. Screwing the nut of the drive shaft to the hub, Caulking the shoulder of the drive shaft nut into the groove of the drive shaft).