
Cars BMW Cars Volkswagen Cars Chevrolet Cars Land Rover Cars Lada Cars Honda Cars Peugeot
English Русский
Български
Беларускі
Український
Српски
Hrvatski
Română
Polski
Slovenský
Magyar
Bookmark News and articles Sitemap Feedback Site search
MercedesMan.ru


A-Class C-Class E-Class G-Class M-Class S-Class Others
W463 (1999-2019)
  • Main
  • G-Class
  • W463 (1999-2019)
  • Transmission
  • Axles front and rear
  • Removal and installation front axle drive shafts

Removal and installation front axle drive shafts (Mercedes-Benz G-Class W463)

0
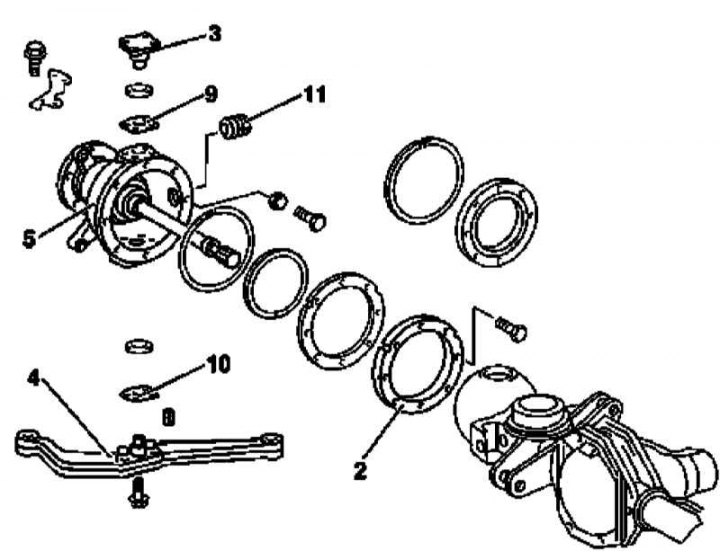
Installation details of the hinge housing assembly with the drive shaft

Installation details of the hinge housing assembly with the drive shaft
2 - Sealing element holder; 3 - Upper wheel pivot bolt; 4 - Steering knuckle; 5 - Assembling the hinge housing with the drive shaft; 9, 10 - Adjusting washers; 11 - Threaded plug
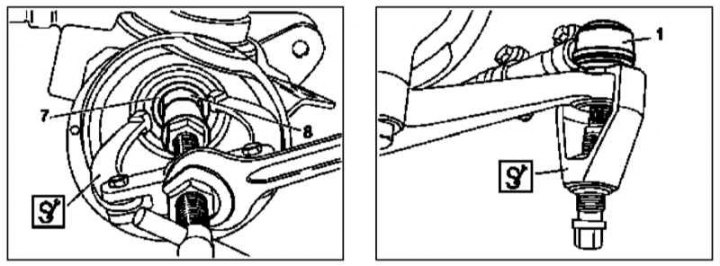

Removal the drive shaft seal and pressing out the steering rod end

Removal the drive shaft seal and pressing out the steering rod end
1 - Tie rod end; 7 - Drive shaft seal; 8 - Bearing bushing
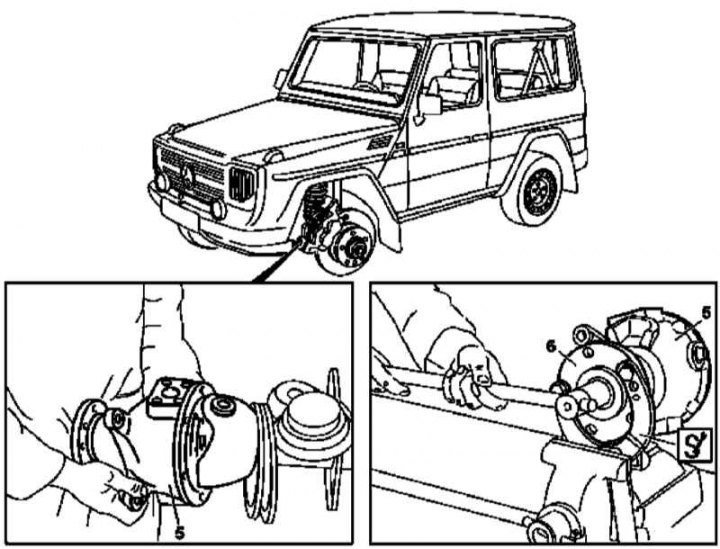

Removal the drive shaft

Removal the drive shaft
5 - Hinged casing; 6 - Hub


1. Remove the brake caliper and brake disc (see Chapter Brake and auxiliary systems).

2. Unscrew the steering damper.

3. Remove the differential lock actuator slave cylinder (see Section Removal, installation and adjustment of actuator cylinders and components of the drive mechanism of the interwheel differential lock).

4. Loosen the fastening castle nut and press the steering rod end (1) out of the steering arm. Assess the condition of the end and prepare a replacement if necessary.

5. After having measured the length of the stop bolt for limiting the wheel turning angle, separate the sealing element holder (2).

6. Remove the upper wheel pivot bolt (3) and immediately attach the adjusting washer (9) to it.

7. Remove the pivot arm (4) from below - also attach the adjusting washer (10) to it.

8. Remove the hinge housing assembly with the drive shaft (5), - tie the tapered roller bearings to the pivot bolt/lever.

9. Remove the drive shaft seal (7).

10. Remove the bearing sleeve (8).

11. Bolt the locking key (717 589 00 31 00) to the wheel hub (6) and clamp it in a vice.

12. Remove the protective cover.

13. Unlock and loosen the outer hub nut.

14. Remove the locking plate.

15. Loosen the inner slotted nut and release the drive shaft from the pivot housing, being careful not to damage the ABS wheel sensor rotor.

16. Carefully wipe all removed components and visually assess their condition - prepare a replacement if necessary.

17. Installation is carried out in the reverse order - remember that the slotted nuts must be replaced without fail. Before installation, do not forget to fill the protective cover of the hub with chassis grease.

18. Finally, adjust the wheel and steering bearings (see Sections Adjusting the front axle wheel bearings and Adjusting the bearings of the swivel units) and wheel alignment angles (see Chapter Suspension and steering).
This article is available at: russian, bulgarian, belarusian, ukrainian, serbian, croatian, romanian, polish, slovak, hungarian
The article has been verified: Polyakov Zakhar Grigorievich
Share with friends:
◀ Previous
G-Class W463 / Axles front and rear
Next ▶

Disassembly and assembly of front wheel hubs
Removal and installation front wheel hubs
Disassembly and assembly of the differential lock actuator cylinder
Removal, installation and adjustment of actuator cylinders and components of the drive mechanism of the interwheel differential lock
Removal and installation of main gear drive pinions
Adjusting the bearings of the swivel units
Disassembly and assembly of the front axle hinge housing
Disassembly and assembly of the drive shaft
Removal and installation axle shafts
Disassembly and assembly of the axle shaft
More similar articles for repairing other models

☛ Front axle beam — removal and installation Mercedes W168 (1997-2004)
☛ Checking the rubber seals of the axle shafts Mercedes W202 (1993-2000)
☛ Diagram 2. Front axle speed signal (GES) (engines 104, 111, 602, 604,… Mercedes W210 (1996-2002)
☛ Removal and installation the front drive shaft flange and the front… Mercedes W163 (1997-2005)
☛ Checking the condition of the protective covers of the drive shafts Mercedes W140 (1991-1998)
☛ Removal and installation of drive axle shafts Mercedes Sprinter (1995-2000, diesel)
Link in different formats to this article
Comments and feedback from visitors
No comments yet


How much will 28 + 31 ?


W463 (1999-2019) 
  • General information
  • Introduction to the guide
  • Controls and instruments
  • Driving and operation
  • Maintenance
  • Power unit
  • Engine repair
  • Cooling system
  • Heating and ventilation
  • Power system (gasoline)
  • Fuel system (diesel)
  • Exhaust system
  • Ignition and control system
  • Charging and starting system
  • Transmission
  • Automatic gearbox
  • Transfer case
  • Axles front and rear
  • Chassis
  • Brake system
  • Front suspension
  • Rear suspension
  • Steering
  • Body
  • Exterior (external elements)
  • Interior (internal elements)
  • Doors, locks and windows
  • Electrical equipment
  • Equipment and devices
  • Switches in salon
  • Headlights and lighting
  • Audio system and navigation
  • Electrical circuits
 
MercedesMan.ru © 2017–2026 · Mobile version · Read about Mercedes · Sitemap: EN BG BY UA RS HR RO PL SK HU · Feedback · Site search · Bookmark A-Class (W168) · C-Class (W201) · C-Class (W202) · C-Class (W203) · E-Class (W123) · E-Class (W124) · E-Class (W210) · G-Class (W463) · M-Class (W163) · S-Class (W116, petrol) · S-Class (W126, petrol) · S-Class (W140) · S-Class (W220) · Sprinter · Vito 1 · Vito 2 · Vario 814D ·
 
We only use cookies without which some of the site's features may not be available.