



Contents: Front axle ↡ Rear axle ↡
Front axle
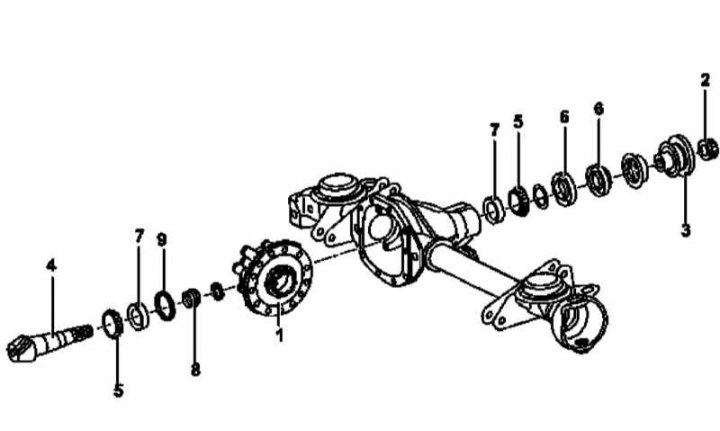
Front axle main gear pinion installation details
1 - Assembly of the differential with the driven gear of the main transmission; 2 - Nut; 3 - Connecting flange; 4 - Drive gear; 5 - Tapered roller bearing; 6 - Seal; 7 - Outer bearing race; 8 - Compression ring; 9 - Adjusting washer
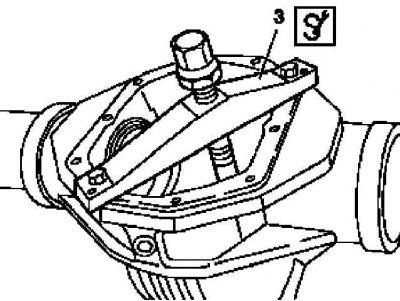
Installation diagram of the support jumper (3)
1. Remove the front cross-axle differential assembly with the final drive driven gear (1) (see Section Removal and installation of interwheel differential assemblies with driven gears of final drives).
2. Remove the seals (6) of the drive gear (4) of the main transmission (see Section Replacing the seals of the main gear drive pinions).
3. Having bolted the support bridge (3) to the gearbox housing, press out the drive gear (4) and, if necessary, develop holes in the bridge for a diameter of 11÷12 mm. If necessary, disassemble the drive gear.
4. Remove the tapered roller bearing (5) and compression ring (8).
5. Carefully wipe the removed components and visually assess their condition. Replace damaged parts.
6. Install the drive gear (4) into place, having first inserted the pin into it.
7. Install the NEW compression ring (8).
8. Using a suitable drift, seat the tapered roller bearing (5) in place.
[Read more on the website MercedesMAN.ru]
9. Install NEW seals (6) on the gear (4).
10. Using a special dynamometer (001 589 49 21 00) measure the resistance of the gear to rotation - if necessary, tighten the connecting flange nut.
Caution! If the nut has been tightened with excessive force, the compression ring (8) must be replaced!
11. Install the differential assembly with the driven gear (1) (see Section Removal and installation of interwheel differential assemblies with driven gears of final drives).
12. Check the concentricity of the connecting flange seat and make appropriate adjustments if necessary (see Section Checking the concentricity of the seating of the connecting flanges of the main gear drives).
Rear axle
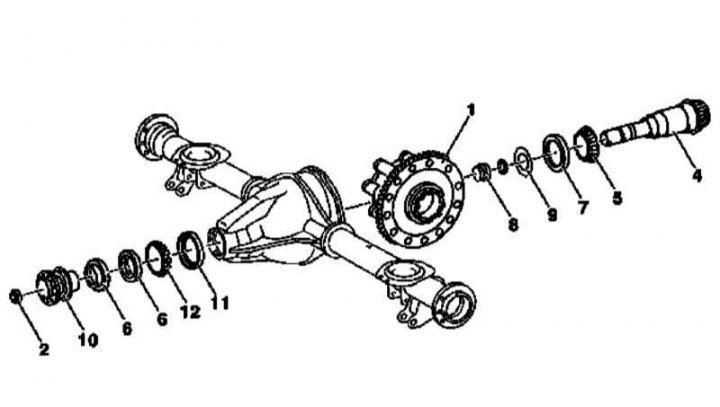
Rear axle main gear pinion installation details
1 - Differential box with driven gear of the main transmission; 2 - Nut; 4 - Drive gear; 5 - Inner tapered roller bearing; 6 - Seals; 7 - Outer race of the inner bearing; 8 - Compression ring; 9 - Adjusting washer; 10 - Connecting flange; 12 - Outer tapered roller bearing
1. Remove the rear cross-axle differential assembly with the final drive driven gear (1) (see Section Removal and installation of interwheel differential assemblies with driven gears of final drives).
2. Remove the connecting flange (10) from the gear (4).
3. Remove the seals (6) of the drive gear (4) of the main transmission (see Section Replacing the seals of the main gear drive pinions).
4. Having bolted the support bridge (3) to the gearbox housing, press out the drive gear (4) together with the compression ring (8) - if necessary, develop holes in the bridge for a diameter of 11÷12 mm. If necessary, disassemble the drive gear.
5. Carefully wipe the removed components and visually assess their condition. Replace damaged parts.
6. Place a NEW compression ring (8) on the drive gear (4).
7. Insert the drive gear (4) into the gearbox housing, having first inserted the pin into it.
8. Using a suitable drift, seat the outer tapered roller bearing (12).
9. Install NEW seals (6) (see Section Replacing the seals of the main gear drive pinions).
10. Attach the coupling flange (10) to the gear (4) (see Section Checking the concentricity of the seating of the connecting flanges of the main gear drives).
11. Measure the gear's resistance to rotation (see above paragraph 10 in the subsection Front axle) and the concentricity of its fit (see Section Checking the concentricity of the seating of the connecting flanges of the main gear drives), - make appropriate adjustments if necessary.
12. Install the differential assembly with the driven gear (1) (see Section Removal and installation of interwheel differential assemblies with driven gears of final drives).
13. By assessing the contact patches, check that the final drive gears are engaged correctly - make the appropriate adjustments if necessary (see Section Checking the concentricity of the seating of the connecting flanges of the main gear drives).