
- place the rear of the car on supports and unscrew the rear wheels;
- Drain the oil from the rear axle housing. If the amount of oil drained is less than 1 liter, damage to the wheel bearings due to lack of oil can be suspected. In this case, the bearings should be removed and checked. Check the oil for metal particles. Their presence indicates damage to the main gear. In this case, it does not make sense to replace the cuff, since the rear axle needs to be repaired;
- release the car with the parking brake and rotate the brake drums. If they are difficult to turn, the brake pads may be stuck either in the drum or on the brake disc. In the first case, the pads should be brought together, as described in sec. «Brake system»;
- unscrew the cardan shaft from the rear axle flange;
Pic. 237. Marking the relative position of the flange and drive gear (for later assembly)
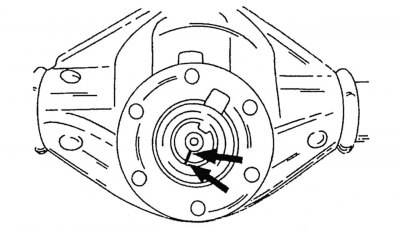
- mark the position of the slotted nut relative to the pinion shaft as shown in fig. 237;
- install a torque wrench together with a wrench for a slotted nut and, by rotating the gear shaft, determine the torque. The resulting value to remember or write down;
- while holding the flange from turning, unscrew the flange nut;
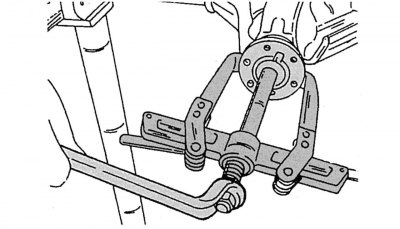
Pic. 238. Removing the flange of the rear axle gearbox
- remove the flange with a two-legged puller (pic. 238). On the inside of the flange there is a slot that is opposite the spline of the gear shaft. This is important during installation. Check the surface of the flange in the places where the sealing parts are installed; if damage is found, the flange should be replaced;
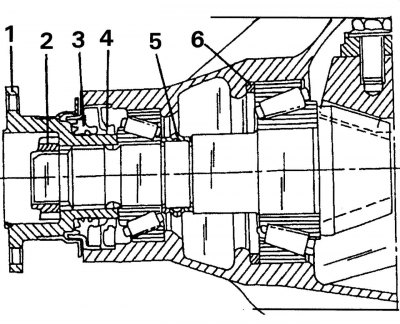
Pic. 239. Main gear drive: 1 - drive flange; 2 - slotted nut; 3, 4 - cuffs; 5 - elastic sleeve (If the slotted nut is overtightened, the); 6 - remote washer
- carefully remove both cuffs with a screwdriver and carefully clean the mounting hole;
- apply universal grease between the dust and working edges of the new cuffs, apply sealant from the outside;
- carefully press the cuffs all the way into the differential case;
- install the flange on the shaft so that its spline coincides with the spline on the gear shaft (when installing a new flange, the old flange will be required);
- tighten the slotted nut until the marks made coincide. Using a torque wrench, check that this happens at a previously determined turning moment;
- if it is required to install a new flange, unscrew the nut again, install a new flange and, slowly tightening the nut, bring it up to a torque of 0.5 Nm more than the indicator determined during disassembly. It is very important not to overtighten the nut, as this will pinch the internal parts and require a complete overhaul of the gearbox. We repeat once again: the turning torque of the new flange should not exceed the originally set torque by more than 0.5 Nm. Subsequent loosening of the nut to set the required tightening torque is not allowed;
- lock the slotted nut and install the cardan shaft. Add oil to the rear axle gearbox as described in next subsection.