



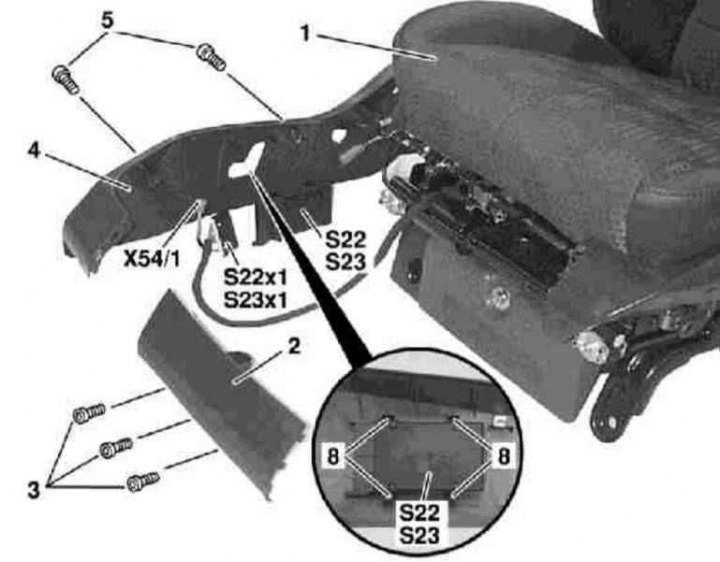
Electric Seat Adjustment Switch Installation Details
1 - Front seat; 2 - Front trim panel; 3 - Screws; 4 - Side trim panel; 5 - Screws; 8 - Locking tabs; S22 - Driver's seat adjustment switch; S22x1 - Switch Wiring Contact Connector; S23 - Passenger seat adjustment switch; S23x1 - Switch wiring connector; X54/1 - ESA controller wiring connector
1. The installation details of the front seat electric adjustment switches are shown in the illustration to which all references in the text refer.
2. Remove the screws (3) securing the front panel (2) of the seat frame trim.
3. Pull the panel (2) down approximately 1 cm and remove it by pushing it forwards - do not forget to release the wiring harness from the clips on the back of the panel.
4. Remove the mounting screws (5) and remove the side panel (4) of the seat frame trim.
5. Disconnect the electrical wiring connector (S22x1 or S23x1) from the corresponding switch (S22 or S23).
6. Disconnect the connector (X54/1) of the seat position adjuster (ESA) wiring harness.
7. By squeezing the locking tabs (8), release the corresponding switch (S22 or S23) from the finishing panel (from the inside of the last one).
8. Installation is carried out in reverse order.
Article obtained from this portal (MERCEDESMAN.ru)