
Attention! It is necessary to use a special tool to fix the fuel pump shaft. If you use a tool made by yourself, parts of the high pressure fuel pump can be damaged.
Removing
Fuel pump sprocket housing
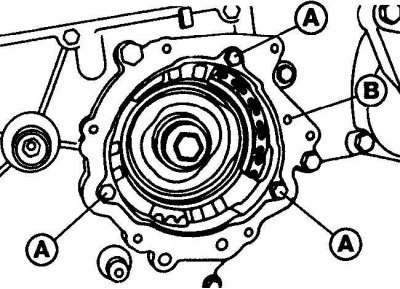
A - fastening bolts;
B - locking pin
Using a Homemade Tool to Remove the Drive Chain from the Fuel Pump Sprocket Teeth
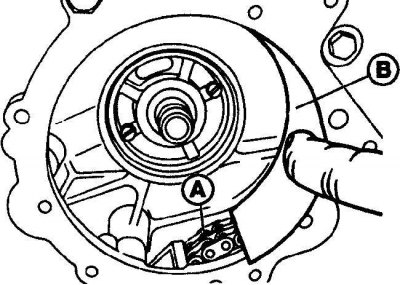
A - drive chain;
B - self-made tool
1. Remove the ground wire from the battery.
2. Remove the clips and remove the soundproof panel from the back of the engine compartment.
3. Remove the auxiliary drive belt tensioner.
4. Remove the radiator fan and shroud.
5. Remove the vacuum pump from the cylinder head cover. Remove the gasket from the vacuum pump.
6. At the crankshaft pulley bolt, turn the engine crankshaft in the direction of working rotation so that the piston of the first cylinder is set to a position of 15°after top dead center. Install by aligning the appropriate mark on the vibration damper with the pointer (see fig. Setting the piston of the first cylinder to position 15°).
7. If equipped, unscrew the housing located in front of the fuel pump sprocket (see fig. Fuel pump sprocket housing). On later models, the body is secured with a locking pin. To remove the locking pin, screw an M6 bolt into it and, using an inertia hammer with an adapter, remove the locking pin.
8. Remove the cylinder head cover.
9. Remove the drive chain tensioner.
10. Unscrew and remove the bolt and gasket securing the camshaft drive chain sprocket.
11. Using a soft wire, tie the camshaft sprocket and the drive chain together.
12. Remove the sprocket along with the drive chain from the end of the camshaft.
13. Unscrew the housing from the front side of the fuel pump sprocket.
14. Unscrew the central bolt of fastening of an asterisk of the fuel pump.
Attention! The fuel pump sprocket center bolt has a left-hand thread.
15. Using paint, mark the position of the fuel pump sprocket relative to the drive chain.
16. Remove the drive chain from the fuel pump sprocket teeth. To do this, use a thick sheet of 140x70 mm and bend it into a circle so that the diameter of the circle is equal to the diameter of the fuel pump sprocket. Attach a self-made tool to the fuel pump sprocket, then expand it so that the drive chain is removed from the fuel pump sprocket teeth, and fix the tool in this position (see fig. Using a Homemade Tool to Remove the Drive Chain from the Fuel Pump Sprocket Teeth).
17. After removing the fuel pump drive sprocket from the teeth, use the grips to remove the injection timing adjustment mechanism together with the sprocket from the drive chain cover.
18. Unscrew the plug covering the mounting hole on the side of the high pressure fuel pump.
19. Using special grips, turn the fuel pump shaft in the direction of operating motion until you can see the regulator housing through the mounting hole. Turn the fuel pump shaft until the protrusion on the regulator housing is aligned with the center of the mounting hole. Using a special tool, through the installation hole, fix the regulator body from turning (see fig. Using a special tool to secure the regulator housing from turning).
Attention! When turning the high pressure fuel pump shaft, be careful not to damage the surface of the fuel pump shaft.
Installation
Fuel pump sprocket and injection timing mechanism
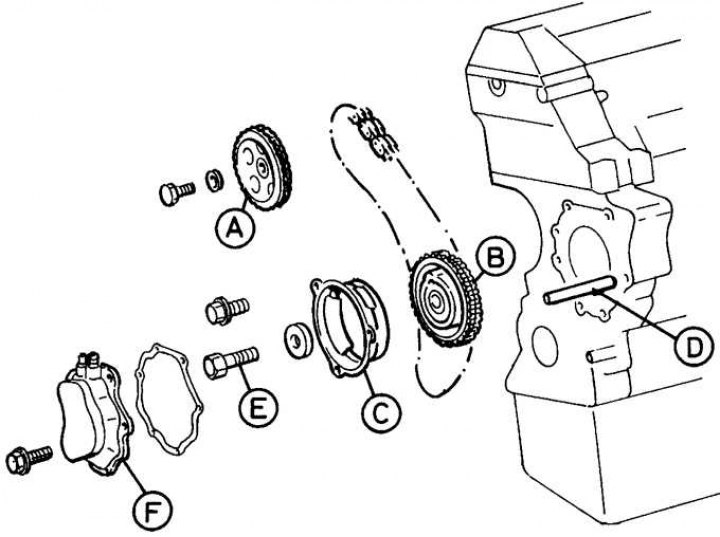
A - camshaft sprocket; B – an asterisk of the fuel pump and the mechanism of adjustment of the moment of injection of fuel; C - body; D - mounting pin; E – a bolt of fastening of an asterisk of the fuel pump; F - vacuum pump
1. Installation is carried out in the reverse order of removal, taking into account the following points (see fig. Fuel pump sprocket and injection timing mechanism).
2. Before installing the sprocket and fuel injection timing mechanism on the fuel pump shaft, check that the No. 1 cylinder piston is set to 15°after top dead center.
3. When installing the fuel pump sprocket, align the marks on the sprocket and drive chain.
4. Secure the engine crankshaft from turning and tighten the fuel pump sprocket bolt to the required torque.
Attention! The fuel pump sprocket bolt has a left-hand thread.
5. Remove the special tool that fixes the distributor housing from the fuel pump and close the installation hole with a plug.
6. Install the sprocket onto the camshaft. Turn the engine crankshaft one full turn and check that the timing marks on the camshaft and crankshaft are aligned with the pointers.
7. When installing the vacuum pump, use new seals.
8. Check and, if necessary, adjust the fuel injection timing.