
Attention! If the timing parts are to be used again, they must be installed in their original places. To avoid confusion, you should make a special box for storing them.
Removing
1. Disconnect the wire "masses" (–) from the battery.
Attention! This erases the anti-theft code of the radio.
2. Remove the air filter cross tube.
3. Unscrew the cylinder head cover.
4. Set the engine to top dead center. To do this, rotate the engine until the markings on the camshaft housing and the crankshaft pulley match. Note: top dead center (TDC) is the highest position that the piston reaches when moving in the cylinder. In this case, it is necessary to distinguish between the dead center of ignition, after which the piston compresses the intake air, and simply the top dead center, after which the piston pushes the combustion gases.
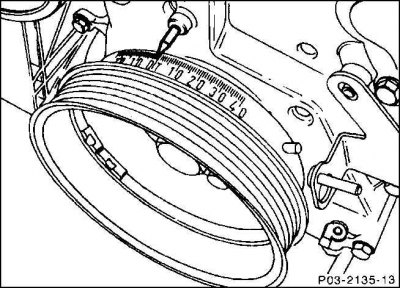
5. Set the gearbox to the idle position and, using the sprocket, reinforced with the central bolt of the crankshaft belt pulley, turn the crankshaft in the direction of engine rotation, i.e. clockwise. Turn until the marking "FROM." (TDC) on the belt pulley will not fit under the pointer.
Attention! Do not rotate the motor in the reverse direction. Never turn it by the camshaft gear bolt.
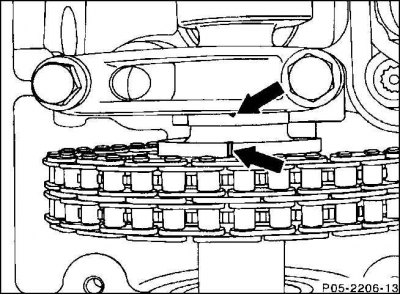
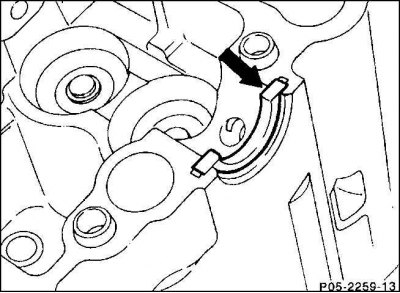
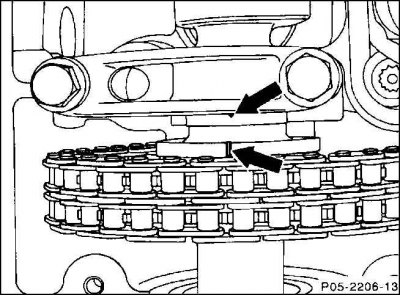
6. At the same time, the markings must match (arrows) on the camshaft flange and on the first bearing cap. If these markings do not match, turn the crankshaft one more full turn.
7. Remove the chain tensioner.
8. Vehicles with height adjuster: unscrew oil pressure pump and set aside with connected hoses. Remove the O-ring and drive disc.
Attention! Do not loosen both hexagon socket screws to secure the cover. These bolts have a through thread that is visible between the cover and the crankcase.
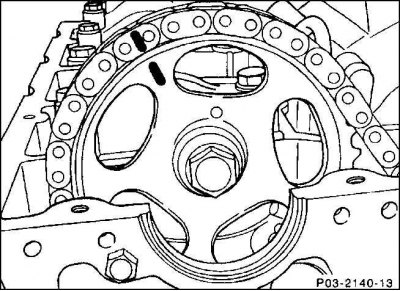
9. Mark the position of the timing gear and control chain relative to each other with varnish or a chisel, after wiping this place on the chain and camshaft gear with a rag.
10. Fix the camshaft gear by inserting a pin or a large screwdriver into one of the holes in the gear.
11. Unscrew the fastening bolt, remove the timing gear. Vehicles with height adjustment Remove the drive sleeve.
Attention! The control chain must remain further engaged with the crankshaft and fuel pump gears. Otherwise, the valve timing will change, which can lead to engine malfunction.
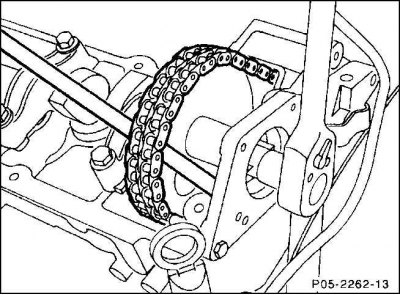
12. Set the control chain aside and attach with wire to the cylinder head.
13. Mark the position of the camshaft bearing caps with varnish.
14. Unscrew the camshaft bearing caps.
Attention! To avoid damage to the camshaft, the unscrewing sequence must be strictly followed.
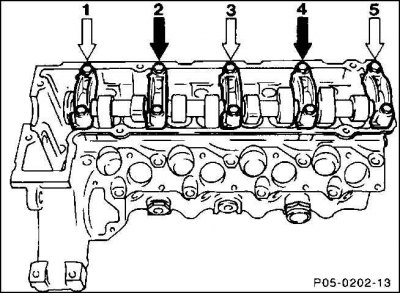
15. First unscrew both bolts on camshaft bearings 1, 3 and 5 (white arrows). Then loosen both bearing cap bolts 2 and 4 alternately and gradually (1/2 turn and one turn respectively), until resistance is removed (black arrows).
16. Pull the camshaft up.
17. Remove washer (arrow) for axial fixation of the camshaft from the cylinder head and check its condition, replace if necessary.
18. Pull out the poppet with a rubber siphon (d 30 mm), for example, HAZET 735-2.
Attention! Do not use a magnetic siphon for this operation: this will magnetize the sliding surfaces of the pusher, and subsequently the smallest metal chips can be deposited on them, which will lead to damage to the pushers and cams. The siphon can be made independently using a household wall hook and a suction cup.
Attention! Thoroughly clean the surface of the pusher before removing.
Installation
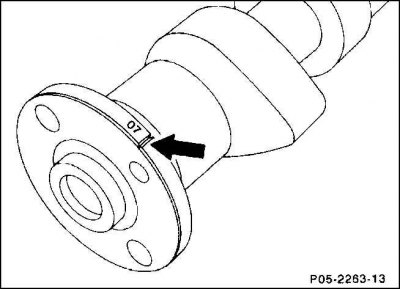
Attention! Install only camshaft with index "13". The index is stamped next to the mark to indicate the TDC position on the camshaft flange.
1. Thoroughly clean the camshaft and bearing caps with gasoline and lubricate with oil, clean the sealing surfaces.
2. Insert the washer for axial fixation of the camshaft into the groove of the cylinder head.
Attention! If a new camshaft is installed or the cylinder head was processed, then after bolting the bearing caps, the camshaft must be checked for smooth rotation.
3. Lubricate the new camshaft with engine oil and install in the cylinder head.
Attention! The poppet pushers remain dismantled.
4. Fit the camshaft bearing caps as shown and tighten evenly to 25 Nm. At the same time rotate the camshaft.
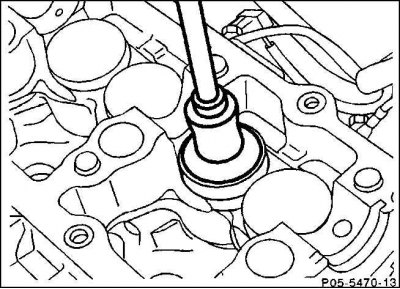
5. To rotate the camshaft, instead of the mounting bolt, screw in a bolt with an hexagon socket M 10x30 (01).
6. If the camshaft turns hard, loosen the bearing cap bolts individually until the jamming point is found.
7. Remove the camshaft and measure the seat of this bearing. Support neck diameter: 30.934–30.950 mm.
8. If the old camshaft is mounted, it should be checked for runout.
9. Lubricate poppet tappets with engine oil and install.
Attention! Install the pushers in the same places as before disassembly.
10. Lubricate the camshaft and place it in the cylinder head so that the TDC marking (arrow) was directed vertically upwards. When doing this, pay attention to the tight fit of the axial lock washer.
11. Install bearing caps 2 and 4 and tighten lightly with bolts by hand. Then alternately tighten the fastening bolts one turn and, finally, tighten with a torque of 25 Nm.
12. The rest of the bearing caps can be installed in any order. Tightening torque: 25 Nm.
13. Unscrew the camshaft gear from the cylinder head and install the control chain so that the markings match.
14. Slide the timing gear onto the camshaft flange. Center the timing gear with the dowel pin.
15. On vehicles with height adjustment, lubricate and install the drive sleeve.
16. Tighten the timing gear with a torque of 25 Nm and finally tighten the bolt with an open-end wrench by 90° (1/4 turn). When tightening the timing gear, use a screwdriver or pin as a counterhold.
17. Install the chain tensioner.
18. Install the pressure oil pump, if it was removed, and screw it to the flange with a torque of 10 Nm, having previously installed the drive disk and a new O-ring.
19. Set the engine to TDC and check the alignment of the markings on the crankshaft pulley and camshaft flange (arrows).
20. Install the cylinder head cover and tighten its mounting bolts with a torque of 10 Nm. Before doing this, check the gasket for damage and replace if necessary.
21. Install the air filter cross tube.
22. Connect wire "masses" battery (–).
23. Set the time on the clock.
24. Set the radio's anti-theft code.
25. Warm up the engine and check the tightness of the cylinder head cover.