
Removing
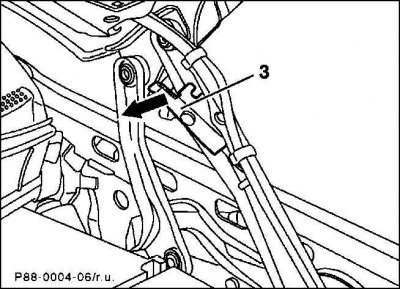
1. To raise the hood, pull the lock lever in the direction of the arrow (3) on the left and slightly lift the hood so that the lock lever is not locked. Disconnect the right locking lever and place the engine hood upright.
Attention! The left locking lever should fit into the upper latch.
2. Disconnect ground cable (–) from the battery.
Attention! This erases the anti-theft code of the radio. Read the instructions in the battery removal and installation section before disconnecting the battery.
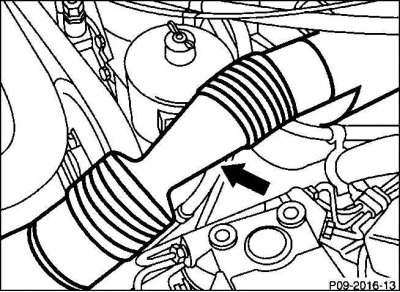
3. Disconnect the air hose (arrow) from the air filter and diffuser, while turning the hose slightly and squeezing it along its length.
4. Remove the air filter.
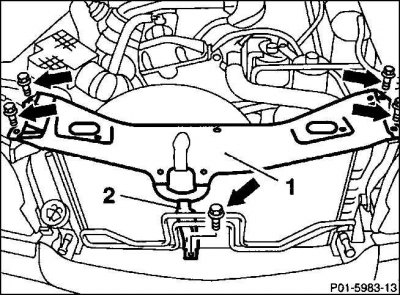
5. Unscrew the cross beam (1) with spacer (2) (arrow).
6. Disconnect the engine hood link.
7. Remove the throttle cable and set aside.
8. Disconnect all electrical wires from the body to the engine, having previously marked them with adhesive tape. For example:
- remove the plug with the thermal switch;
- unscrew the glow plug wires (key size 10 mm) and remove from the holders;
Attention! In some models, the fastening nuts are inserted into the cable lugs so as not to lose them.
- air conditioning: disconnect the electrical wire from the air conditioning compressor.
9. Disconnect and remove the electrical wires from the holders.
10. Disconnect all vacuum hoses that go from the body to the engine compartment. For example:
- unscrew the vacuum hose for the brake booster from the vacuum pump.
11. Remove the fuel lines, having previously marked them with adhesive tape to facilitate subsequent installation. Wipe up spilled fuel with a rag.
12. Raise the vehicle.
13. Remove the bottom cover of the engine compartment.
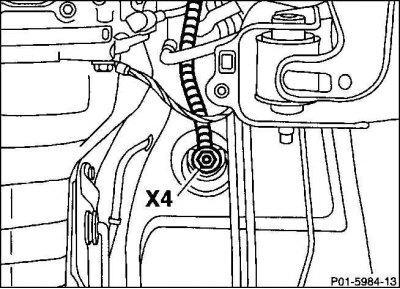
14. Disconnect the positive cable (X4) from the contact piece on the underside of the vehicle on the left and place on top of the engine.
15. Unscrew the exhaust pipe outlet flange from the exhaust manifold.
16. Drain the coolant.
17. Remove the radiator.
Attention! In vehicles with air conditioning, immediately after removing the radiator, install a protective shield on the condenser.
18. Disconnect all coolant hoses between the engine and the body by first loosening and fully folding out the fixing clamps.
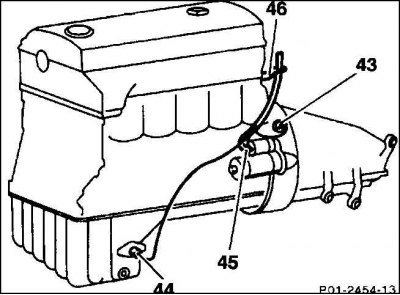
19. Remove the oil pressure switch plug (43) and oil level sensor (44).
20. Disconnect the electrical wires (45) from the starter.
21. Release the tourniquet (46) from the holder.
22. Remove the plug connection from the three-phase current generator.
Installation
1. Check engine mounts, coolant hoses, fuel and oil lines for porosity and cracks, replace if necessary.
2. Check the crankshaft deep groove ball bearing and the clutch thrust bearing for ease of rotation, and the clutch bearing for ease of movement.
3. Check whether the thickness and condition of the lining of the clutch friction disc is sufficient.
4. If separated, attach the gearbox to the engine and enter them together into the engine compartment.
5. During installation, the engine must be lowered carefully so as not to damage the drive shaft, clutch and body.
6. Tighten the bolts connecting the engine and gearbox.
7. Tighten the front bearing bolts by hand.
8. Tighten the bolts of the rear engine bracket with a torque of 45 Nm, and nuts with a torque of 70 Nm.*
9. Screw in the bolts of the front bearings of the engines with a torque of 30 Nm.
10. Remove the jack and disconnect the cable from the engine.
11. Install the cardan shaft in the gearbox.*
12. Screw the convector into the middle tunnel.*
13. Screw the gas outlet side support to the gearbox.*
14. If the engine was removed without a gearbox, install the starter.
15. screw wire "masses" between starter and body.
16. Connect the electrical wires to the starter.
17. Screw on the speed sensor (L3).*
18. Screw on the tachometric inductive pickup, if present.
19. Automatic transmission: connect the shift lever to the gearbox and insert the wire connector for the start and reverse light switches (S 16/1). Install the Kickdown solenoid valve wiring connector on the right side of the transmission. Check shift mechanism adjustment.*
20. Screw on the clutch sensor hydraulic hose, bleed the clutch sensor.*
21. Manual Transmission: Install the fork rods on the gear shift knobs and secure with clips. Check adjustment.
22. Automatic transmission: screw on the oil lines of the oil-air cooler.
23. Remove hose clamps.
24. Level adjustment: screw the oil lines/hoses to the oil pressure pump.
25. Screw on the hydraulic hoses of the servo pump with a torque of 30 Nm.
26. Connect all electrical wires, i.e., glow plugs, thermal switch plug, three-phase current generator wire, oil level sensor and oil pressure switch.
27. Fix the phase wire in the holder above the starter.
28. Air conditioning: tighten the refrigeration compressor with a torque of 25 Nm. Install the ribbed V-belt.
29. Install the radiator.
30. Put on all coolant hoses and secure communications.
31. Check for antifreeze in the coolant and top up.
32. Screw the exhaust manifold to the exhaust pipe outlet flange.
33. Connect positive cable (X4) to the connector located at the bottom left of the vehicle.
34. Install the bottom cover of the engine compartment.
35. Lower the car.
36. Install the throttle cable and adjust it.
37. Insert the rod into the engine hood.
38. Screw on the front transverse support beam with spacer.
39. Insert the fuel lines as marked on them.
40. Screw the vacuum hose for the brake booster to the vacuum pump.
41. Install all vacuum hoses that lead to the engine.
42. Check the oil level in the box, top up if necessary.
43. Fill with hydraulic oil for power steering, bleed air from power steering.
44. Clean the air filter, replace if necessary.
45. Install the air filter.
46. Install the air hose.
47. Connect wire "masses" to the battery.
48. Bring the engine up to operating temperature, check the brake fluid level and check the tightness of all hose connections.
49. To close the engine hood, pull the lock lever at the left hinge and slowly lower the hood until the lever locks into place.