Cars BMW Cars Volkswagen Cars Chevrolet Cars Land Rover Cars Lada Cars Honda Cars Peugeot
English Русский
Български
Беларускі
Український
Српски
Hrvatski
Română
Polski
Slovenský
Magyar
Bookmark News and articles Sitemap Feedback Site search
MercedesMan.ru


A-Class C-Class E-Class G-Class M-Class S-Class Others
190 (W201) (1982-1993) W202 (1993-2000) W203 (2000-2007)
  • Main
  • C-Class
  • W202 (1993-2000)
  • Power unit
  • Diesel engines
  • Engine removal (cars with air conditioning)

Engine removal (cars with air conditioning) (Mercedes-Benz C-Class W202)

0
Warning! Do not open the air conditioner coolant circuit, as the liquid contains substances that can cause frostbite when in contact with the skin. When removing the engine, do not open the coolant circuit either.


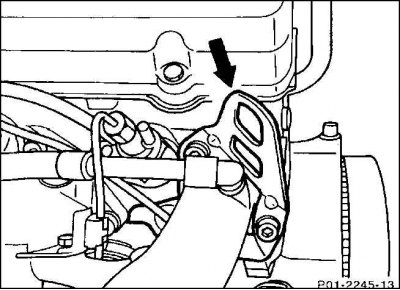
1. Remove the V-ribbed belt.
1. Remove the V-ribbed belt.


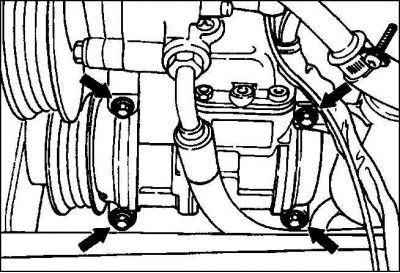
2. Unscrew the refrigeration compressor (arrows) and hang it together with the connected wires on the side of the body.
2. Unscrew the refrigeration compressor (arrows) and hang it together with the connected wires on…


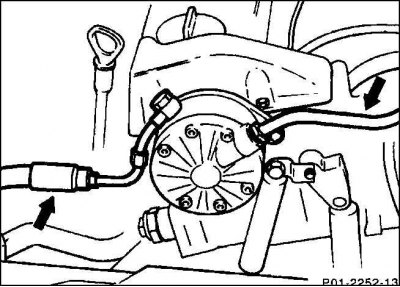
3. Vehicles with height adjustment: Unscrew the oil hoses of the pressure oil pump (arrows). If a dual pump is installed, disconnect the oil lines from the pump.

4. Use a special syringe to suck out the hydraulic oil from the power steering reservoir. Unscrew and roll up the hoses. Collect the leaked fluid with a rag.
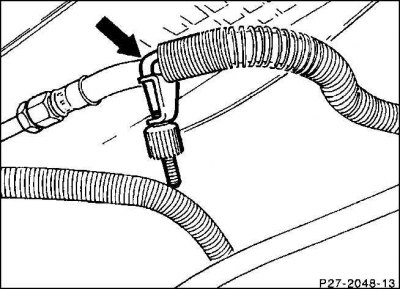
4. Use a special syringe to suck out the hydraulic oil from the power steering reservoir. Unscrew…


5. Automatic transmission: Use hose clamps to tighten the oil cooler lines.
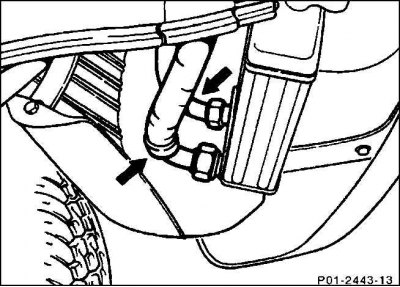


5. Automatic transmission: Use hose clamps to tighten the oil cooler lines.


6. Unscrew the oil lines (arrows) of the air oil cooler.

7. Manual transmission: After first depressing the locking clamps, remove the fork rods from the transmission handles.*

8. Unscrew the clutch sensor hydraulic hoses (arrows).*
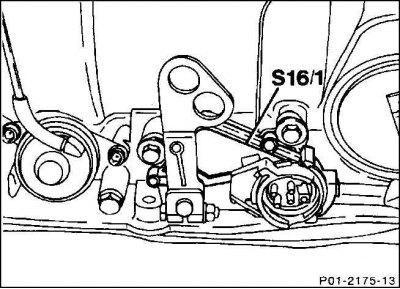
8. Unscrew the clutch sensor hydraulic hoses (arrows).*


(Material based on data from the portal: MercedesMAN.ru)

9. Automatic transmission: Disconnect the shift linkage from the transmission and remove the wiring connector for the starter lock and reversing light switches (S 16/1). Disconnect the wiring connector for the kickdown solenoid valve on the right side of the transmission.*
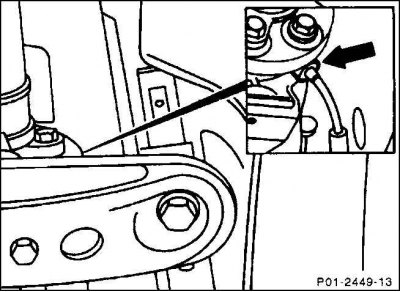
9. Automatic transmission: Disconnect the shift linkage from the transmission and remove the wiring…


10. If equipped, unscrew the tachometer pickup (arrow) and remove the two lower starter bolts. Set the connecting wire aside. If the engine is removed without the gearbox, remove the starter.*
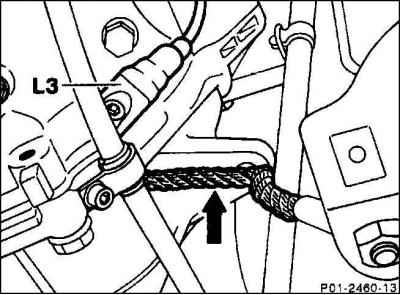


10. If equipped, unscrew the tachometer pickup (arrow) and remove the two lower starter bolts. Set…


11. Unscrew the speed sensor (L3).*

12. Unscrew the ground wire between the starter and the body.

13. If the engine is separated from the transmission, remove the starter.

14. Unscrew the exhaust side support from the gearbox.*

15. Unscrew the convector in the middle tunnel.*

16. Unscrew the propeller shaft from the gearbox and press it away from the gearbox.*

17. Loosen the propeller shaft intermediate bearing bolts, remove the nuts and slide the propeller shaft as far back as possible.*

18. Place a jack with a wooden spacer under the gearbox and move it slightly (lift up) box.

19. If the engine is separated from the transmission, remove the bolts connecting them at the bottom.
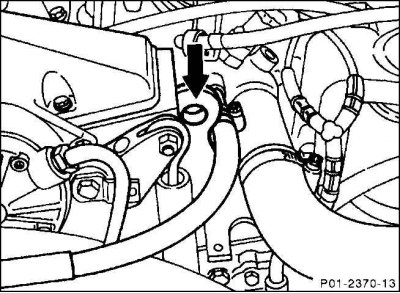
19. If the engine is separated from the transmission, remove the bolts connecting them at the…

20. Attach a cable to the engine. To do this, thread the appropriate cable or chain through the engine lugs (arrows). Slightly move the engine using a crane.
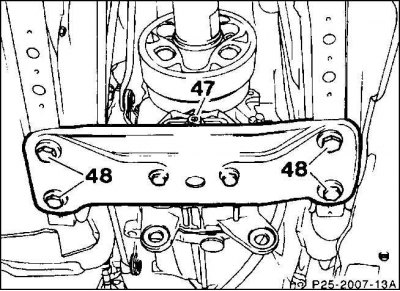


20. Attach a cable to the engine. To do this, thread the appropriate cable or chain through the…


21. Remove the rear engine bracket with support, unscrew the nut (47) and bolts (48).*
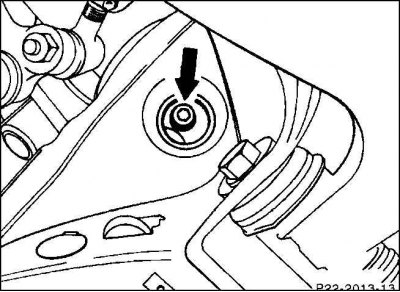
21. Remove the rear engine bracket with support, unscrew the nut (47) and bolts (48).*


22. Remove the Allen bolts (arrow) from the bottom of the front engine mount from the vehicle frame cross support.

23. Remove the upper bolts connecting the engine and gearbox.

24. Separate the engine from the gearbox using a pry bar and remove it (lift up).
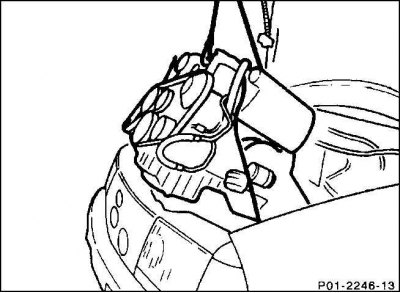
24. Separate the engine from the gearbox using a pry bar and remove it (lift up).


25. Lift the engine with the gearbox in a diagonal position, adjusting the tilt to the lifting height. The maximum tilt is about 45°.


Caution! Lift the engine carefully to avoid damaging the car body. Pay special attention to the rear engine eye and oil filter. Also, check that everything is disconnected from the engine.


26. If the engine and gearbox are removed together, disconnect the gearbox flange.
This article is available at: russian, bulgarian, belarusian, ukrainian, serbian, croatian, romanian, polish, slovak, hungarian
The article has been verified: Khromov Roman Mikhailovich
Share with friends:
◀ Previous
C-Class W202 / Diesel engines
Next ▶

Engine ventilation
Removal and installation the engine
Technical characteristics of diesel engines
Lower Engine Compartment Cover — Removal and Installation
Chain tensioner — removal and installation
Camshaft (2.0 L engine)
Camshaft (2.2/2.5L engine)
Cylinder head (2.0L engine)
More similar articles for repairing other models

☛ Checking the engine oil level using a dipstick Mercedes W168 (1997-2004)
☛ Design and specification of engine lubrication system Mercedes W123 (1976-1985)
☛ Mercedes-Benz G-Class Cars — Abstract Mercedes W463 (1999-2019)
☛ Mercedes-Benz M-Class Cars (W163) — Abstract Mercedes W163 (1997-2005)
☛ Replacing the oil filter on a 110 engine with air conditioning Mercedes W126 (1979-1991, petrol)
☛ Rear cover of automatic transmission (on cars with engine 104.900) Mercedes Vito 1 (1996-2003)
Link in different formats to this article
Comments and feedback from visitors
No comments yet


How much will 47 + 43 ?


W203 (2000-2007) 
  • General information
  • Introduction to guide
  • User manual
  • Maintenance
  • Power unit
  • Gasoline engines
  • Diesel engines
  • Cooling system
  • Ventilation and heating
  • Supply system
  • Injection system (gasoline)
  • Injection system (diesel)
  • Exhaust system
  • Ignition and control system
  • Charge and launch systems
  • Transmission
  • Mechanical gearbox
  • Automatic gearbox
  • Clutch and drive shafts
  • Differential
  • Chassis
  • Brake system
  • Car suspension
  • Steering
  • Body
  • Exterior (external elements)
  • Interior (internal elements)
  • Electrical equipment
  • Equipment and devices
  • Lighting system
  • Electrical diagrams (2000)
  • Electrical diagrams (since 2001)
W202 (1993-2000) 
  • General information
  • User manual
  • Driving a car
  • Car care
  • Maintenance
  • Power unit
  • Gasoline engines
  • Diesel engines
  • Lubrication system
  • Cooling system
  • Heating and ventilation
  • Ignition system
  • Fuel system
  • Injection system (gasoline)
  • Injection system (diesel)
  • Exhaust system
  • Transmission
  • Clutch
  • Car gearbox
  • Chassis
  • Suspension, wheels and tires
  • Steering
  • Brake system
  • Body
  • Exterior (external elements)
  • Interior (internal elements)
  • Doors and windows
  • Electrical equipment
  • Equipment and devices
  • Power devices
  • Lighting system
  • Electrical circuits
190 (W201) (1982-1993) 
  • General information
  • Introduction to the guide
  • Operation and care
  • Maintenance (gasoline)
  • Maintenance (diesel)
  • Troubleshooting
  • Power unit
  • Petrol engine I4
  • Petrol engine V6
  • Diesel engines
  • Engine overhaul
  • Cooling and heating
  • Power system (carburetor)
  • Injection system (gasoline)
  • Injection system (diesel)
  • Exhaust system
  • Charge and start system
  • Ignition system (I4)
  • Ignition system (V6)
  • Diesel heating system
  • Transmission
  • Clutch
  • Mechanical gearbox
  • Automatic gearbox
  • Cardan shaft and axle shafts
  • Chassis
  • Brake system
  • Car suspension
  • Steering
  • Body
  • Exterior (external elements)
  • Interior (internal elements)
  • Doors, locks and windows
  • Electrical equipment
  • Equipment and devices
  • Electrical circuits
 
MercedesMan.ru © 2017–2026 · Mobile version · Read about Mercedes · Sitemap: EN BG BY UA RS HR RO PL SK HU · Feedback · Site search · Bookmark A-Class (W168) · C-Class (W201) · C-Class (W202) · C-Class (W203) · E-Class (W123) · E-Class (W124) · E-Class (W210) · G-Class (W463) · M-Class (W163) · S-Class (W116, petrol) · S-Class (W126, petrol) · S-Class (W140) · S-Class (W220) · Sprinter · Vito 1 · Vito 2 · Vario 814D ·
 
We only use cookies without which some of the site's features may not be available.