
Removing
Camshaft bolts
1. Remove the cylinder head cover.
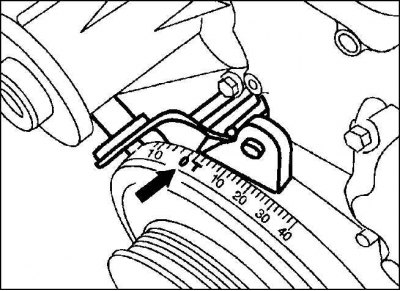
2. Set the piston of the first cylinder to the ignition TDC. To do this, idle the transmission and turn the crankshaft clockwise with the sprocket attached to the crankshaft by the belt pulley center bolt. Turn the crankshaft until the mark "FROM" on the belt pulley will not be under the pointer (arrow).
Attention! Do not rotate the motor in the opposite direction. Never turn the shaft by the timing gear bolt.

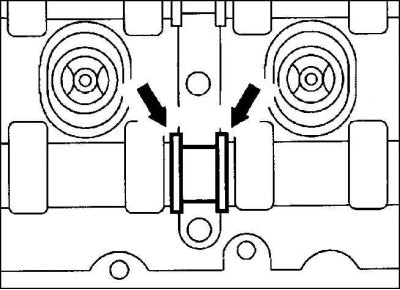
3. In this position, insert a locking pin or other suitable 6.75 mm diameter rod into the intake camshaft gear hole (2) through the first camshaft bearing cap or turn the crankshaft a full turn and insert the pin.
4. Mark relative to each other the position of the timing gear and the control chain with varnish or a graver, after wiping this place on the chain gear with a rag.
5. Remove the chain tensioner.
6. Remove the mounting bolts and remove the exhaust camshaft gear. To unscrew the bolts, a T40 socket wrench is required.
Attention! The control circuit must remain engaged with the crankshaft and fuel pump gears. Otherwise, the valve timing will change, which can lead to malfunctions in the engine.
7. Set the control chain aside and wire it to the cylinder head.
8. Number the camshaft bearing caps in order so that they can be installed in their original place during subsequent installation.
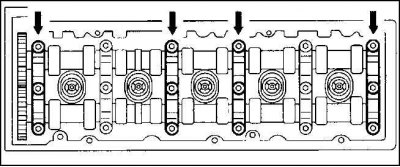
9. 2.5L engine: Unscrew the camshaft bearing caps.
Attention! Camshafts are very fragile. In order not to damage them, strictly follow the disassembly procedure: first unscrew all bearing bolts 1, 3, 4 and 6 (arrows). Then alternately unscrew the bolts of both bearing caps 2 and 5 (1/2 turn respectively), until the resistance disappears (see fig. Camshaft bolts).
10. 2.2 l engine: first unscrew bearing caps 1, 3 and 5. Then loosen bearing cap bolts 2 and 4 in stages (1/2 turn respectively), until the resistance disappears.
11. If necessary, remove the poppets and inspect for external damage (presence of scratches), replace if necessary. To pull the pusher in the workshop, a pusher siphon is used, which at home can be made from the suction cup of a wall hook.
Installation
Attention! When replacing a camshaft, use a shaft with the same index. The index is stamped next to the middle bearing.
1. Thoroughly clean the camshafts and bearing caps with gasoline and lubricate with engine oil. If the tappets were dismantled, lubricate them with oil and install them in the cylinder head in the same position as before dismantling.
2. Check the washers for axial fixation of the camshaft in the grooves of the middle bearing, replace if necessary.
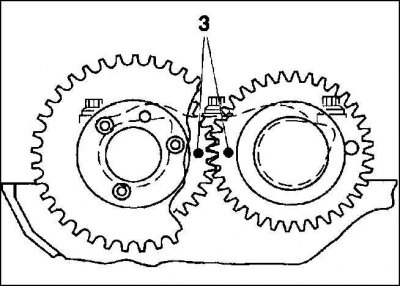
3. Lubricate the camshafts with engine oil and insert into the cylinder head, with both holes (3) (d = 1.5 mm) must be in the timing gears opposite each other. In this position, you can install the rod.
4. Install the camshaft bearing caps in accordance with their numbering and evenly, in the reverse order of dismantling, tighten with a torque of 15 Nm.
5. Insert the rod into the intake camshaft flange.
6. Install the camshaft sprocket with the chain superimposed on it on the exhaust camshaft and tighten with a new bolt with a torque of 20 Nm. The marks on the control chain and the sprocket must match.
Attention! Remove the pin from the sprocket.
7. Install the chain tensioner with a new O-ring.
8. Install the cylinder head cover and complete the engine.