
Electrolyte level
The battery is maintenance-free. An electrolyte is poured into it - a solution of sulfuric acid in distilled water. Since the water from the solution can evaporate, from time to time you need to check the electrolyte level and top up with distilled water. The electrolyte level must be between the marks on the battery case. The factory installed battery is overfill protected. To fill with water, unscrew the plug on top of the battery and pour distilled water until the electrolyte is visible.
Degree of charge
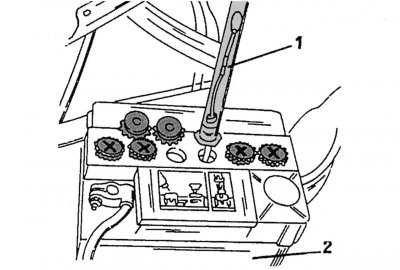
Pic. 303. Checking the density of the electrolyte: 1 - hydrometer; 2 - electrolyte level mark
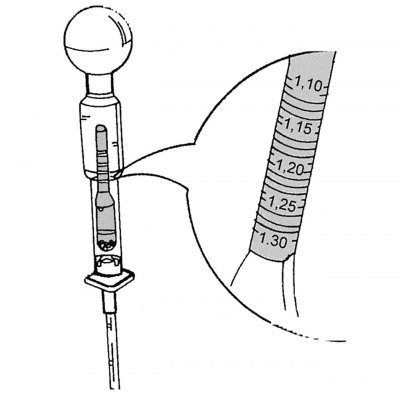
Pic. 304. Electrolyte Density Measurement
A hydrometer is used to check. Unscrew the plug from the top of the battery and push the tip of the device through the rubber overflow protection (pic. 303). Pump out enough electrolyte with the rubber bulb of the hydrometer so that the float of the device floats freely in the liquid (pic. 304). Depending on the degree of charge of the battery, the electrolyte has a different density, which is determined by the level of immersion of the device's float. At a value of 1.28, the battery is fully charged; at a value of 1.12, the battery is completely discharged. Intermediate values indicate the respective state of charge.
Battery charge
It is possible to add distilled water to a heavily discharged battery only after charging. When charging, the electrolyte level rises, so a fully charged battery may therefore «boil». The charging current should not exceed 10% of the battery capacity at first. Depending on the charger used, the charging current gradually decreases in the future. The battery is fully charged when the electrolyte density does not change for 2 hours.
The battery plugs must be turned out and put on the filling holes so that the explosive gas formed from oxygen and hydrogen escapes. Since electrolyte splashes can be difficult to avoid when charging, it is recommended to cover the area around the battery, such as with newspaper. When charging, the enclosed space must be ventilated. Under no circumstances should open flames be used.
When using a household charger, the battery can not be removed from the car, the wires can not be disconnected. When using a quick charger, both battery terminals must be disconnected so as not to damage the alternator diodes, electronic devices, radio, etc. In this case, the charging current should not exceed 50% of the battery capacity, the charging time should not exceed 30 minutes.
Removing and installing the battery
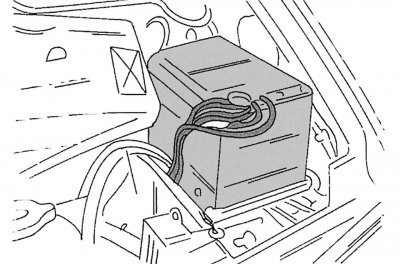
Pic. 305. Battery location
The battery is installed in the engine compartment at the location shown in fig. 305. Before removing the battery, turn off the ignition. Remove the side and top plastic protective covers. Loosen and remove the negative and positive terminals. Loosen the bolts of the battery holders, remove them, and then remove the battery. Disconnect the negative terminal first. Before installing, first clean the terminals and coat with terminal compound. Connect and screw the positive wire first. Tighten the battery mounting bolts to 20 Nm.
Note. If your car has a radio with an anti-theft code, you will need to enter the code after removing the battery.
If the vehicle is not used for a long time, it is necessary to disconnect «negative» wire so that electrical consumers such as watches do not drain the battery. It is necessary to charge the battery at least once every 3 months, as a discharged battery fails faster.
Battery disposal
When replacing the battery, the old one must be disposed of. Do not dispose of the battery with household waste. You should find a place where used batteries are accepted. When transporting the battery in a car, make sure that it does not tip over. In this case, the electrolyte will leak out and the vehicle will be damaged. After working with the battery, wash your hands - do not wipe them on clothing.
Starting the engine with a dead battery
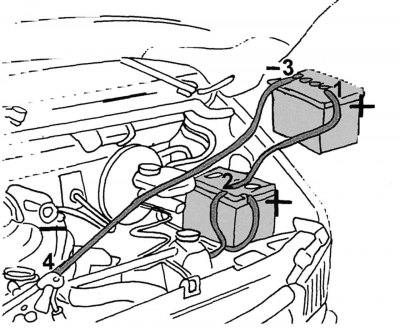
Pic. 306. The order of connection during «smoking»: 1 - positive terminal of the battery, from which «light up»; 2 - positive terminal of the discharged battery; 3 - negative terminal of the battery, from which «light up»; 4 - connection to «mass» on the cylinder block
The easiest way to use wires for «smoking», which must have a sufficient cross section and reliable terminals. It is better to purchase more expensive copper wires. The insulation of cheaper aluminum wires gets hot, so you can burn your fingers when removing the terminals. First connect the positive wire to both positive terminals, then the negative one. On fig. 306 shows how to connect the wires.
The following precautions must be taken into account:
- the voltage and capacity of the batteries must be the same;
- so that there is no short circuit «weight», cars should not touch each other;
- turn off all consumers of electricity;
- negative wire from battery «donor» Do not connect to the negative terminal of the battery being charged. On fig. 306 this wire is connected to the cylinder block;
- car engine from which «light up», must be stopped!
Tug launch
Careless towing can cause serious damage. Remember that when the engine is not running, neither the brake booster nor the power steering is active. For this reason, this method is not recommended. In case of emergency, the following precautions must be strictly observed:
- the battery must be installed and connected;
- if the engine does not start immediately, the catalytic converter may be damaged;
- for towing, use a reliable towing bar;
- the warning light for the preheating system must go out;
- turn on 2 or 3 gear;
- after starting to move, slowly release the clutch pedal and depress the fuel supply pedal.
It is also possible to start the engine with the help of towing in a car with an automatic gearbox. In doing so, the following precautions must be observed:
- turn the key in the ignition lock to position 2 and wait until the preheater lamp goes out;
- move the gearshift lever to position N;
- start towing (a prerequisite - a reliable tow bar). With a cold gearbox, do not tow at a speed of more than 25 km/h, with a heated gearbox - more than 40 km/h. Hold this speed for about 2 minutes so that the necessary pressure is formed in the gearbox;
- move the gearshift lever to position 2;
- do not press the fuel pedal until the gearbox has cranked the engine. After the engine starts, immediately move the gearshift lever to position N.
If the engine does not start
In this case, the vehicle must be towed, considering the following:
- the brake booster and power steering do not function when the engine is not running;
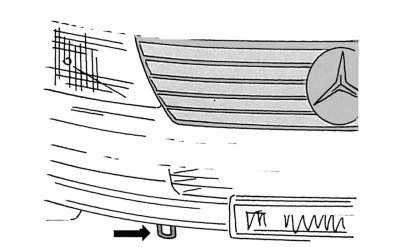
Pic. 307. Towing eye
- for towing, use only a reliable towing bar, the location of which is indicated in fig. 307.
With manual gearbox installed
Towing is allowed for no more than 100 km without removing the cardan shaft. Set the gearshift lever to the neutral position. If the towing distance is longer, remove the propeller shaft.
With automatic gearbox installed
Towing is allowed no more than 50 km without removing the cardan shaft. Do not exceed the speed of 40 km/h. If the towing distance is longer, remove the propeller shaft.