
Running in
The more you treat the engine with care at the beginning of its use, the more satisfied you will be with its work later. Avoid heavy load for the first 1500 km (full throttle motion) and high engine speed (no more than 2/3 of the maximum speed in the selected gear).
Change gears in time!
When pressing the accelerator pedal, it is advisable not to overcome the point of resistance («kickdown»).
Do not downshift with the selector lever to brake.
Select shift ranges 3, 2 or 1 only at low speeds (on mountain passes).
After the first 1500 km, the speed and the number of revolutions can be gradually increased to the limit values.
Help system - TeleAid
(Telematic Alarm Identification on Demand - used in Germany).
The call for help system allows the transmission of a call for help signal to one of the ambulance control centers within the territory of the Federal Republic of Germany.
The call for help is transmitted automatically after an accident. If a dangerous situation arises, you can activate the help system manually. In this case, all information necessary for assessing an emergency is transmitted, such as data on the location of the vehicle (determined by the GPS satellite positioning system, as well as by the way sensors of the ABS system) and concerning the severity of the accident.
In a short time after the call for help system is triggered, voice communication is automatically established between the ambulance control center and the passengers of the injured vehicle. If any of the passengers are able to speak, they can give more detailed information about the consequences of the accident to the staff of the ambulance control room. The phone is in speakerphone mode.
The call for help system is available for:
- the presence of a valid contract with the services offering the relevant services (telephone and help signaling service).
- the presence of a valid contract with the services offering the relevant services (telephone and help signaling service).
- have a valid phone card,
- access to the appropriate radiotelephone network (access is possible only within Germany on the basis of networks D1 and D2), which provides the transmission of short messages through the SMS service (Short Message Service),
- the possibility of receiving signals from the GPS satellite orientation system,
- the operational readiness of the call-for-help system.
Attention! The first commissioning of the call for assistance system must be carried out exclusively at the service station «Mercedes-Benz».
When the electronic key is turned in the ignition to position 1 or 2, the assistance call system is operational.
The control LED on the call system button lights up for approximately 5 seconds.
When the electronic key is turned to position 0 in the ignition switch or when the key is removed, the assistance call system is no longer operational.
Phone personal identification code (PIN)
When measuring the personal identification code of the phone (PIN) (refer to your phone's user guide) the phone displays a message «Export PIN Speichern» (Enter PIN code into memory).
Confirm the message by clicking on the button «OK» - the message is briefly displayed on the phone display «Gespeichert» (Entered into memory).
The personal identification code (PIN) is entered into the memory of the call-for-help system control unit.
If this process is not confirmed by pressing the button «OK», but is interrupted by the command «WITH», the phone displays the message briefly «Nicht gesp.» (Not stored in memory). In this case, the call system for help is not ready for operation, the control LED on the button for the call system for help is constantly on.
When using a D1 network calling card and the PIN code request function is disabled, it is still necessary to enter the PIN code into the assistance call system control unit.
Note. If the control LED on the button of the call system does not go out or lights up while driving, then a malfunction has occurred.
If the control LED goes out after a while, a short-term system fault has occurred.
Attention! If the control LED does not go out, it is possible that the call for help system is partially or completely inoperative.
Contact the service station as soon as possible «Mercedes-Benz» to test the call for help system.
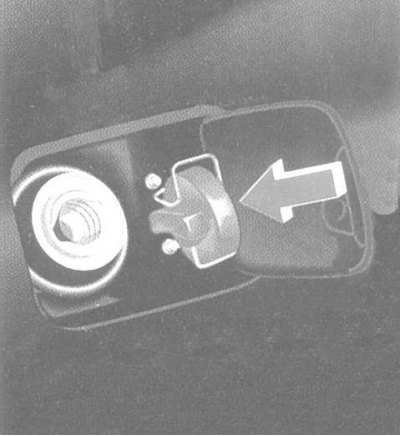
Sending a call for help
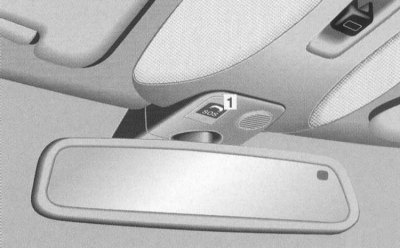
Manually: Lightly press the cover -1- - the cover opens.
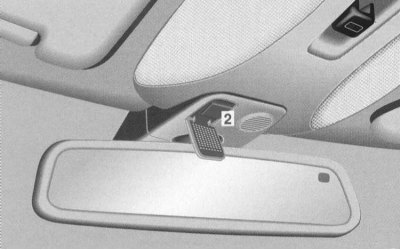
Lightly press the help call button -2-.
The control LED on the help call button -2- flashes.
The receipt of a call signal for help for further transmission to the ambulance control room is confirmed by a message through the loudspeaker installation. Wait for voice communication with the ambulance control room.
After calling for help, close the cover -1-.
Automatically:
- when the airbag is deployed;
- in case of a strong impact on the car from behind;
- when the vehicle rolls over.
The control LED on the help call button -2- flashes.
The receipt of a call signal for help for further transmission to the ambulance control room is confirmed by a message through the loudspeaker installation. Wait for voice communication with the ambulance control room.
Note. The control LED flashes until the call for help ends.
After the transmission of the call signal for help, the telephone switches to the hands-free mode after a few seconds until the exchange of information between the ambulance control center and the passenger of the car is completed.
During this time, it is not possible to conduct other telephone conversations.
Attention! Under voltage (e.g. with a discharged battery) it is not possible to send a call for help via the help call system.
After sending a call for help: If the control LED on the button of the call for help is constantly on, and no voice communication has been established before, the transmission of a call for help has failed (e.g. no radiotelephone network).
In this case, rescue activities must be organized on their own.
Attention! The call for help system is publicly available. Any misuse of the help button is therefore punishable.
Electronic ignition lock
There is a danger of an accident!
Remove the smart key from the ignition, even if you leave the vehicle for a short time.
Electric seat adjustment is also possible with one door open. Therefore, do not leave children in the car unattended.
Models with KEYLESS-GO system: Please note the notes on using the dongle and smart card at the same time.
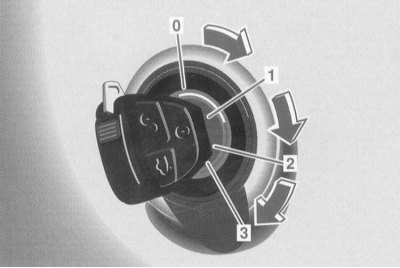
0 The smart key can only be removed in position 0 if the AT selector lever is in position «R».
To mechanically lock the vehicle, the AT selector lever is locked in position «R» at position 0 or 1 of the ignition switch and after removing the electronic key.
1 Radio position.
Most electrical consumers can be switched on. Information is given in separate datasheets.
2 Driving position.
Movement position. All electrical consumers can be switched on.
The AT selector lever is released. If the AT selector lever is in position «R», to move it, additionally depress the brake pedal.
3 Launch position.
Starting and shutting down the gasoline engine (below in this section).
Attention! When inserting the main electronic key into the ignition lock, the mechanical key must not be pulled forward. This may damage the ignition switch. (Mechanical key - refer to Section Locks, keys and locks. Smart card. Single lock).
Note. Do not stick the infrared window on the end of the electronic key and keep it clean, otherwise the operation of the electronic ignition switch cannot be guaranteed.
If the electronic key has been left in the ignition switch in position 0 for a long time, it can no longer be turned. To ensure rotation, remove and reinsert it.
If the electronic key in the ignition lock cannot be turned, the AT selector lever remains locked in position «R». The cause may be a significant discharge of the vehicle battery. (Charging the Battery - Chapter Current service, or Starting the engine from an auxiliary power source).
Then insert the electronic key into the ignition switch again and turn it. If the ignition switch is in position 2, the selector lever can be moved and remains free.
When the car is parked for a long time, the electronic key should be removed to avoid discharging the battery.
Ignition lock function KEYLESS-G0
There is a danger of an accident!
Even if you leave the car for a short time, take your smart card with you.
Electric seat adjustment is also possible with one door open. Therefore, do not leave children in the car unattended.
Please note the notes on the simultaneous use of an electronic key and a smart card (Chapter Locks, keys and locks. Smart card. Single lock).
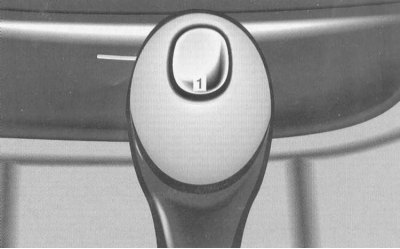
By pressing the start/stop button -1- on the selector lever without depressing the brake pedal, the radio receiver, operating position and zero position are activated sequentially.
Engine can be started from any position (radio position, operating position and zero position), if the AT selector lever is in position «R» or «N». (Starting a gasoline engine is discussed below).
Radio position (corresponds to the position «Electronic key in the ignition switch in position 1»):
Most electrical systems can be included.
For more information, see the technical descriptions.
Operating position
(corresponds to the position «Electronic key in the ignition in position 2»):
- All electrical systems can be switched on.
- The AT selector lever is released.
Zero position
(corresponds to the position «The electronic key is removed from the ignition lock»):
- Most electricity consumers cannot be turned on.
- AT selector lever locked in position «R» and cannot be moved.
Note. Moving the AT selector lever is possible only when the battery is connected and charged and the ignition switch is in position 2. If the AT selector lever is in position «R», apply the service brake additionally.
Attention! In order for the driver to always be able to perform all the functions, we recommend that you carry the smart card with you at all times:
- If the smart card is removed from the vehicle (e.g. with luggage or clothes), the vehicle can no longer be blocked and the engine started.
- If the smart card is removed with the door open or the engine running, a warning message appears on the multi-information display every 3 seconds after driving off «CHIP CARD NOT RECOGNISED» (SMART CARD NOT RECOGNIZED).
- Remember that the car engine can be started by leaving the smart card in the car.
In order to be able to drive if the KEYLESS-GO system malfunctions, for example due to a strong source of radio interference or a dead car battery, we recommend that you always carry a spare key with you.
Do not expose the smart card to excessive electromagnetic radiation. There is a risk of malfunction!
Start blocking device
(Vehicle Authorization Check System)
Driving a car with an electronic key:
- Remove the electronic key from the ignition. The start lock is on. The engine cannot be started.
- Insert the electronic key into the ignition switch. The start lock is off.
Driving with a smart card:
- Turn off the engine with the start/stop button (see below). The start lock is on. The engine cannot be started.
- Start the engine with the start/stop button (see below). The start lock is off.
Starting and shutting down the gasoline engine with an electronic key
There is a danger of an accident!
Remove the smart key from the ignition, even if you leave the vehicle for a short time.
Do not leave children unattended in the car.
Models with KEYLESS-GO: Please note the notes on using the dongle and smart card at the same time (Chapter Locks, keys and locks. Smart card. Single lock.
Before launch
Apply the parking brake.
Move the AT selector lever to position «R» / «N».
Launch
Turn the electronic key in the ignition lock to position 3 and release. The starting process is carried out automatically until the engine starts, or for a certain time - the impulse start function.
Do not press the accelerator pedal.
Repeat launch
Before restarting, turn the smart key in the ignition lock back to position 0 and repeat the starting process, keeping the smart key in position 3 until the engine starts.
If the engine does not start after a long process, contact a service station «Mercedes-Benz».
Note: Too long starting attempts will drain the battery. Emergency start of the engine by towing is not possible.
Engine shutdown
When the vehicle is stopped, move the AT selector lever to the position «R» and turn the electronic key in the ignition switch to position 0.
Note. The electronic key can only be removed from the ignition lock to position 0 if the AT selector lever is in position «R».
Starting and shutting down the gasoline engine with KEYLESS-GO
There is a danger of an accident!
Even if you leave the car for a short time, take your smart card with you.
Do not leave children unattended in the car.
Please note the notes on the simultaneous use of an electronic key and a smart card (Chapter Locks, keys and locks. Smart card. Single lock).
Before launch
Apply the parking brake.
Move the AT selector lever to position «R» / «N»
Launch
Press the brake pedal.
Briefly press the start/off button on the selector lever.
The starting process is carried out automatically until the engine starts, or for a certain time - the impulse start function.
During the starting process, press the brake pedal.
Do not press the accelerator pedal.
Repeat launch
Press the brake pedal.
Press the start/stop button on the AT selector lever until the engine starts.
During the starting process, press the brake pedal.
Do not press the accelerator pedal.
If the engine does not start after a long starting process, contact a workshop «Mercedes-Benz».
Note. Excessive starting attempts will drain the battery.
Emergency start of the engine by towing is not possible.
Shutdown
When the vehicle is stopped, move the AT selector lever to the position «R» or «N».
Press the start/stop button on the selector lever until the engine stops. When the driver's door is closed, the vehicle's electrical equipment is switched to the radio position (corresponds to position 1 of the electronic key in the ignition lock), and when open - to the zero position (corresponds to the position «The electronic key is removed from the ignition lock»).
Note. If, after turning off the engine, the selector lever was not moved to the position «R», when the driver's door is opened, a signal sounds and the multi-information display lights up «SELECT LEVER IN P» (SELECTOR LEVER POSITION «R»).
Move the AT selector lever to position «R».
Automatic transmission
Individual gears are switched on automatically depending on:
- selector lever positions AT with switching ranges 4, 3, 2 and 1
- selected switching program (W/S)
- accelerator pedal position
- movement speed.
The shift mechanism automatically adapts to the driver's individual driving style by shifting the shift points.
Shift point shifting is a continuous process, constantly taking into account the momentary operating and driving conditions, as well as the desires of the driver.
The automatic transmission responds to changing operating conditions with an adapted gearshift program.
Switching the selector lever AT is possible in position 2 of the ignition lock. To move the AT selector lever from the position «R» additionally apply the service brake.
Starting off
Press the service brake to release the AT selector lever. Release the parking brake.
Switch the AT selector lever when the engine is idling to one of the driving positions. Wait until the gear is fully engaged, especially when the engine is cold. This is confirmed by a slight jerk.
Release the service brake and depress the accelerator pedal.
Upshifting after a cold start
After starting a cold engine, gear shifting is performed at a higher engine speed than shifting at operating temperature.
Thus, the catalyst reaches its operating temperature earlier.
Accelerator pedal position
Light pressure on the accelerator pedal = earlier upshift.
«kickdown» - depressing the accelerator pedal, overcoming the point of resistance, maximum acceleration, shifting back to the lowest possible gear.
When the desired speed is reached, release the accelerator pedal - again there is a shift to a higher gear.
Stopping the car
Leave the selector lever in the drive position «D» or «R» and with the help of a service or parking brake, insure the car from moving forward, and on the rise - from rolling back.
Maneuvering
When maneuvering in confined spaces, adjust the speed by releasing the service brake in a controlled manner. Depress the accelerator pedal only slightly, do not play with it.
Parking
There is a risk of injury!
When carrying out work on the car with the engine running, press the parking brake pedal and move the AT selector lever to the position «R».
- Depress the parking brake pedal.
- Move the AT selector lever to position «R».
- On steep ascents or descents, turn the front wheels towards the sidewalk curb, being careful not to damage the tires.
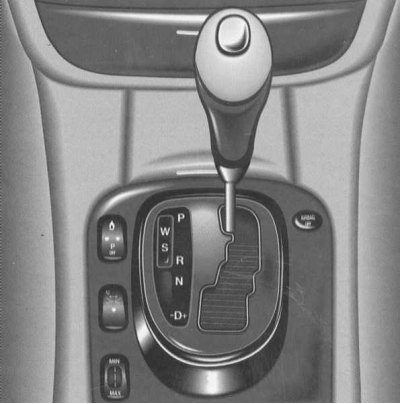
Selector lever positions AT

The current position of the automatic transmission selector lever is indicated on the dashboard display.
P Park lock
Additional car protection when parking. Turn on only after the car has come to a complete stop.
Note. The electronic key can only be removed in position «R» selector lever AT.
With the electronic key removed, the AT selector lever is locked in position «R».
R Reverse gear
Turn on only after the car has come to a complete stop.
N Neutral position
There is no transmission of torque from the engine to the drive wheels. With the brakes released, the car can move freely (pushing, towing).
Do not shift to position while driving «N», it may damage the transmission.
If the EPS system function is disabled or malfunctioning:
Only when the vehicle is in danger of skidding is it allowed to switch to position «N» (for example, in winter on a slippery road).
«D» All 5 forward gears available The mode is designed for all normal forward driving conditions.
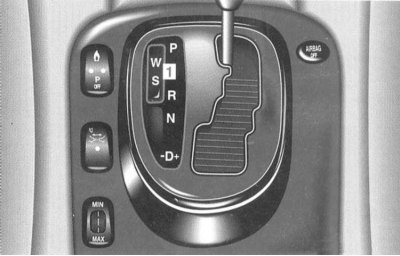
Switching ranges for special operating conditions
Pregnant «D» selector lever AT shift ranges for special operating conditions are selected by lightly pressing or pushing the selector lever to the left or right.
The included switching range is indicated on the dashboard.
Lightly press the selector lever in the direction —: Shifts one range each time in the sequence D, 4, 3, 2, 1.
Press the selector lever in the direction - and keep it pressed: The shift range changes to the currently engaged AT gear. If driving is already taking place in the highest possible gear of the currently engaged shift range, shifting is only carried out to the next lower shift range.
Note. If the selector lever is moved in the direction - at too high a speed, downshifting will not take place. This prevents exceeding the permissible engine speed.
Lightly press the selector lever in the + direction: Switching is performed from the currently selected shift range to the next higher shift range.
Press the selector lever in the + direction and keep it pressed: Shifting is carried out from the currently selected shift range directly to the position «D».
Note. If the transmission is in shift range «D», you can shift up one gear by pushing the selector lever lightly in the + direction.
There is a risk of skidding!
On slippery roads, do not downshift to slow down. The drive tires may lose traction.
Switching ranges:
- 4 Shift only up to 4th gear.
- 3 Shift only up to 3rd gear.
In this position, the braking action of the engine can be used.
- 2 Shift only up to 2nd gear.
The mode is intended for driving on steep passes, in the mountains, in difficult operating conditions, and also as a brake position on especially steep descents.
- 1 1st gear.
Braking position for driving on particularly steep descents and long passes.
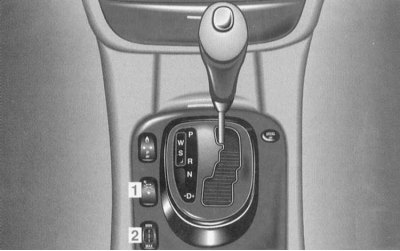
Program switch
Push switch «W/S» -1- switching between programs «W» And «S».
The selected program is displayed on the dashboard.
«S» Standard mode
The mode is provided for all normal driving conditions.
«W» Winter mode
Starting forward and backward occurs in 2nd gear.
Upshifting and downshifting is performed by pressing the accelerator pedal hard at lower road speeds and lower engine speeds than in the program «S».
At the position «kickdown» accelerator pedal upshifting and downshifting is performed as in the program «S».
Emergency mode
If, while driving, the transmission can no longer be shifted and retains the selected gear even under changed operating conditions, the transmission is in emergency mode.
To enable further movement, 2nd gear or 2nd reverse gear can be engaged. The sequence of actions in this case is as follows:
Stop the car.
Move the AT selector lever to position «R».
Turn the electronic key in the ignition switch to position 0.
Wait at least 10 seconds.
Start the engine.
Move the AT selector lever to the position «D»: 2nd gear engaged.
Move the AT selector lever to the position «R»: Contact a workshop immediately «Mercedes-Benz» to check the transmission.
Parking brake
There is a danger of an accident!
Do not leave children unattended in the car. They can release the parking brake.
Applying the parking brake: Depress the parking brake pedal firmly. The parking brake is applied.
On the dashboard, when the parking brake is applied, the brake system warning lamp lights up.
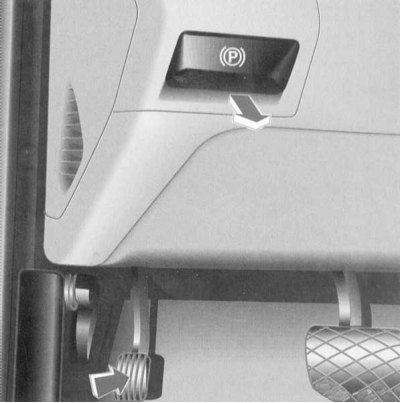
Release: Pull the handle towards you. The parking brake is released instantly - the car can immediately move off.
The brake warning light on the dashboard goes out when the engine is running.
Note. When starting off with the parking brake applied, a warning horn sounds - release the parking brake.
If the brake warning light stays on when the parking brake is released and the engine is running, refer to «Brake warning lamp» (Chapter Warning and indicator lamps, as well as messages of the multi-information display about the registered malfunctions).
Driving tips
Control pedals
There is a danger of an accident!
In no case do not limit the freedom of control of the pedals. There must be no objects in the driver's footwell. When using foot mats or carpets, ensure that there is sufficient space and that they are securely fastened.
Traffic and parking
Fire hazard!
When driving or when parking, make sure that the components of the exhaust system do not come into contact with flammable material.
Warming up the engine to operating temperature
After starting off, quickly warm up the engine to operating temperature. Only then can the load be brought to full power.
Starting off
Starting off on slippery ground:
Be sure to avoid prolonged scrolling of one of the drive wheels. This could damage the transmission.
Steering
There is a danger of an accident!
When the engine is not running, the power steering does not work. In this case, much more effort is required to control.
Brakes
There is a danger of an accident!
The service brake booster only works when the engine is running. It should be noted that when the engine is not running, much more effort is required for braking.
On long and steep descents, it is recommended to unload the brakes by shifting the transmission to a lower gear - select shift ranges 3, 2 or 1.
This prevents overheating of the brakes and reduces brake lining wear.
After an increased load on the brakes, it is recommended that you do not immediately park the car, but first continue driving for some time in order to cool the brakes faster with oncoming air flow.
If you drive without braking for a long time in heavy rain, it may happen that there will be some delay during the first braking and you will have to apply the brake with more force. Therefore, keep a greater than usual distance from vehicles moving in front of you.
To prevent corrosion on the brake discs, before parking the vehicle after driving on a wet road, especially if it has been sprinkled with de-icing agent, press the brake firmly to dry the brake discs by heating.
Service brake
With relatively low operating loads on the brake system, from time to time you should verify its effectiveness by short, strong braking at a higher speed. This improves the adhesion of the brake linings.
Ensure that braking does not endanger other road users!
If the control lamp of the brake system lights up when the parking brake is released, refer to Section Warning and indicator lamps, as well as messages of the multi-information display about the registered malfunctions.
Install only brake pads approved by us!
The installation of brake pads not approved by us can adversely affect the braking process of the car, significantly reducing safety.
Shutting off the fuel supply in forced idle mode
In forced idle mode, the fuel supply is interrupted if the accelerator pedal is fully released.
Engine malfunctions
During unstable engine operation (e.g. in the event of a misfire) unburned fuel can enter the catalytic converter and cause thermal damage.
In the event of misfiring, only short-term operation of the engine at light load is allowed (at low speed).
The fault must be repaired immediately at a workshop «Mercedes-Benz».
Aquaplaning
Depending on the water level on the road, despite sufficient tire tread depth and low driving speed, hydroplaning may occur. When it rains, brake carefully and avoid driving in a rut.
Tire grip
While on a dry road the vehicle is fully steerable at a certain speed, when driving on a wet or icy road, the speed must be reduced accordingly in order to achieve the same degree of driving safety.
Already at temperatures close to the freezing point, you should especially carefully monitor the condition of the road surface.
If there is ice on the road (e.g. due to fog), when braking on ice, a thin water film is quickly formed, which significantly reduces the coefficient of adhesion of tires to the road. Take extra care in this weather.
In winter, it is recommended to use M + S tires (with a tread for driving on muddy and snowy roads). In icy conditions and on slippery snow, they can reduce the stopping distance compared to tires with a summer tread pattern.
Tires
There is a danger of an accident!
Be sure to adhere to the prescribed tire pressures.
This is especially important for tires operating under extreme conditions such as high speed, full load and high outside temperatures.
Avoid severe tire wear. With a tread height of less than 3 mm, the wet grip coefficient of tires is sharply reduced.
The grip coefficient of tires with the road varies significantly depending on the weather or the condition of the road surface.
Trips abroad
Extensive network of maintenance stations «Mercedes-Benz» available abroad. Relevant service station lists «Mercedes-Benz» can be requested at any service station «Mercedes-Benz».
In some countries, only low-octane fuel grades are sold.
In countries with a driving order that differs from the driving order in the country where the vehicle is approved, it is necessary to switch the headlights to symmetrical dipped beam or partially tape them (Chapter Replacing incandescent lamps).
This reduces the glare of oncoming vehicles.
Winter operation
Before the onset of winter, it is recommended to contact the service station «Mercedes-Benz» in order to prepare the car for operation in the winter.
Change the engine oil: if the oil filled is not approved for winter use.
Check the concentration of antifreeze with anti-corrosion additives.
Windshield washer and headlamp cleaner: Add glass washer concentrate to the water «MB» (refer to Chapter Specifications Current service).
Battery monitoring: When the temperature drops, the capacity of the battery drops. Only a well-charged battery ensures a reliable engine start even at low temperatures.
Tires: In winter, we recommend using M + S tires on all wheels (with a tread for driving on muddy and snowy roads). The maximum driving speed for M + S tyres, as well as the legally prescribed maximum speed, must be observed!
Note. When operating the car in winter, the maximum effect of the electronic traction control system (ESP) only achieved with M + S tires and, if necessary, snow chains.
Tips for driving in icy conditions
The most important rule when driving in icy conditions: Drive carefully, avoid sudden acceleration, braking and steering maneuvers.
If the vehicle is in danger of skidding, or if the vehicle cannot be stopped at low speed, move the automatic transmission selector lever to position «N».
Use the steering wheel to try to keep the car under control.
When driving in deep snow, we recommend increasing the vehicle's ground clearance (subsection «ride height control»).
Defrost agents used on roads can have a negative effect on braking performance. Therefore, more force may be required to achieve the habitual braking action.
For this reason, we recommend that you repeatedly press the brake pedal when driving for a long time on roads strewn with defrosting agents. In this way, the inhibitory effect reduced by the defrosting agents can be normalized again.
Make sure that braking does not endanger other road users!
If, after driving on roads sprinkled with defrosting agents, the vehicle is parked, the braking effect should be checked as soon as possible, with due care, before continuing the journey. If there is a noticeable decrease in braking efficiency, it can be restored by repeatedly depressing the brake pedal.
Anti-skid chains
Only use snow chains that have been tested and approved by us.
Any maintenance station will provide information on this issue «Mercedes-Benz».
Note. Models with tires 245/45 R18.
To facilitate the installation of snow chains, it is recommended to increase the vehicle's ground clearance (below in this section).
Attention! Snow chains are only permitted on certain wheel and tire combinations. (See Specifications for more details).
Apply snow chains to the rear wheels only (main bridge). Follow the manufacturer's installation instructions.
Maximum travel speed (50 km/h) allowed only on snow.
On snow-free roads, the snow chains should be removed as soon as possible. (Recommendations for driving in icy conditions are given above).
When using snow chains, the ESP traction control function can be disabled (see below).
Trailer towing
There is a danger of injury and accidents!
When hitching and unhitching a trailer, use the utmost care and diligence.
When the vehicle is reversing, no persons must be between the vehicle and the trailer!
Trailers with an overrun braking system must not be disconnected in a state of overrun.
Incorrect coupling of the trailer to the towing vehicle poses a risk of the trailer coming off.
Do not exceed the maximum drawbar load, the permissible tow load and the permissible rear axle load of the vehicle.
The installation instructions for the tow hitch with detachable ball head must be strictly observed.
When operating with a trailer, it must be taken into account that the dynamic properties in this case differ markedly from the dynamic properties of a vehicle without a trailer.
A trailer combination is heavier, has limited acceleration and climbing ability, and a longer stopping distance. It reacts more sensitively to crosswind gusts, etc. and requires more careful driving.
Fuel consumption when driving a car with a trailer naturally increases.
When loading a trailer, make sure that the gross weight of the trailer and the permissible weight of the load towed by the vehicle together with the towing device are not exceeded (Specifications).
Permissible values are indicated in the vehicle passports and on the nameplates of the tow hitch and trailer.
The lowest value is valid.
In addition, the permissible load of the trailer drawbar on the ball head of the tow hitch must not be exceeded.
The maximum bearing load is indicated in the Specifications or on the adhesive plate. It must not exceed the value indicated on the nameplates of the tow hitch and the trailer.
We recommend using a maximum drawbar load on the trailer drawbar, however, of at least 50 kg.
According to the drawbar load, the load weight in the vehicle must be reduced in order to avoid exceeding the permissible load on the rear axle.
It is recommended not to exceed the maximum speed of 80 km/h, incl. and in countries that allow higher speeds.
Harsh braking should be avoided as much as possible and should be applied lightly at first in order to roll the trailer onto the tractor. Then gradually increase the braking force.
If the trailer begins to wobble, slow down, do not turn the steering wheel against the skid and, if necessary, brake. Don't ever try «draw out» composition by increasing the speed of movement.
The values for hill-climbing capability given in the Specifications refer to sea level. When driving in the mountains, it must be remembered that as the altitude increases, the engine power and, consequently, the ability to overcome the slope when starting from a standstill, decreases.
Note. Trailers with an overrun braking system must not be disconnected in a state of overrun. Damage to the bumper may occur due to the reverse motion of the inertial braking system.
Tempostat
The cruise control allows you to operate without fatigue, as it automatically maintains the set speed by actively depressing and releasing the accelerator pedal.
The tempostat switch lever on the steering column can be used to select and activate the tempostat or variable speed limiter.
The selected system, tempostat or variable speed limiter is indicated by the LIM indicator on the tempostat switch lever:
- Tempostat: The LIM indicator on the tempostat switch lever is off.
- Variable speed limiter: LIM indicator on the tempostat switch lever is on - refer to subsection «Variable speed limiter».
There is a danger of an accident!
The driver is always responsible for driving speed. The tempostat is only an aid to the driver.
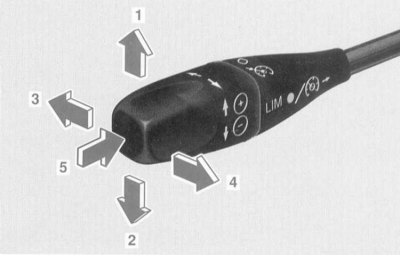
- 1 Recording the speed of movement - lightly press the lever of the cruise control switch.
Acceleration - keep the tempostat switch lever pressed.
Accurate setting in steps of 1 km/h - briefly press the tempostat switch lever.
- 2 Recording the speed of movement - lightly press the lever of the cruise control switch.
Decreasing speed - keep the switch lever pressed.
Fine-tuning in steps of 1 km/h - briefly press the switch lever.
- 3 Shutdown - lightly press the switch lever.
The limited speed remains memorized.
- 4 Recall the memorized speed - lightly press the cruise control switch lever.
- 5 Switching between variable speed limiter and cruise control - press the switch lever.
The tempostat is selected if the LIM indicator on the tempostat switch lever is off.
The variable speed limiter is selected if the LIM indicator on the cruise control switch lever is on.
There is a danger of an accident!
The tempostat function does not automatically adapt to the road conditions, so the tempostat cannot be used, for example, in icy conditions.
It is possible to write to the memory of any speed above 40 km / h:
Switching from variable speed limiter to tempostat. The LIM indicator on the tempostat switch lever must be off. If necessary, press the tempostat switch lever in direction -5-.
Pick up the desired speed by depressing the accelerator pedal.
Lightly press the tempostat switch lever in direction -1- or -2-. The speed is memorized.
The memorized speed is indicated on the multi-information display, and the segments from the memorized speed to the maximum speed light up on the speedometer.
Release the accelerator pedal.
Note. When the speed of the vehicle is increased by pressing the tempostat switch lever in the direction -1- or the speed is reduced in the direction -2- after releasing the tempostat switch lever, the speed is stored in the memory.
Precise setting in steps of 1 km/h:
- Increasing speed - the tempostat switch lever is slightly pressed in the direction -1-.
- Speed reduction — the lever of the tempostat switch slightly press in the direction -2-.
Recalling the entered speed from memory:
- From a driving speed of approx. 40 km/h, the entered speed can be recalled.
- Lightly press the switch lever in direction -4-.
The memorized speed is indicated on the multi-information display, and the segments from the memorized speed to the maximum speed light up on the speedometer.
Select the memorized speed only if the driver remembers it well and intends to recall it again.
Note. Turning the electronic key in the ignition switch to position 1 or 0 resets the memorized speed.
Switching off: Briefly press the tempostat switch lever in the direction -3- or -5-, the speed remains in the memory.
When pressed in the -5- direction, the LIM indicator on the cruise control switch lever lights up - the variable speed limiter is selected.
The tempostat is also switched off when the brake pedal is pressed.
If the segments on the speedometer begin to flash, the tempostat is switched off, for example, if the AT selector lever is switched to the position while driving «N» or hydroplaning.
Note. On uphill or downhill slopes, the speedostat reduces the deviation from the speed selected by the driver by shifting the gearbox to a lower gear. Despite this, it is possible that the set speed cannot be maintained.
After overcoming such a section, the memorized speed is automatically set and the transmission returns to its previous position.
If the speed of the car is reduced by pressing the lever of the cruise control switch in the direction -2-, then if the speed is not sufficiently reduced, the transmission is switched to 4th or 3rd gear.
For a short-term increase in driving speed (e.g. for overtaking) - press the accelerator pedal. If the accelerator pedal is released again, the memorized speed is set again.
Use the cruise control only if the road conditions permit a steady speed.
The multi-information display turns on «CRUISE CONTROL - - -» (TEMPOSTAT - - -) when trying to memorize a speed below 40 km/h or when recalling an unrecorded speed from the memory, the tempostat remains on.
If the tempostat malfunctions, refer to Section Warning and indicator lamps, as well as messages of the multi-information display about the registered malfunctions.
Safe distance system «Distronic» (DTR)
If there is no vehicle in front, the system «Distronic» (DTR) functions like a normal tempostat. It allows you fatigue-free driving as it automatically maintains the set speed.
If the distance sensor detects a vehicle ahead at a slower speed, your vehicle speed is reduced and the vehicle in front continues to follow the set distance.
With the lever of the tempostat switch on the steering column, the system can be selected and activated «Distronic» (DTR) or variable speed limiter (system «Speedtronic»).
Indication of the selected system, system «Distronic» or a variable speed limiter, is produced by the LIM indicator on the tempostat switch lever:
System «Distronic»:
The LIM indicator on the tempostat switch lever is off.
Variable speed limiter: LIM indicator on the cruise control switch lever is on (refer to Variable Speed Limiter).
There is a danger of an accident!
The driver is always responsible for driving speed and maintaining the required distance from the vehicle in front. System «Distronic» is only an aid.

- 1 Recording the speed of movement - lightly press the lever of the cruise control switch.
Increasing the selected speed to the next ten km / h - briefly press the cruise control switch lever or keep it pressed.
- 2 Recording the speed of movement - lightly press the lever of the cruise control switch.
Reducing the selected speed to the next ten 10 km / h - briefly press the cruise control switch lever or keep it pressed.
- 3 Shutdown - lightly press the switch lever.
The limited speed remains memorized.
- 4 Recall the memorized speed - lightly press the cruise control switch lever.
Fine-tuning, increasing the selected speed in steps of 1 km / h - briefly press the cruise control switch lever or keep it pressed.
- 5 Switching between variable speed limiter and system «Distronic» - press the switch lever.
System «Distronic» is selected if the LIM indicator on the tempostat switch lever is off.
The variable speed limiter is selected if the LIM indicator on the cruise control switch lever is on. (The variable speed limiter is described below).
Inclusion
There is a danger of an accident!
System function «Distronic» does not automatically adapt to road conditions and therefore the system cannot be used «Distronic», for example, with icy conditions.
Any driving speed can be memorized from approximately 40 km/h to 160 km/h: Switching from variable speed limiter to system «Distronic».
The LIM indicator on the tempostat switch lever must be off. If necessary, press the tempostat switch lever in direction -5-.
Pick up the desired speed by depressing the accelerator pedal.
Lightly press the tempostat switch lever in direction -1- or -2-. The speed is memorized.
The memorized speed is indicated on the multi-information display, and one or two segments in the range of the memorized speed light up on the speedometer.
Release the accelerator pedal.
Note. If the tempostat switch lever is kept pressed in direction -1- or -2-, the vehicle speed is increased or decreased in steps of 10 km/h until the tempostat switch lever is released.
Precise control in steps of 1 km/h: Increasing the selected speed - press the cruise control switch lightly in direction -4-.
Note. If the cruise control lever is kept pressed in direction -4-, the vehicle speed is increased in 1 km/h increments until the cruise control lever is released.
Recalling the entered speed: From a driving speed of approx. 40 km/h up to approx. 160 km/h, the entered speed can be recalled.
Lightly press the switch lever in direction -4-.
The memorized speed is indicated on the multi-information display, and one or two segments in the range of the recorded speed light up on the speedometer.
Select the memorized speed only if the driver remembers it well and intends to recall it again.
Note. Turning the electronic key in the ignition switch to position 1 or 0 resets the memorized speed.
If the electronic traction control system (ESP) off, turn on the system «Distronic» (DTR) impossible.
When the ESP traction control function is enabled, the system «Distronic» turns off - the yellow warning signal lamp on the speedometer lights up. Additionally, an audible signal sounds.
Invalid start attempts: If an invalid start attempt occurs, the multi-information display will show «- - -».
Invalid inclusion attempts, for example, are:
- Switching on outside the speed range of approximately 40 to 160 km/h.
- Switching on when the automatic transmission selector lever is in position «R», «R» or «N».
- Switching on during the braking of the car by the driver.
- Switching on by briefly pressing the tempostat switch lever in the direction -4-, although the speed has not been entered into the memory.
In the event of a malfunction or defect in the system «Distronic» follow the subsection System «Distronic» (DTR) Section Warning and indicator lamps, as well as messages of the multi-information display about the registered malfunctions.
Shutdown
Briefly press the tempostat switch lever in the direction -3- or -5-, the speed remains in the memory.
When pressed in the -5- direction, the LIM indicator on the cruise control switch lever lights up - the variable speed limiter is selected.
System «Distronic» also turns off:
- when pressing the brake pedal;
- when the vehicle speed drops below 40 km/h due to the vehicle in front;
- when switching the AT selector lever to the position «N»;
- when the function of the electronic traction control system ESP is turned on;
- when accelerating the car to a speed of over 160 km.
Driving a car
When the electronic key is turned in the ignition switch to position 2, the system warning lamp lights up on the speedometer «Distronic». It goes off when the engine is running.
System «Distronic» off: Distance measurement to the vehicle in front, continues even if the system «Distronic» off.
There is a danger of an accident!
If the system warning light «Distronic» lights up on the speedometer while driving, which means that the distance to the vehicle in front is too small. In addition, a double horn sounds if there is a risk of collision.
It is necessary to increase the distance to the vehicle in front.
Failure to keep a distance from the vehicle in front increases the risk of an accident.
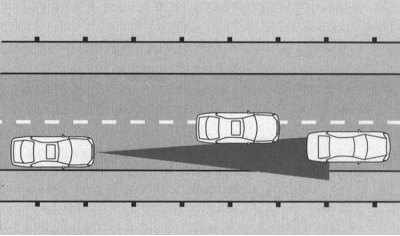
System «Distronic» on: If the distance sensor detects a slower vehicle in front, your vehicle speed is reduced and the vehicle continues to drive at the set distance to the vehicle in front.
Segments on the speedometer light up from the speed of the vehicle in front to the speed selected by the driver.
There is a risk of injury!
System «Distronic» performs automatic braking to achieve a predetermined distance to the vehicle in front or to maintain speed. The brake pedal is then pulled in.
The foot must not be on the brake pedal - there is a danger of pinching the foot.
In the event of a sudden, slower moving obstacle (e.g. when the vehicle in front changes lane) system «Distronic» produces a deceleration of up to 2 m/s2, which corresponds to approximately 20% of the maximum possible deceleration of the car.
There is a danger of an accident!
If the system warning light «Distronic» lights up on the speedometer while driving and a double beep sounds, then a stronger deceleration is required.
Use the service brake to slow down the vehicle.
On ascents or descents, the system «Distronic» reduces deviation from the driver's chosen speed by braking and shifting the transmission to a lower gear. After overcoming such a section, the transmission returns to its previous position.
For a short-term increase in driving speed (e.g. for overtaking) - press the accelerator pedal. If the accelerator pedal is released again, the memorized speed is set again.
If, due to the regulation of the distance to the vehicle in front, the system «Distronic» the vehicle speed drops below 40 km/h, or if the vehicle speed exceeds 160 km/h, the system «Distronic» turns off. Additionally, an audible signal sounds.
Recommendations for driving a car using the system «Distronic»
There is a danger of an accident!
Failing to recognize obstacles (e.g. a vehicle in front) system «Distronic» adjusts until the speed selected by the driver is reached. Consequently:
When changing lanes from the left to the right, your vehicle will continue to overtake vehicles moving in the left lane on the right, in the lane leading to the freeway exit, your vehicle will continue to accelerate to the speed selected by the driver.
Below is a description of some of the motion situations that affect the operation of the system «Distronic».
The system is intended primarily for use on motorways or federal highways equivalent to them. The use of the system within cities is not recommended.
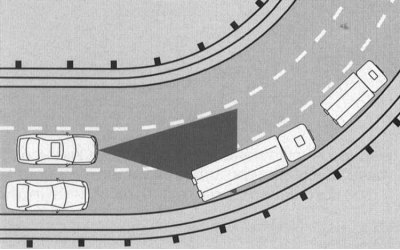
When cornering, entering or exiting a curve, it may be difficult to identify vehicles in front.
Offset traffic from the vehicle in front can make it difficult to identify it.

Vehicles that change lanes at a short distance into your lane can only be recognized after a complete lane change.
- 1 Switch - to turn off the warning sound of the distance to the vehicle in front
- 2 Set distance adjuster
If the system «Distronic» not switched on, the audible signal can be turned off using switch -1-.
Turning off the sound signal: Press the switch -1- at the top of the symbol. The control LED on the switch lights up.
Turning on the sound signal: Press the switch at the bottom -1-. The control LED on the switch goes out.
Setting the desired distance to the vehicle ahead: Turn the knob -2- towards MIN or MAX.
The time interval setting range is 1.0 to 2.0 seconds.
Note. Setting the time interval, for example, to 1.8 seconds, corresponds to the distance of half the speed of movement in meters.
Indication on the multi-information display
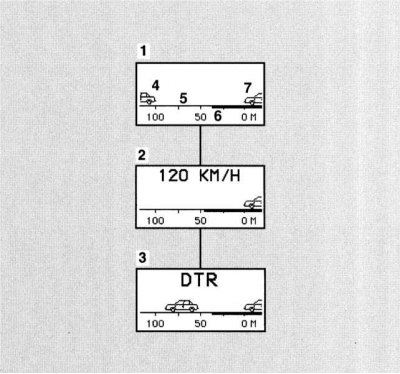
1 System «Distronic» off. The actual distance -5- and the set distance -6- to the vehicle ahead -4- are displayed
2 System «Distronic» turns on, the set speed is displayed for approximately 3 seconds
3 System «Distronic» enabled.
4 Vehicle ahead. Appears only if a vehicle ahead has been detected.
5 Actual distance to the vehicle in front
6 Target distance to the vehicle in front
7 Your car
Calling up the system display «Distronic»: Press the
System «Speedtronic»
Consists of variable and constant speed limiters.
The variable speed limiter helps you, by controlling the engine speed, not to exceed the set speed, for example during speed limits.
With the permanent speed limiter you can limit the maximum speed when driving with winter tyres.
The tempostat switch lever on the steering column can be used to select and activate the tempostat, system «Distronic» (DTR) or variable speed limiter.
Indication of the selected system, tempostat, system «Distronic» (DTR) or a variable speed limiter, is produced by the LIM indicator on the tempostat switch lever:
Variable Speed Limiter: The LIM indicator on the switch lever is on.
Tempostat or system «Distronic» (DTR): LIM indicator on the tempostat switch lever is off. (Tempostat and system «Distronic» discussed earlier in this section).
There is a danger of an accident!
The driver is always responsible for driving speed. System «Speedtronic» is only an aid to the driver.
Variable speed limiter

- 1 Activate the variable speed limiter - lightly press the cruise control switch lever.
Raising the limited speed - keep the tempostat switch lever pressed.
- 2 Activate the variable speed limiter - lightly press the cruise control switch lever.
Reducing the limited speed - keep the tempostat switch lever pressed.
- 3 Switching off the variable speed limiter - lightly press the cruise control switch lever.
The set speed limit remains in memory.
- 4 Recall the limited speed from the memory - slightly press the lever of the cruise control switch.
Accurate control, increasing the limited speed in steps of 1 km / h - briefly press the lever of the cruise control switch.
- 5 Switch between cruise control and variable speed limiter - press the cruise switch lever.
The variable speed limiter is selected if the LIM indicator on the cruise control switch lever is on.
Tempostat or system «Distronic» (DTR) is selected if the LIM indicator on the tempostat switch lever is off. (Tempostat and system «Distronic» discussed earlier in this section).
There is a danger of an accident!
If the variable speed limiter is activated, segments from the beginning of the scale to the set speed limit light up on the speedometer:
The set speed can only be exceeded in this case when the accelerator pedal is in position «kickdown».
Switching off the speed limiter:
Briefly press the switch lever in direction -3- or -5-.
All segments light up on the speedometer.
When pressed in direction -5-, the LIM indicator on the tempostat switch lever also goes out.
The speed limiter is also deactivated if the accelerator pedal is in position «kickdown» the speed of movement differs from the pre-set speed by no more than 20 km/h.
Use the speed limiter only if you do not foresee the need for sudden acceleration to a speed above the preset speed.
When changing the driver, for safety reasons, be sure to inform him of the set speed.
Unlike tempostat or system «Distronic» the variable speed limiter is not disengaged by depressing the brake pedal.
There is a risk of injury!
Models with the system «Distronic»: To prevent exceeding the set speed limit, the system «Distronic» performs automatic braking. The brake pedal is then pulled in.
The foot must not be under the brake pedal - there is a danger of crushing the foot.
Switching/Activation
Start the engine.
When the engine is running, it is possible to limit any speed above 30 km / h for vehicles with a system «Distronic».
Switching from tempostat or system «Distronic» to the variable speed limiter.
The LIM indicator on the tempostat switch lever should be on. If necessary, press the tempostat switch lever in direction -5-.
Lightly press the switch lever in the direction (1, 2 or 4).
The variable speed limiter is activated.
The set speed limit is indicated on the multi-information display, and the segments from the beginning of the scale to the set speed limit light up on the speedometer.
Direction -1-: The current driving speed is stored as the new speed limit; this rounds up to the next higher ten. By further slight pressing or holding the lever, the set limited speed is increased.
Direction -2-: The current speed is stored as the new speed limit; this rounds off to the next lower ten. By further slight pressing or holding the lever, the set limited speed is reduced.
Direction -4-: The memorized last speed limit is activated if the driving speed exceeds the memorized speed limit by no more than 30 km/h.
By further slight pressing or holding the lever, the set speed limit is increased in steps of 1 km/h.
Deactivation
Lightly push the selector lever in direction -3- or push in direction -5-.
All segments light up on the speedometer.
When pressed in direction -5-, the LIM indicator on the tempostat switch lever goes out.
The speed limiter is also deactivated if the accelerator pedal is in position «kickdown» the speed of movement differs from the pre-set speed by no more than 20 km/h.
Note. Depending on the design, slight deviations of the speedometer readings from those set by the speed limiter are possible.
In the event of a malfunction of the variable speed limiter - refer to subsection «Speedtronic», section Warning and indicator lamps, as well as messages of the multi-information display about the registered malfunctions).
Models without a system «Distronic» (DTR)
If the speed limiter cannot maintain the set speed (e.g. downhill), a beep sounds and the multi-information display flashes for about 5 seconds «LIMIT EXCEEDED» (LIMIT EXCEEDED).
The segments on the speedometer flash until the set speed limit is reached again.
Permanent speed limiter
When operating a vehicle with tires with a winter tread pattern, a permanent speed limiter can be set in the system menu «Individual installation» (Chapter Multifunction steering wheel, multi-information display) at a speed of 210 km / h.
When the permanent speed limiter is on, the speedometer lights up segments from zero to 210 km/h.
Shortly before reaching the set speed limit, its value is displayed on the multi-information display.
Note. In the event of a malfunction of the constant speed limiter, refer to subsection «Speedtronic» Section Warning and indicator lamps, as well as messages of the multi-information display about the registered malfunctions).
Emergency brake booster (BAS) (Brake Assist)
There is a danger of an accident!
Driving at excessive speeds, especially when cornering, hydroplaning and not keeping a good distance from the vehicles in front increase the risk of an accident. This risk cannot be reduced with BAS.
BAS helps you shorten your stopping distance when braking in hazardous driving situations and allows you to take full advantage of the anti-lock braking system (ABS).
When the brake pedal is depressed very quickly, BAS provides maximum brake boost. To achieve the shortest possible braking distance, do not reduce the force of your foot, but continue to press the brake pedal.
When you release the brake pedal, BAS turns off; the normal function of the service brake remains available as usual.
Anti-lock braking system (ABS)
There is a danger of an accident!
Driving at excessive speeds, especially when cornering, hydroplaning and not keeping a good distance from the vehicles in front increase the risk of an accident. This risk cannot be reduced by the ABS system either.
If the electronic key in the ignition switch is in position 2, the ABS warning lamp is on. It goes off when the engine is running.
If the control lamp of system ABS on a dashboard at the working engine constantly burns — address to the Section Warning and indicator lamps, as well as messages of the multi-information display about the registered malfunctions.
The ABS system prevents the wheels from locking, regardless of road conditions, from a speed of approximately 8 km/h.
If one of the wheels reaches the limit of blocking during braking, then due to the control of the brake pressure using ABS, the vibration of the car and a slight pulsation of the brake pedal are felt. In this way, the driver is notified of the transition to regulation using ABS.
If further braking is necessary, do not reduce foot pressure on the pedal. Thus, the advantage of the ABS system is used - braking while maintaining controllability of the car.
If full braking is required, depress the brake pedal with full force, thereby providing control mode using the ABS system.
If the road is slippery, such as icy or snowy conditions, the system may be activated already at low braking force. The resulting pulsation of the brake pedal indicates that the driving style must be adapted to difficult road conditions.
Electronic traction control (ESP)
Electronic traction control (ESP) increases the stability of the vehicle and the ability to transmit traction in all modes of operation.
By braking the wheels, counteraction to skidding or insufficient vehicle controllability is created. At the same time, the warning signal lamp on the speedometer flashes.
There is a danger of an accident!
If the warning light on the speedometer flashes, adjust the driving mode to the road conditions.
Driving too fast increases the risk of an accident. This risk cannot be reduced by the ESP system either.
If the electronic key in the ignition switch is in position 2, the warning light on the speedometer lights up. It goes off when the engine is running.
Turning off the ESP traction control function
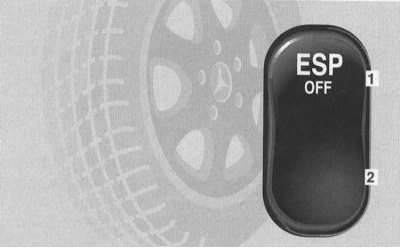
The switch is located on the center console.
Push switch:
- 1 Shutdown
- 2 Turn on
When driving with snow chains, in deep snow, sand or gravel, turning off the traction control system can play a positive role. In this case, the engine torque is not limited and the drive wheels can spin, creating a milling action.
To switch off, press the ESP system switch at the top -1-.
The warning light on the speedometer comes on.
The traction control function is also activated when one wheel reaches the limit of tire adhesion to the road, for example, when one-sided icy conditions.
The wheel is then braked to increase traction. This function works up to a speed of about 40 kph. It switches off at the latest at a speed of about 80 km/h.
The warning light on the speedometer will flash at any speed if the tires have reached their traction limit.
To return to normal driving mode, press the ESP system switch at the bottom -2-. The traction control system is ready to work again.
There is a danger of an accident!
If the warning light on the speedometer lights up: Adapt the driving mode to the road conditions.
If the warning light on the speedometer starts flashing: When starting off, depress the accelerator pedal only as far as necessary.
Release the accelerator pedal while driving.
Match the driving mode to the road conditions.
Do not turn off the traction control system.
Failure to follow these warnings increases the risk of an accident. There is a risk of the car skidding.
When towing with the front axle raised or checking the parking brake on the brake test stand, the engine must be off. Otherwise, due to the active braking action via the ESP system, the rear axle brake system may be damaged.
Note. In the event of a malfunction of the anti-lock braking system (ABS), the ESP system is also switched off.
When operating the car in winter, the maximum effect of the electronic traction control system (ESP) only achieved with tires «M+S» and, if necessary, snow chains.
If wheels with different tire sizes are used, the ESP system will not function properly.
If the electronic traction control system (ESP) off, turn on the system «Distronic» (DTR) impossible.
When you turn on the ESP traction control system, the system «Distronic» turns off - the yellow warning signal lamp on the speedometer lights up.
Vehicle ride height control
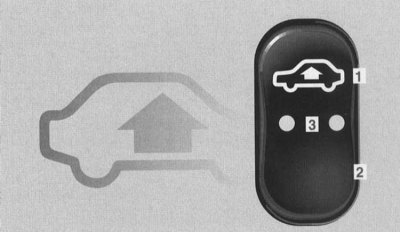
The switch is located on the center console.
Pressing the switch while the engine is running:
- 1 Increased ground clearance
- 2 Normal ground clearance
- 3 Control LEDs
The ground clearance of the vehicle is automatically adjusted depending on the set ground clearance («elevated» or «normal») and speed of movement. Thus, traffic safety is increased and fuel consumption is reduced.
At speeds above approximately 140 km/h, the vehicle's ride height is lowered to approximately 15 mm below normal. This is done regardless of the selected ride height. At speeds below approx. 70 km/h, normal ground clearance is restored.
Pressing the switch at the top -1-: Increased ground clearance, set, for example, when the road is bad. This raises the vehicle's ground clearance by approximately 25 mm. The control LEDs -3- light up. The multi-information display turns on «AIR SPRING, VEHICLE RISING» (AIR SUSPENSION, VEHICLE LIFTING!).
When the car is lifted, the indication turns off.
Note. When driving at speeds above about 120 km/h, or if the speed remains between 80 km/h and 120 km/h for about 5 minutes, setting «increased ground clearance» reset. The multi-information display turns on «AIR SPRING, LEVEL CANCELLED!’ (AIR SUSPENSION, ROAD CLEARANCE SELECTION RESET!).
If the vehicle speed does not reach these limits, the elevated ride height is stored even when the smart key is removed from the ignition.
Pressing the switch at the bottom -2-: Reduces the elevated ride height to normal. The control LEDs -3- go out.
Note. Warning system and fault signaling - refer to subsection «air suspension» Section Warning and indicator lamps, as well as messages of the multi-information display about the registered malfunctions).
Adaptive damping system (ADS)
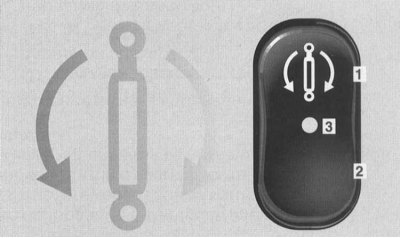
The switch is located on the center console.
Press the switch while the engine is running:
- 1 Sports damping program
- 2 Comfort damping program
- 3 Control LED
Optimal damping is automatically set depending on the selected damping program («sports» or «comfortable»), road condition and driving style.
Top switch -1- pressed: Sport damping program. Setting for a sporty driving style. The control LED -3- on the switch lights up and goes out.
Note. Selected damping program (1, 2) remains in memory even when the electronic key is removed from the ignition switch.
System «Parktronic» (PTS)
System «Parktronic» indicates to you optically and acoustically the distance between your vehicle and an obstacle.
If the smart key in the ignition switch is turned to position 2, the system «Parktronic» switches on automatically and remains activated up to a speed of approximately 15 km/h.
At a higher speed, the system «Parktronic» turns off automatically. At low speed, it automatically turns on again.
Activation of signaling devices with the corresponding control zone is carried out depending on the position of the automatic transmission selector lever.
AT selector lever position:
- «D» — signaling devices for the front zone are activated.
- «R», «N» — signaling devices for the front and rear zones are activated.
- «R» — signaling devices are deactivated.
There is a danger of an accident!
The driver is always responsible for parking and maneuvering in critical situations.
System «Parktronic» is an auxiliary system. It is not designed to replace the driver, and is not able to relieve him of the obligation to remain attentive.
System «Parktronic» can be turned off with a switch on the center console.
Sensors
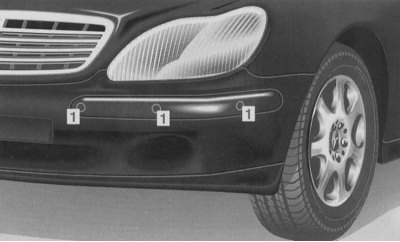
The immediate area is monitored by 6 sensors -1- on the front bumper and 4 sensors on the rear bumper.
Attention! To ensure full system performance «Parktronic» keep the sensors free of dirt, ice and snow at all times.
To this end, clean the sensors regularly and avoid scratching or damaging the sensors. (Cleaning system sensors «Parktronic» on bumpers - refer to the Head Body).
Signaling devices
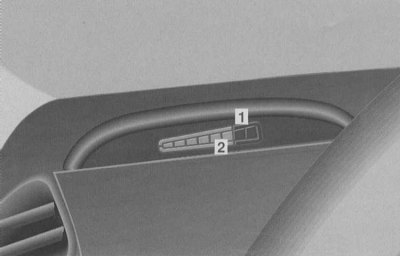
1 frame
2 segments
The distance between the sensor and the obstacle is shown to you by segments -2- of the signaling devices.
The warning lights for the front area are located on the instrument panel above the air vent on the driver's side and above the middle air vent.
The signaling devices for the rear area are located on the roof lining at the rear.
If the system «Parktronic» switched on, frames -1- are lit on the signaling devices.
The signaling devices are subdivided into 6 yellow and 2 red segments.
If the vehicle approaches an obstacle detected by the sensors, one or more segments light up depending on the distance. Starting from the seventh segment, an intermittent warning sound is additionally heard, and from the eighth segment, a continuous warning sound signal for a maximum of 3 seconds.
Range of sensors
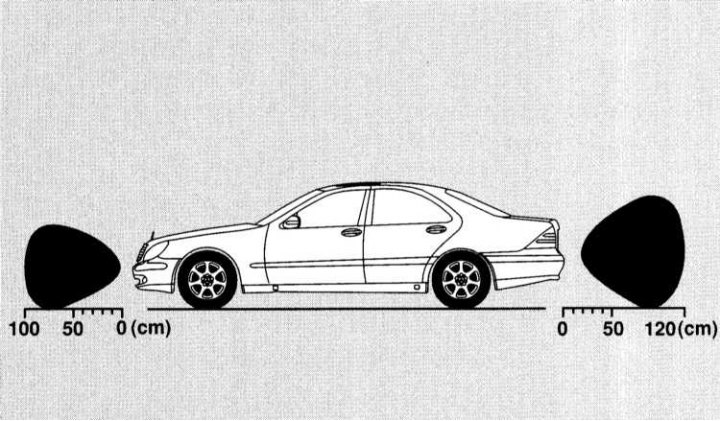
Front bumper:
- in the middle about 100 cm
- corners about 60 cm
Rear bumper:
- in the middle about 120 cm
- corners about 80 cm
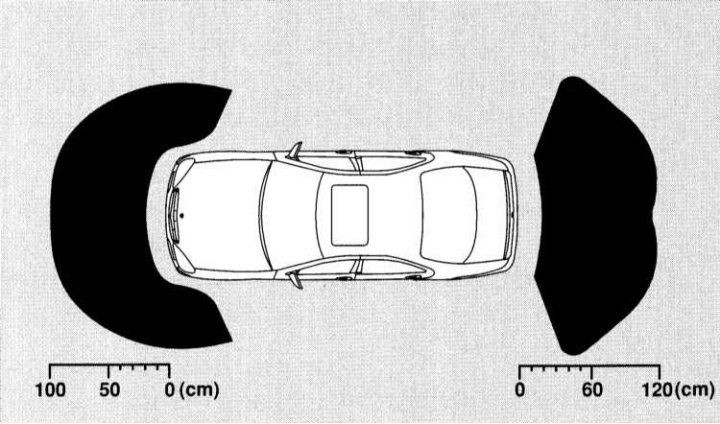
At these distances, the first yellow segment lights up. As the distance decreases, other segments light up.
Minimum distance between sensor and obstacle:
- front corners about 15cm
- about 20 cm in the middle
All yellow segments and one or both red segments light up. In addition, a warning tone sounds for approximately 3 seconds.
Further approach may cause the obstacle to no longer be displayed (segments do not light up).
There is a danger of an accident!
The driver is always responsible for parking and maneuvering in critical situations.
Ensure that there are no people or animals in the maneuvering area.
System «Parktronic» is an auxiliary system. It is not designed to replace the driver, and is not able to relieve him of the obligation to remain attentive. Therefore, the driver should continue to pay attention to the immediate surroundings of the vehicle when driving at low speed.
Attention! When parking, pay special attention to objects below or above the sensors, such as pedestals or trailer drawbars.
Similar items in close proximity (about 30cm), may not always be recognized by the system and thus may be damaged or cause damage to the vehicle.
System function «Parktronic» may be affected if the sensors are damaged or covered with mud, snow, ice and especially snow.
Interference from other sources of ultrasound, such as the air brakes of trucks or pneumatic hammers, cannot be completely excluded either.
It is possible that certain objects that may touch the front or rear of the vehicle will not be recognized by the system's sensors.
System shutdown «Parktronic»

The switch is located on the center console.
Push switch:
- 1 Shutdown
- 2 Turn on
- 3 Control LED - lights up when the system is turned off «Parktronic»
Switching on occurs automatically when the electronic key in the ignition switch is turned to position 2.
Trailer towing
If the power cable is plugged into the socket when towing a trailer, the rear protection function is not activated.
If the power cable is disconnected, the rear protection function is activated again.
Note. The trailer adapter with 7-pin plug must be unplugged after the trailer has been disconnected, otherwise the rear protection function remains inactive.
System malfunction «Parktronic»
In the event of a fault, only the red segments of all signaling devices light up.
The cause may be an extraneous ultrasound source or a dirty transducer. (Cleaning system sensors «Parktronic» on bumpers - refer to the Head Body).
After cleaning the sensors, turn the electronic key in the ignition switch back to position 2.
In the event of a fault, an additional warning tone sounds for approximately 3 seconds and the control LED on the system switch «Parktronic» lights up in the center console. The system is shutting down!
Contact a service station as soon as possible «Mercedes-Benz» to check the system «Parktronic».
Remote garage door opener
There is a danger of an accident!
Pressing one of the buttons on the transmitter of the built-in remote control in the interior rearview mirror is only allowed if there are no people or objects in the movement range of the garage door opener; Otherwise, there is a risk of injury to persons due to the opening door.
The remote control integrated in the interior rearview mirror can open or close up to three different door systems.
Note. Some garage door openers cannot be controlled by the built-in remote control. You can get more detailed information at your service station «Mercedes-Benz».
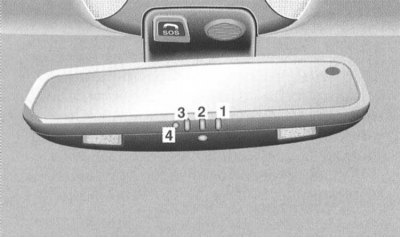
1 transmitter button
2 Transmitter button
3 Transmitter button
4 Control LED
Programming the built-in remote control
There is a danger of an accident!
During programming and when pressing the transmitter button of the built-in remote control in the interior rearview mirror, there should be no people or objects in the movement area of the door or garage door.
The garage door may begin to open or close and thus injure people.
The transmitter buttons -1-, -2- and -3- can be programmed.
Programming using the transmitter button -1- as an example: Turn the electronic key in the ignition switch to position 1 or 2.
Press the transmitter button -1- and keep it pressed until the control LED -4- flashes approximately once per second.
Keep the transmitter button -1- pressed.
Note.
The control LED -4- starts flashing immediately if one of the transmitter buttons is being programmed for the first time, or if the contents of the memory of the built-in remote control have been previously reset.
When reprogramming the programmed transmitter button, the control LED -4- starts flashing after approx. 20 seconds: Keep the portable garage door opener remote control pointing (transmitter output) on the left side of the interior rearview mirror. Press the transmitter button of the portable remote control until the control LED -4- flashes quickly.
The programming went well. Release the transmitter button -1-.
Opening/closing the garage door
The built-in remote control, after programming, takes on the properties of a portable remote control for the garage door opener system (refer to the relevant «Operation manual»).
- Turn the electronic key in the ignition switch to position 1 or 2.
- Press the desired transmitter button (1, 2 or 3) according to programming.
The garage door opens or closes.
Note. The transmitter works as long as the transmitter button is pressed. After a maximum of 20 seconds, the transmission process is interrupted and the control LED -4- starts flashing. If necessary, press the transmitter button again.
Resetting the built-in remote control memory
- Turn the electronic key in the ignition switch to position 1 or 2.
- Press the buttons -1- and -3- and keep them pressed for about 20 seconds until the control LED -4- flashes rapidly.
The contents of the memory have been reset.
Note. Before selling the vehicle, we recommend that you reset the internal remote control memory.
Gas stations: what you need to know when refueling
Refueling
Opening the fuel tank cap: turn to the left.
Insert the fuel tank cap into the holder on the inside of the fuel tank manhole cover. (Emergency unlocking of the fuel tank hatch cover - refer to Section Locks, keys and locks. Smart card. Single lock).
Fuel grades
Gasoline engine: unleaded gasoline EN 228.
Filling volume:
- Models without ski bag approx. 88 l, including fuel reserve approx. 11 l.
- Models with ski bag approx. 78 l, including fuel reserve approx. 10 l.
Fill the fuel tank only to the level at which the dispenser gun turns off - do not overfill it.
Fire hazard!
Fuel is highly flammable.
Open flames and smoking while handling fuel are prohibited.
Avoid getting fuel on skin or clothing.
Unhealthy!
Direct skin contact with fuel and inhalation of fuel vapors are harmful to health.
Engine oil
(Oil level control is discussed in Chapter Current service).
Difference between the lower and upper marks on the oil dipstick: approx. 2 liters.
(refer to Chapter Specifications Current service).
Tire pressure
Prescribed tire pressure - refer to the tire pressure chart on the inside of the fuel filler cap. Check tire pressure at least once every two weeks. (More detailed recommendations are given in Chapter Current service).