
Power windows
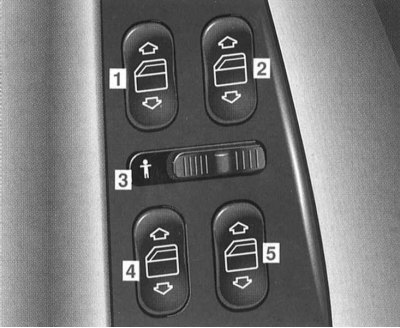
The central control panel is located on the driver's door
Switch:
- 1 front left power window
- 2 front right windows
- 3 blocking rear side windows
- 4 rear left power windows
- 5 rear right power window
There are switches for the respective glass on the front passenger door and on the rear doors.
Ignition key position 1 or 2.
Lowering the side windows: press the switch to the first point of resistance on
Raising the side windows: press the switch to the first point of resistance on
Release the switch when the desired position is reached.
Automatic lowering or raising of side windows
Press the switch on
To stop lowering or raising the side windows: press the switch on
If the glass encounters an obstacle at the top, the lifting process is interrupted and the glass lowers slightly.
If you continue to keep the switch pressed on
Note. The side windows can also be lowered and raised using the convenience opening/closing system (Chapter Locks, keys and locks. Smart card. Single lock).
There is a risk of injury!
When lifting the side windows, make sure that no one is crushed.
If the side windows are raised using the convenience closing system and encounter an obstacle, the automatic lowering will not take place.
In this case, press and hold the radio remote control unlock button or, on vehicles with KEYLESS-GO, pull the door handle until the side windows begin to roll down again.
Also, when leaving the vehicle for a short time, remove the electronic key from the ignition or take the smart card with you.
Locking rear side windows
There is a risk of injury!
If there are children in the rear of the passenger compartment, the switches on the rear doors should be blocked.
Move the switch -3- to the right until the symbol
Side window adjustment
If the voltage supply has been interrupted (disconnected clamps or discharged battery), the side windows can no longer be automatically lowered or raised. In this case, readjust the windows:
Press the switch on
Sliding and lifting top hatch
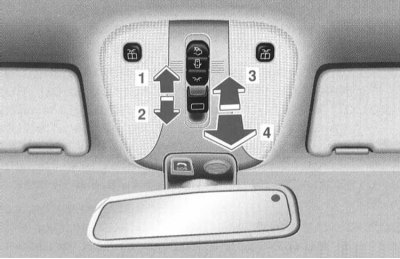
Push switch:
1 opening
2 Closing
3 Rise
4 Lowering
Turn the electronic key in the ignition switch to position 1 or 2.
Opening, closing, raising or lowering the sliding and lifting sunroof:
Push the switch in the required direction.
Release the switch when the desired position is reached.
Automatic control of sliding and lifting sunroof
Push the switch past the point of resistance in the desired direction and then release.
If the switch is pressed in the direction «opening», the sliding and lifting sunroof moves to the last set position. If a different position is required, press the switch again in the desired direction.
Stopping the sliding and lifting top hatch.
Push the switch in any direction.
If the sliding and lifting sunroof encounters an obstacle when closing or lowering, the process is interrupted and the sunroof opens slightly again.
There is a risk of injury!
When closing the sliding and lifting sunroof, make sure that no one is trapped.
If the sliding and lifting sunroof is closed with the convenience closing system and encounters an obstacle, automatic opening is not possible.
In this case, press and hold the radio remote control release button or, on vehicles with KEYLESS-GO, pull the door handle until the slide/lift sunroof begins to open again.
Also, when leaving the vehicle for a short time, remove the electronic key from the ignition or take the smart card with you.

When the sliding and lifting sunroof is opened, the sun screen also moves back.
The sunscreen can be pulled forward to block out the sun's rays when the sliding/tilting sunroof is closed or raised.
The roof sunroof sunscreen can be pushed back for better illumination.
Note. The sliding and tilting sunroof can also be opened and closed using the convenience opening/closing system (Chapter Locks, keys and locks. Smart card. Single lock).
To prevent damage to the sealing strips, do not carry objects with sharp edges protruding from the sliding and lifting sunroof.
Sliding and lifting sunroof adjustment
If the voltage supply has been interrupted (disconnected clamps or discharged battery), the sliding and lifting sunroof has been mechanically closed, the sliding and lifting sunroof opens jerkily or there has been a malfunction, the sliding and lifting sunroof must be readjusted:
Switch Push Direction «Climb» and wait until the slide-and-lift sunroof is fully raised and hold down for about 1 second.
Manual control of the sliding and lifting roof hatch
In the event of a malfunction of the electric drive, the sliding and lifting top hatch can also be closed and opened manually using a crank.
The drive of the sliding and lifting top hatch is located behind the cover.
Squeeze out the lens -1- of the ceiling (e.g. with a screwdriver).
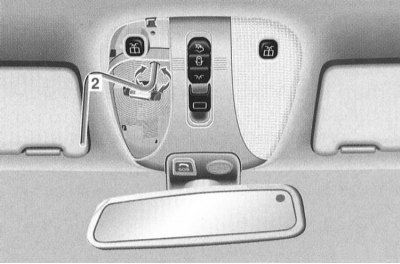
Turn the electronic key in the ignition switch to position 1 or 2.
Remove the collar from the folder for «Instruction manuals».
Insert the knob -2-.
Slide Forward - Rotate clockwise.
Lowering - Turn counterclockwise.
Slide Back - Rotate counterclockwise.
Raise - Rotate clockwise.
After mechanical closing, adjust the sliding and lifting top hatch.