
Front seat adjustment
There is a risk of injury!
Sitting positions that interfere with the correct fit of seat belts exacerbate risk factors and should therefore be avoided.
The backrest should be set almost vertically. The back should fit against the backrest, and the seat belt should fit against the shoulder area.
Set the head restraint so that the back of the head rests on it approximately at eye level.
When adjusting the seat position, ensure that no one is trapped.
Also, when leaving the vehicle for a short time, remove the electronic key from the ignition or take the smart card with you.
However, seat adjustment is also possible with one door open.
Therefore, do not leave children in the car unattended.
There is a danger of an accident!
For safety reasons, the seat position must not be changed while driving.
Turn the electronic key in the ignition switch to position 1 or 2.
With the driver's door open, the driver's seat can be adjusted with the smart key inserted.
The front passenger seat can also be adjusted with one door open.
Note. If you are adjusting the seat from a lying position or from a far-reclined position, make sure that the rear vanity mirrors are closed.
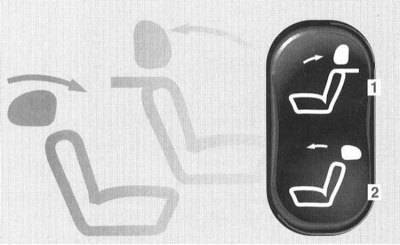
The switches are located in the front doors.
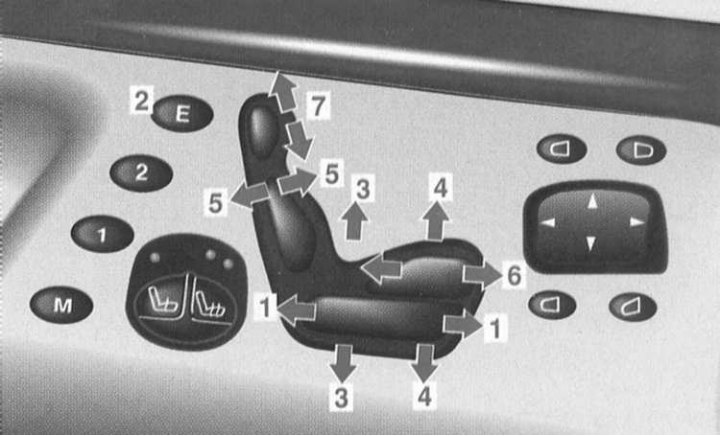
We recommend the basic adjustment as follows:
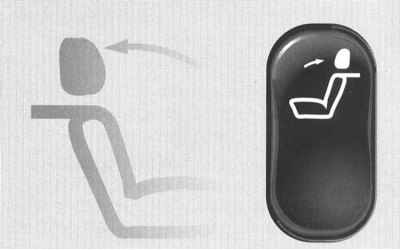
- 1 Longitudinal movement of the seat
Move the switch in the direction of the arrow until you can comfortably reach the accelerator pedal.
Note. If there are objects in the luggage net in the passenger's footwell, do not move the front passenger seat all the way forward - the luggage could be damaged.
- 2 Press button E
Car with memory function
Keep button E pressed until all position adjustments have been made.
This step will make it easier for you to adjust the seat position. All other seating positions, mirrors (driver's seat) and steering wheel (driver's seat) are set automatically depending on the set longitudinal position of the seat. After that, it should only be fine-adjusted as described below. External rear-view mirrors, an internal rear-view mirror and a steering wheel are described in Section Steering wheel, mirrors.
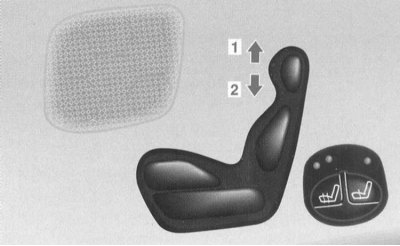
Seat height
Move the rear switch in the direction of the arrow until the highest position is reached while maintaining sufficient headroom.
Seat tilt
Move the switch forward in the direction of the arrow until you reach a position that provides light support to your thighs.
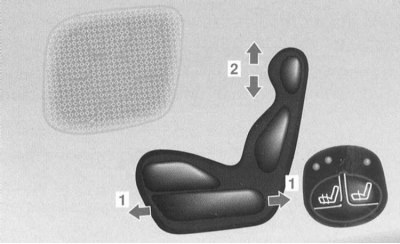
Backrest tilt
Move the switch forward or backward until your arms on the steering wheel are slightly bent at the elbows.
Seat cushion contour
Move the switch forward or backward until you reach a position that provides light support to your hips.
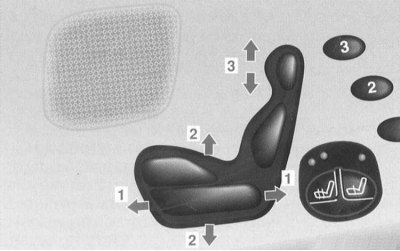
Head restraint height
The height of the head restraints is automatically adjusted when the seat is adjusted so that the back of the head rests on the head restraint at approximately eye level. If this position is not reached automatically, adjust the head restraint using the switch.
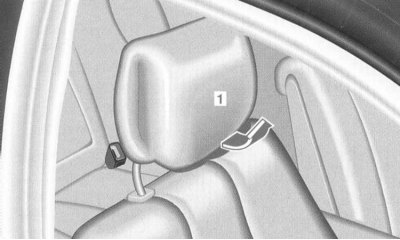
Adjust head restraint inclination -1- manually. Pull or push the head restraint in front.
(Recording the position of the seat - refer to Section Seat position memory).
Removal and installation of headrests of a seat of the driver and a seat of the forward passenger
There is a risk of injury!
Drive only with head restraints installed.
Note. To facilitate the removal and installation of the head restraint, tilt the seat back slightly.
Removing
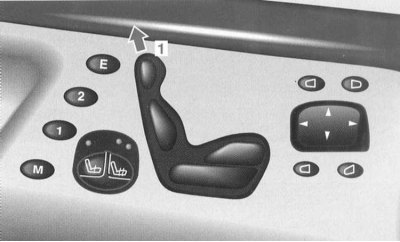
Move the switch -1- up until the head restraint is fully extended. Pull out the headrest.
Installation
Move switch -1- up for about 5 seconds.
Press the headrest down until it locks.
Lumbar support

The controls are located on the front side of the driver's and front passenger's seats and on the side of the rear seats.
For support of a backbone it is possible to adjust a camber of a back.
Turn the electronic key in the ignition switch to position 2.
Set the backrest convexity between position 0 and 5 with the knob -1-.
Multicontour backrest
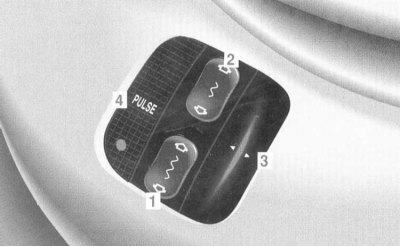
Driver's seat and front passenger's seat: The switch is located on the front side of the seat.
To support the spine, an individual adjustment of the backrest contour is possible.
Turn the electronic key in the ignition switch to position 2.
Rear seats

The switch is located on the side of the seat.
It is recommended to carry out the basic installation in the following sequence:
- 1 Back bulge in the lumbar area
- 2 Back bulge in the back area (driver's seat and front passenger's seat only)
Switches 1 and 2:
Press the switch from above and keep it pressed, the individual airbags are inflated sequentially from top to bottom. Release the switch when the desired position is reached.
Press the switch down and keep it pressed, the individual airbags are inflated sequentially from bottom to top. Release the switch when the desired position is reached.
- 3 Side backrests
Press the button to the right or left, the lateral support is strengthened or weakened. Install the seat back sides to provide good lateral support.
- 4 Dynamic function (PULSE)
The multi-contour seat back is equipped with a dynamic function to avoid constant muscle strain during long journeys.
At the same time, the inflated air cushion in the backrest inflates rhythmically and then relieves pressure.
When the dynamic function is enabled, the control LED on the switch lights up. After approximately 5 minutes, the dynamic function will automatically turn off.
Note. If the uppermost airbag is inflated, the middle airbag will inflate and the pressure will be released.
Seat heating
Turn the electronic key in the ignition switch to position 1 or 2.
Notes:
- If too many electrical consumers are switched on or if the battery is not sufficiently charged, the seat heating system may switch off. In this case, one or both control LEDs flash.
- When sufficient voltage is restored, the seat heating switches on automatically.
The buttons are located on the corresponding door.
Models without seat ventilation
Press button -1-.
The red control LED above the button lights up. Normal heating mode.
The seat heating switches off automatically after approximately 30 minutes.
Press button -2-:
Both red control LEDs above the button light up. Maximum heating mode.
After approximately 5 minutes, it automatically switches to normal heating mode.
Press button -1- or -2- again:
None of the control LEDs are lit.
The seat heating system is off.
The buttons are located on the corresponding door.
Models with seat ventilation
Press button -3-.
Both red control LEDs above the button light up. Maximum heating mode.
After approximately 5 minutes, it automatically switches to normal heating mode.
Press the button -3- again: The red control LED above the button lights up. Normal heating mode.
The seat heating switches off automatically after approximately 30 minutes.
Press the button again: None of the control LEDs is lit.
The seat heating system is off.
Seat ventilation
The buttons are located on the corresponding door.
Seat ventilation can be activated manually or by the opening system in summer (driver's seat) (Chapter Locks, keys and locks. Smart card. Single lock).
If the seat ventilation is activated by the opening system in summer, the maximum ventilation level is automatically set.
Manual activation
Turn the electronic key in the ignition switch to position 1 or 2.
Press button -1-.
The 3 blue control LEDs above the button light up. Maximum ventilation mode (stage 3).
Approximately every 10 minutes, automatic switching to a lower ventilation level takes place.
Press button -1- again: The 2 blue control LEDs above the button light up. Medium ventilation level (stage 2).
Press button -1- again: One blue control LED above the button lights up. Low ventilation mode (stage 1).
Press button -1- again: None of the control LEDs is lit.
The seat ventilation system is switched off.
Note. If too many electrical consumers are switched on or if the battery is not sufficiently charged, the seat ventilation system may be switched off. In this case, one or more control LEDs flash.
When sufficient voltage is restored, the heated rear window switches on automatically.
Rear seat head restraints
The switch is located on the center console.
There is a risk of injury!
If the rear seats are occupied, drive only with the head restraints in place. This reduces the risk of injury to rear passengers in an accident.
Turn the electronic key in the ignition switch to position 1 or 2.
Reclining
Briefly press the switch on the symbol.
Installation up
Fold the head restraint up manually until it locks.
Incline
The slope can be adjusted manually.
Pull or push the head restraint in front.
Rear seat head restraints (automatic)
There is a risk of injury!
If the rear seats are occupied, drive only with the headrests in place. This reduces the risk of injury to rear passengers in an accident.
Note. On vehicles with 3 rear seats, the center head restraint cannot be adjusted automatically. Manually fold it up until it locks.
With seat occupied (belt in belt buckle) the headrests of both outer seats are installed automatically.
Make sure that the movement of the head restraints is not obstructed by objects (e.g. clothes).
The switch is located on the center console.
Turn the electronic key in the ignition switch to position 1 or 2.
Push switch:
- 1 Tilt back
- 2 Mounting up: Both outer head restraints are mounted or folded down together. If there are 3 head restraints in the rear, the center head restraint also folds down.
The switches are located on the corresponding tailgate.
- 1 Installation up
- 2 Tilt back
The corresponding outer head restraint can be mounted upwards or folded back.
The tilt of the headrest can be adjusted manually. Pull or push the head restraint in front.
Rear seat adjustment
There is a risk of injury!
Sitting positions that interfere with the correct fit of seat belts exacerbate risk factors and should therefore be avoided.
The backrest should be set almost vertically. The back should fit against the backrest, and the seat belt should fit against the shoulder area.
Also, when leaving the vehicle for a short time, remove the electronic key from the ignition or take the smart card with you.
However, seat adjustment is also possible with one door open. Therefore, do not leave children in the car unattended.
Turn the electronic key in the ignition lock to position 1 or 2 (and if one of the doors is open, also when the smart key is removed or in key position 0).
Models with bench seat
The switches are located on the corresponding tailgate.
- 1 Longitudinal movement
Push the switch forward or backward. At the same time the inclination of a back is regulated at the same time.
- 2 Head restraint height
Pull the switch up or push down. The head restraint is installed upwards or leans back.
Models with separate rear seats
The switches are located on the corresponding tailgate.
- 1 Longitudinal movement
Switch push forward or backward.
At the same time the inclination of a back is regulated at the same time.
- 2 Seat cushion tilt
Pull the switch up or push down.
- 3 Headrest
Pull the switch up or push down.
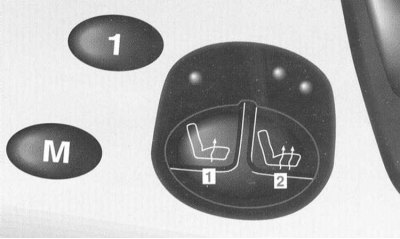
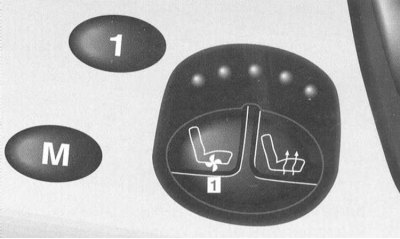
Adjusting the front passenger seat from the rear
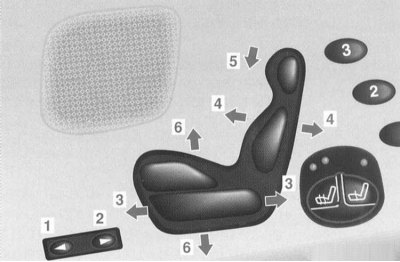
The switch is located on the right rear door.
Turn the electronic key in the ignition switch to position 1 or 2.
Press the button -1-, adjust the position of the front passenger seat:
- 3 Longitudinal movement
- 4 Backrest tilt
- 5 Lowering the head restraint
- 6 Seat height
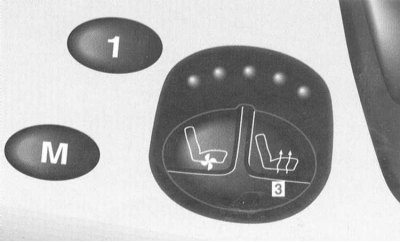
Rear seat adjustment
Press the button -2- and adjust the position of the rear seat:
Refer to the above materials of this Section.
Note. If there are objects in the luggage net in the front passenger footwell, do not move the front passenger seat all the way forward as the luggage could be damaged.