
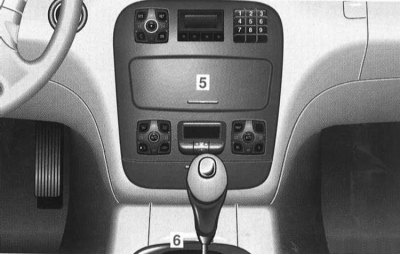
Interior lighting
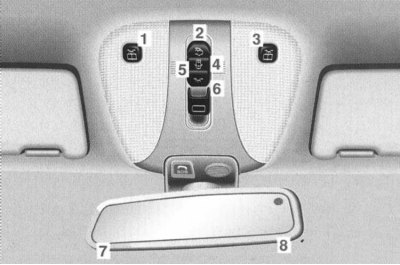
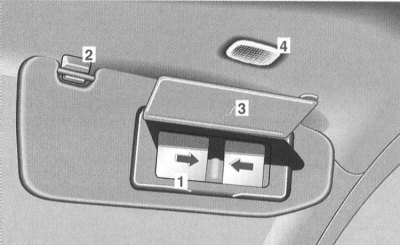
1. Front left reading light.
Turning the reading light on and off: press the button.
The left reading light -7- in the interior rearview mirror is switched on or off.
2. Plafonds in the rear of the cabin.
Switching on and off the lamp in the rear: press the button.
3. Front right reading light.
Turning the reading light on and off: press the button.
The right-hand reading light -8- in the interior rear-view mirror switches on or off.
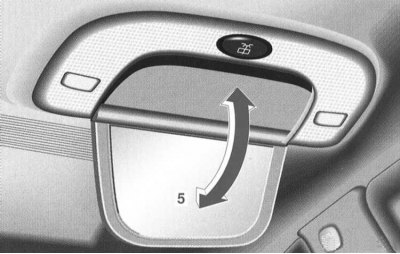
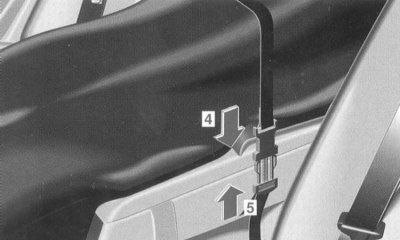
4. Switch off the automatic function: press the rocker switch.
The lights remain off even if the car is unlocked, one door is opened or the smart key is removed from the ignition.
5. Activation of the automatic function: toggle switch in the middle position.
If the electronic key is removed from the ignition switch at nightfall, the lights turn on and off with a time delay.
The lights come on when one door opens at nightfall. When one of the front doors is opened, the front light turns on, when one of the rear doors is opened, the rear lights turn on.
If the doors are closed, the lights turn off with a delay.
If the car is unlocked at nightfall, the lights turn on and off with a time delay.
Note. The time after which the ceiling lamps turn off with a delay after the key is removed from the ignition lock can be set in the system «Individual installation» (Chapter Multifunction steering wheel, multi-information display).
With one door open and the electronic key in position 0 or removed, the lights turn off approximately 5 minutes after all the electronic equipment of the car is in its original position.
6. Switching on the front light manually: Press the rocker switch. As long as the toggle switch is pressed, the front telephone is switched on.
Switching off the front light: Toggle switch in position 4 or 5.
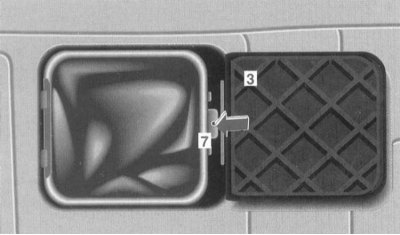
Rear Reading Light
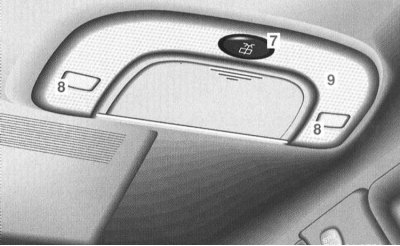
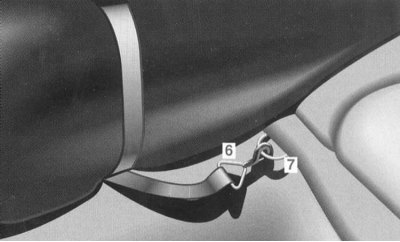
7. Switching the reading lights on and off: The reading lights -8- in the left or right rear light -9- are switched on or off.
Interior lighting
For better orientation in the dark, your car is equipped with various lighting devices in the cabin.
Lighting when opening/closing the door:
- The electronic key in the ignition lock is in position 1 or the parking lights are on. Lights are lit in the recesses for opening/closing doors.
- If the electronic key in the ignition switch is turned to position 0 and the lights are off, the lights will turn off with a delay of approximately 5 minutes.
Footwell lighting: Parking lights on. The legroom is illuminated.
Center console lighting: The electronic key in the ignition switch is in position 1. The center console lighting comes from the interior rear-view mirror.
Door lights for exiting the car
If one of the doors is opened at nightfall and the interior lighting is switched to automatic mode, the corresponding door light is switched on to exit the vehicle.
When the door is closed, the exit door light will automatically turn off.
Rear window shade
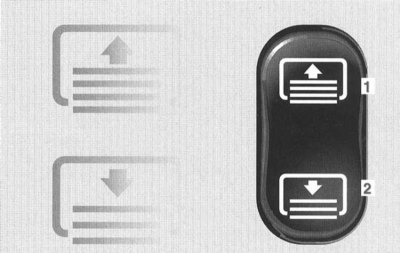
The switch is located on the center console.
Turn the electronic key in the ignition switch to position 1 or 2.
Push switch:
- 1 - Rise
- 2 - Lowering
The rear window blind should always be lowered or fully raised.
Note. Make sure that the movement of the rear window blind is not obstructed by objects (e.g. clothes).
Sun visors
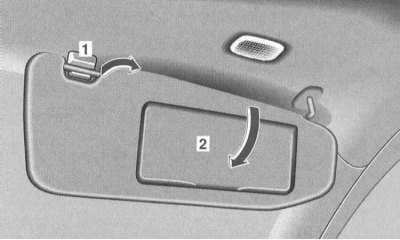
There is a danger of an accident!
To avoid glare, keep the covers over the mirrors -2- closed while driving.
For glare protection from the front: Fold down the sun visors.
To protect against glare from the side windows: Pull the sun visor out of the holder -1- on the inside and move it to one side.
Cosmetic mirror
There is a danger of an accident!
To avoid glare, keep the covers over the mirrors -3- closed while driving.
1 - Illuminated cosmetic mirror in the sun visor.
Opening: The sun visor must be locked in the holder -2-. Fold the cover -3- up. Lighting -4- turns on.
Move the mirror left or right, the mirror halves reflect the normal or enlarged image.
Closing: flip the lid down.
5 - Illuminated cosmetic mirror in the rear.
Opening: lightly press the lid, the mirror opens and the light turns on.
Closing: turn the mirror up until it locks.
Note. To avoid damage, before moving the driver's or front passenger's seat from the lying position to the driving position, close the respective vanity mirror.
Salon
There is a risk of injury!
It is not allowed to transport heavy or solid objects in the cabin in an unsecured state.
Otherwise, during heavy braking, a sudden change in direction of travel or an accident, passengers may be injured by them.
Luggage safety nets cannot hold heavy and hard objects.
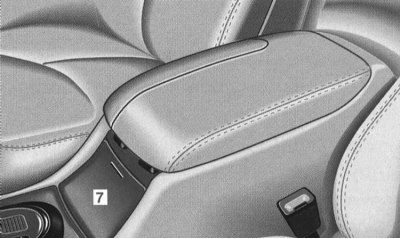
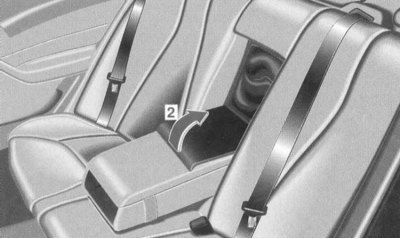
Stowage compartments and armrest consoles
There is a risk of injury!
If there are objects in the storage compartments, the latter must be closed while driving.
Glove box
1 - Unlock
2 - Locking
3 - Opening
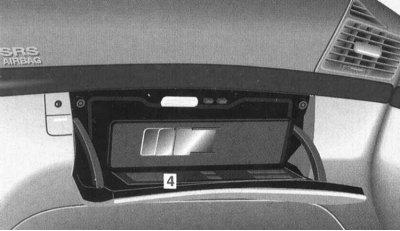
In the lid of the glove box there is a compartment -4- with recesses for cards in credit card format, a flashlight and a ballpoint pen.
Opening the compartment in the glove box lid: Press lightly on the lid at the marking.
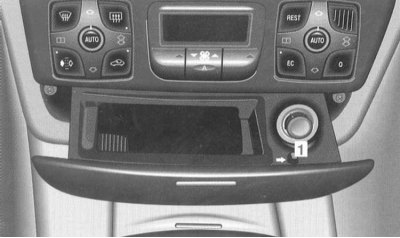
Stowage compartments in the center console
5 - Compartment for glasses on the middle console
6 — Section below on the average console
Spectacle compartment
Opening: Lightly press down on the lid at the bottom of the marking.
Closing: Push the lid down until it locks into place.
Bottom section
Opening: Pull the lid forward, holding on to the marking area.
Closing: Press the lid slightly forward at the marking and release. The lid closes automatically.
Locker in front of the armrest console
7 - Locker in front of the armrest console
Opening: Press lightly on the top of the lid at the marking.
Closing: Move the lid up until it locks into place.
Removing the insert: Pull out the insert by grasping it through the recess in the handle.
Locker in front of the driver's seat
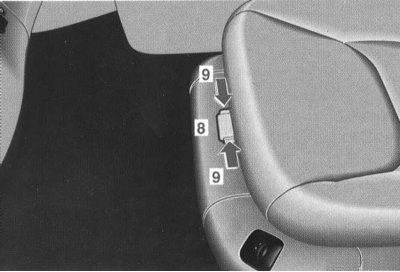
8 - Locker in front of the driver's seat
Opening: Squeeze the buttons -9- and fold the cover down.
Closing: Fold the lid up until it locks into place.
Stowage compartments under the armrest console
There is also a coin compartment in the storage compartments under the armrest console.
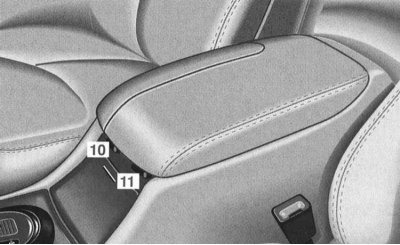
Locker in the armrest console
Opening: by pressing the button -10-, raise the armrest console.
Closing: lower the armrest console and lock it.
Note. Models with air conditioning in the rear: Do not place any objects in the recess under the locker.
Stowage compartment under armrest console
Models without air conditioning in the rear
Opening: by pressing the button -11-, raise the armrest console.
Closing: lower the armrest console and lock it.
Note. Air conditioning possible in storage compartment (Chapter Automatic air conditioner. Ventilation. Independent heater).
The temperature in the storage compartment can rise significantly due to limited space. Therefore, when transporting a heat-sensitive load, it is necessary to close the ventilation nozzle of the switched on heating.
Do not cover the ventilation nozzle in the locker with objects.
Using the telephone in the rear
To make it easier to use the phone in the rear, the phone can be moved to the rear.
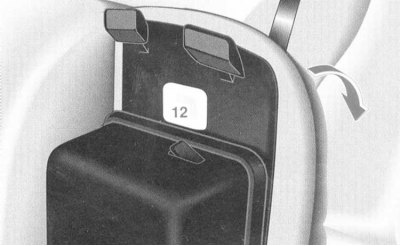
By pressing the button -11- (refer to the illustration on the left), fold the armrest console back until it locks into place.
By pressing the button -12-, fully fold the cover of the armrest console.
Rear seat armrest
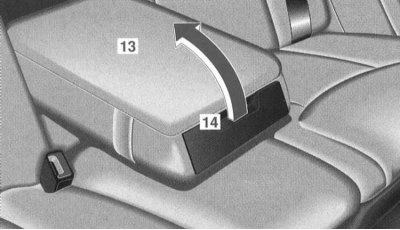
Pull out the armrest -13- at the top and fold it into the rear seat.
Opening the locker: By pressing the handle -14- up, fold the armrest up.
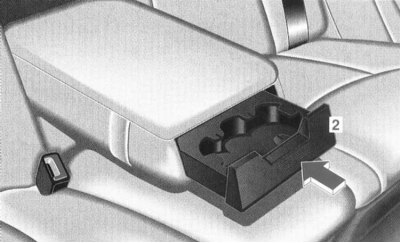
Locker between rear seats
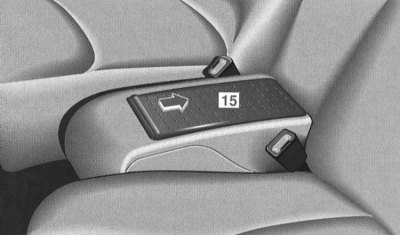
Opening the locker: Move the cover -15- back.
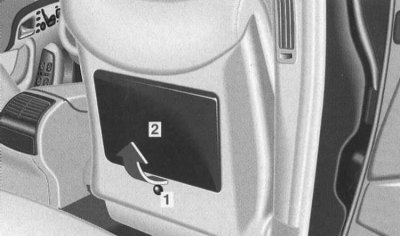
Locker on the back shelf
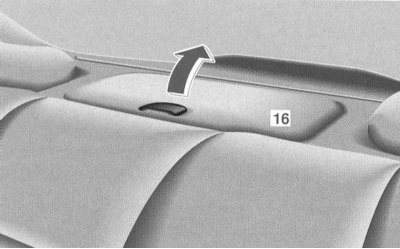
Opening the locker: Lift the lid -16-.
Beverage holder
There is a risk of injury!
The drink holder must be closed while driving. Use only suitable containers, to avoid burns, do not insert hot drinks into the holder.

1 Drink holder in the armrest
Opening: Pull the lid aside.
Closing: Fold back the lid.
2 Drinks holder in rear seat armrest
Opening: Press the drawer, the drink holder slides out.
Closing: Push the drawer in until it clicks into place.
Folding table in the rear
Folding the table: Press the button -1-, and tilt the table -2- up to the required position until it locks.
Note. The table can be fixed in 3 positions.
Folding the table: Raise the table completely and swing down until it locks into place.
There is a risk of injury!
During the movement, the folding table must be folded.
Otherwise, in case of heavy braking, a sudden change in direction of travel or an accident, passengers may be injured by objects on it or by the table itself.
Ashtray
Center console
Opening: Press lightly on the lid at the mark, the ashtray pops out.
Removing insert: Risk of accident!
Turn off the engine and apply the parking brake to prevent the vehicle from moving away unintentionally.
Note. Move the AT selector lever to position N.

Move the slider -1- to the right. The insert pops out a little.
Installing the insert: Press the insert until it locks into place.
Rear doors
Opening: Lightly press the lid on the back, the ashtray moves back.
Removing the insert: By pulling the ashtray slightly towards you, remove the insert.
Installing the insert: Install the insert and push down when moving back.
Cigarette lighter
1 Cigarette lighter on center console
There is a risk of injury!
Take a hot cigarette lighter by the handle only.
When turning the electronic key in the ignition switch to position 1 or 2, make sure that children cannot get burned by the hot cigarette lighter.
2 Cigarette lighter on rear doors
The electronic key in the ignition switch is in position 1 or 2.
Push in the cigarette lighter: the pop-up occurs automatically as soon as the coil heats up.
The cigarette lighter socket can be used to connect special accessories.
Luggage net in front passenger footwell
There is a risk of injury!
The luggage safety net is designed for carrying light loads only.
Heavy, as well as fragile objects and objects with sharp edges must not be transported in a safety net for luggage.
The luggage safety net cannot protect the load in the event of an accident.
Note. If there are objects in the luggage net, the front passenger seat must not be moved all the way forward - the objects in the net could be damaged.
Safety net for luggage in the trunk
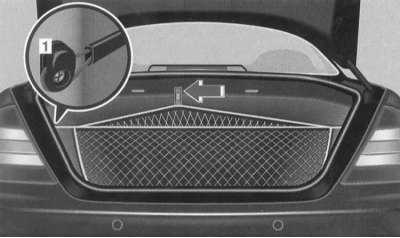
There are hooks -1- on the left and right in the luggage compartment, on which the luggage safety net is hung.
strap (arrow) must be placed in the trunk.
The luggage net and hooks are designed to carry light loads in normal traffic. In the event of an accident, they cannot protect the load. Please observe the instructions on the strap (arrow) weight data.
Refrigerator box in the back
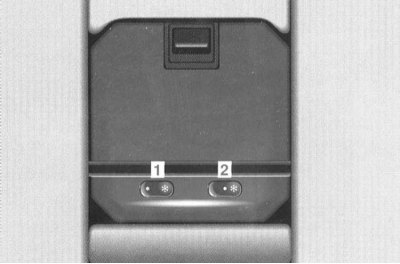
Push switch:
1 Temperature
2 On/Off
Turning on / off the refrigerator box
Lightly press the switch -2- on the symbol - the control LED on the switch flashes for about 30 seconds and then lights up permanently.
Lightly press the switch -2- on the side without a symbol - the control LED on the switch goes out.
Temperature setting
Small snowflake - low cooling stage.
A large snowflake is a high cooling stage.
When the refrigerator box is opened, the internal lighting of the refrigerator box turns on.
Note. The cooling capacity depends on the selected cooling stage and the outdoor temperature.
When a large number of electricity consumers are turned on or the battery is insufficiently charged, the refrigerator box can automatically switch to a lower cooling power level or turn off - the control LED on the switch flashes. When sufficient voltage is restored, the refrigerator box will switch on automatically again.
Cooler Care
If the refrigerator box is not used for a long time, it should be turned off, defrosted, rinsed and left the lid open for a while. Flushing the refrigerator box (Chapter Body).
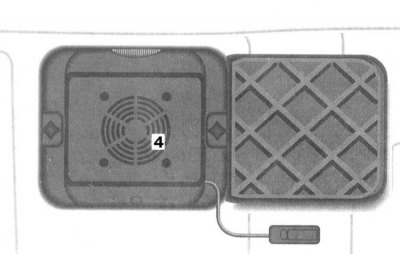
Fire hazard!
Do not cover the ventilation grille -4- in the trunk.
Do not carry flammable materials in the trunk.
Removing the refrigerator box
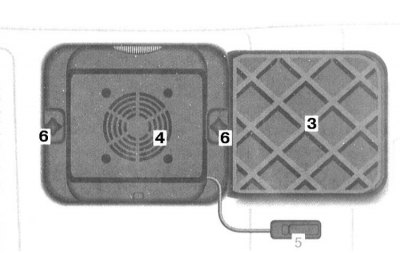
Instead of a cold box, you can install a ski bag. (Installing the ski bag - refer to the following resources).
Turn off the refrigerator.
Pull out the mains plug -5-.
Turn out fixing bolts -6-.
Take out the refrigerator box.
Note. With the refrigerator box installed, the door -3- must be opened to the side. The door is held back by a magnet.
Cold box installation
Installation is carried out in the reverse order.
Telephone
General information
There is a danger of an accident!
First of all, pay attention to the movement. Use the phone1 only if the traffic situation allows it.
Stop the vehicle if you intend to make a telephone conversation using the handset and not the speakerphone.
Remember that your car already travels 14 m per second at a speed of 50 km/h.
The use of radiotelephones with antennas located in the passenger compartment can lead to malfunctions of the electronic systems and thus adversely affect the operational safety of the vehicle.
1 Comply with the laws in your country of residence.
Radiotelephones may only be used in the passenger compartment if they are connected to a separate external aerial approved by «Mercedes-Benz».
(Using your phone - refer to the appropriate User Guide).
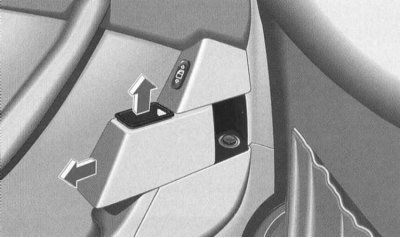
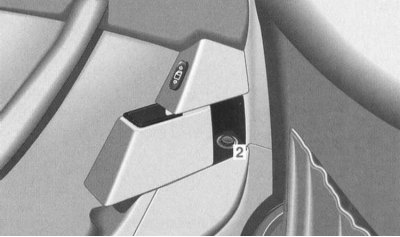
Radiotelephone in a locker under the armrest
Phone installation
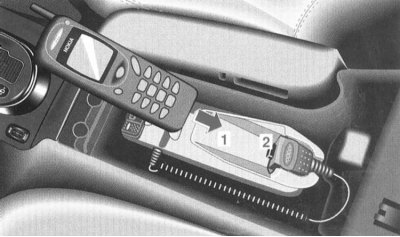
Open the locker (above in this section).
Insert the telephone into the socket -1- until the plug -2- is audibly fixed.
To fix, press the phone from the front -3- down.
Only in this position is the telephone connected to the hands-free installation.
Note. A modem can be connected via socket -4-.
Conducting telephone conversations via the radiotelephone communications control panel
Press button -5-. The socket -1- with the telephone folds up.
Pull the telephone with plug -2- forward. The plug with the cable leading to the external antenna must remain plugged into the phone to make a telephone conversation.
Removing the phone
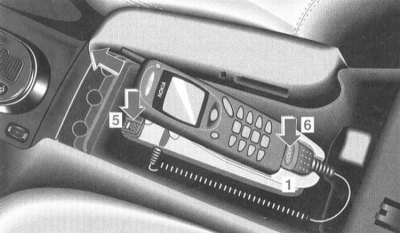
Press button -5-. The socket -1- with the telephone folds up.
Press the plug lock -6- and pull the phone forward.
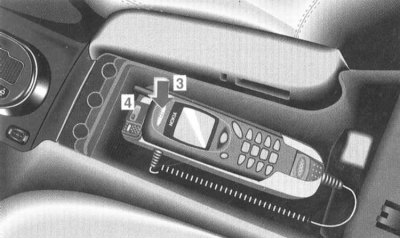
Radiotelephone in glove box
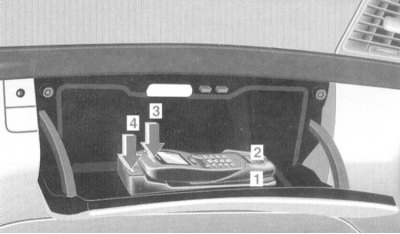
Phone installation
Open glove box (above in this section).
Insert the switched on phone into the socket -1-.
To fix, press the phone from the front -3- down.
It takes approximately 30 seconds for the data from the phonebook to be read into a separate memory. The phone then turns off automatically and the phone's batteries are charged.
For a landline telephone, only the read telephone book of the radiotelephone is available.
If you do not wish to read the phonebook, turn off the radiotelephone before inserting it into the receiver. In this case, you still have the telephone book of the landline telephone at your disposal.
Various radiotelephone and landline phone network providers: All telephone numbers in the radiotelephone phone book must be entered into memory along with the corresponding area codes. Only in this case can all telephone numbers be dialed via a landline telephone.
It is not possible to make telephone calls if the radiotelephone is in the glove box.
Attention! To ensure the smooth operation of the communication system, do not turn on the phone in the holder.
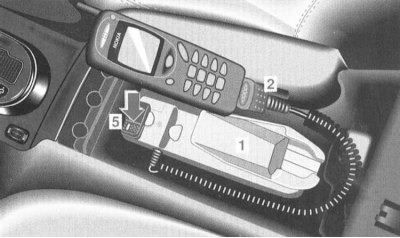
Removing the phone
Press button -4-.
The socket -1- with the telephone folds up.
Take off your phone.
After removing the telephone, the telephone book of the landline telephone is again available.
Note. The plug -2- is firmly connected to the receptacle -1-, so it does not need to be unlocked.
Landline telephone in a locker under the armrest
Conducting telephone conversations via the radiotelephone communications control panel
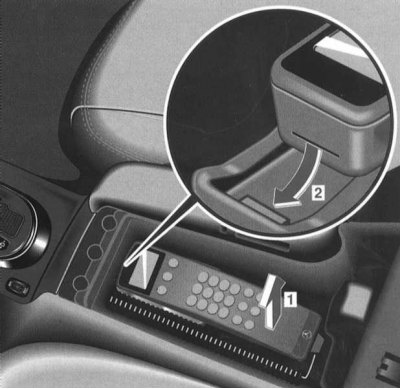
Removing the phone: Open the locker (above in this section).
Pull the phone upwards -1- from the holder.
Installing the phone: Insert the phone into the holder latch -2- and press down until it clicks into place.
SIM card (phone card)

Turn off your phone and take it out.
Installation: SIM card (Subscriber Identity Module) insert into the reader -3- so that the chip is facing downwards in the forward direction.
Removal: Remove the SIM card.
Ski bag
Unfolding: Lower the rear armrest -1-.
Fold the cover -2- down.
Unfold the ski bag and retract it into the cabin.

Pull the handle in the trunk to open the door -3-. The door is held by a magnet.
Loading
Put your skis in the bag.
Attach the ski bag with straps to the armrest in the rear part of the passenger compartment -4-.
Tighten the fastening belt -5-.
Hook the carabiner -6- to the bracket -7-.
There is a risk of injury!
The ski bag is designed for 4 pairs of skis.
Do not load foreign objects into the ski bag.
The ski bag must always be secured. In the event of an accident, a loose ski bag can cause injury.
Folding: Close the tailgate.

Disconnect the connection. To do this, squeeze the tongues.
Unhook the carabiner.
Straighten the ski bag.
Fold the ski bag and insert it into the backrest.
Fold the cover -2- up.
Note. Removing the ski bag - to dry the ski bag or if the space is to be used as a stowage compartment or a cold box.
Removal: Pull the handle in the trunk to open the door -3-. The door is held by a magnet.
Holding the recess -7- on the frame of the ski bag, press to the left and pull the bag back.
Unhook the carabiner.
There is a risk of poisoning!
Ski bag removed: The boot lid must be closed while driving to prevent exhaust gases from entering the passenger compartment.
Note. To prevent unauthorized persons from entering the trunk from the passenger compartment, close the door in the trunk.
Installing the ski bag
Insert the ski bag through the boot into the opening. Install the ski bag frame on the left and fix on the right.
Tailgate lights
If the trunk lid is left open for a long time, the trunk lights will turn off after about 10 minutes.
Roof rack system
There is a danger of an accident!
Follow the manufacturer's installation instructions.
An improperly secured roof rack system or cargo can become loose.
The maximum roof load with roof rack systems is 100 kg.
To prevent damage to your vehicle, use only roof rack systems that have been tested and approved by us.
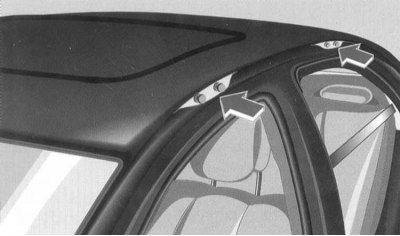
The roof rack must only be screwed to the roof mounting bolts (arrows) behind rubber door seals.
Attention! The elements of the roof rack system must not limit the maximum lifting distance of the sliding and lifting sunroof.
Drawbar hitch (Trailer towing - refer to Section Vehicle control and assistance systems)
(Dimensions and loads are given in the Specifications).
Note. In case you need to purchase a spare key, enter the key number in the current «Management».
Key No
A spare key can be purchased at the service station «Mercedes-Benz».
Removing the plug
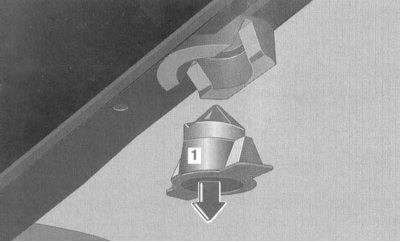
Remove the plug -1- downwards from the socket of the ball head.
The ball head is located together with the spare wheel in an additional compartment under the boot floor.
Plug -1- put in the compartment.
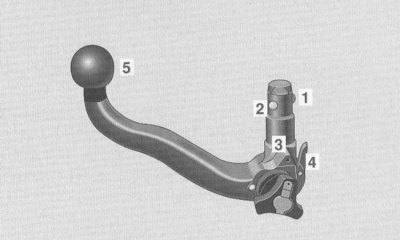
Ball head installation
There is a danger of an accident!
Install the ball head with special care, as the safety of the trailer as a whole depends on this.
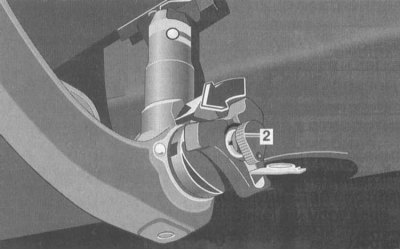
Key -2- must be inserted.
The red zone must match the white markings (mounting position), otherwise unlock the lock in the handwheel with the key -2- in the direction of the arrow.
Pull the handwheel and turn it into the red zone until it locks into place.
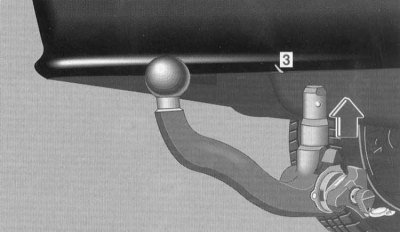
Insert the ball head vertically into the mounting socket. When doing so, observe the insert marking -3- on the bumper.
The ball head locks automatically.
Note.
The marking for insertion is located in the middle of the car at the bottom of the bumper.
Attention! The green zone must match the white marking -4-.
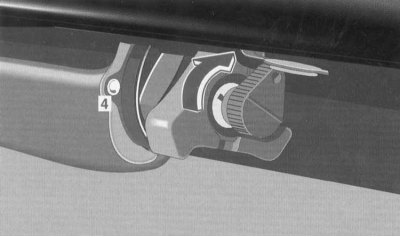
Ball head lock
To do this, turn the key in the lock in the direction of the arrow.
Remove the key and put on the protective cap.
Movement position
There is a danger of an accident!
In the event of malfunctions or damage, have a service station «Mercedes-Benz» checking the entire tow hitch.
If the trailer hitch is not in use, we recommend dismantling the ball head.
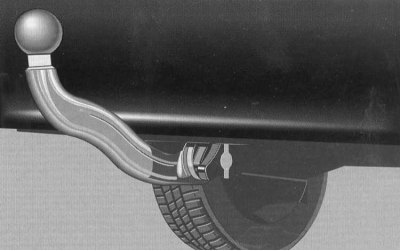
Flip-out socket
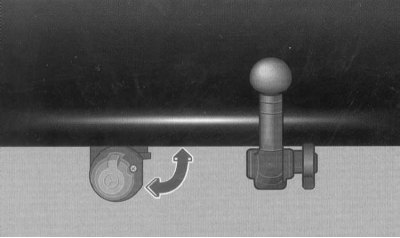
Tilt the socket down if necessary.
If the socket is no longer needed, fold it up.
Removing the ball head
Remove the protective cap, unlock the lock in the handwheel with the key.
Grasp the ball head, pull the handwheel and turn the red marking into the green zone until the handwheel locks.
Pull the ball head down.
Ball head storage
The ball head is located together with the spare wheel in an additional compartment under the boot floor.
There is a danger of an accident!
Do not transport the ball head loose in the cabin.
Otherwise, during heavy braking, a sudden change in direction of travel or an accident, passengers may be injured by the moving ball head.
Plug nozzle
Insert the plug into the socket of the ball head until it locks into place.
Note. Pay attention to the secure fit of the plug.
Care instructions
When soiled, the ball head and the ball head seat should be cleaned so that easy installation and removal is ensured at any time.
Note. Do not clean the ball head with a high-pressure car washer, do not use solvents.
Attention! After cleaning, apply a thin coat of oil or grease to the following areas:
- 1 fixing balls,
- 2 guide,
- 3 receiving socket,
- 4 release lever,
- 5 ball surface, and also on the ball head bracket on the car.
Lubricate the lock with an acid- and resin-free oil.
Then run a functional test on the vehicle.
This work can also be carried out at the maintenance station «Mercedes-Benz».
Trailers with 7-pin plug
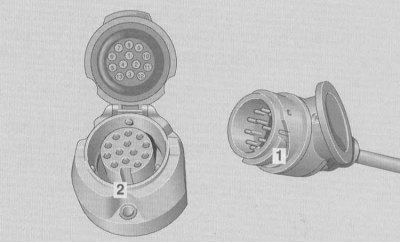
1 ledge
2 Groove
The plug connection between a vehicle with a 13-pin socket and a trailer with a 7-pin plug can be made using an adapter cable.
An adapter cable can be purchased at any service station «Mercedes-Benz».
Installation: Lift up the cover. Insert the plug with the protrusion into the groove and turn to the right until it stops. Let the lid lock into place.
Loosely fasten the adapter cable to the trailer with cable straps.
Mains power supply
Your car has the ability to connect to the power supply from the car's mains. If the trailer requires a power supply from the vehicle mains, then inserting the necessary fuse must be done at the service station «Mercedes-Benz».