



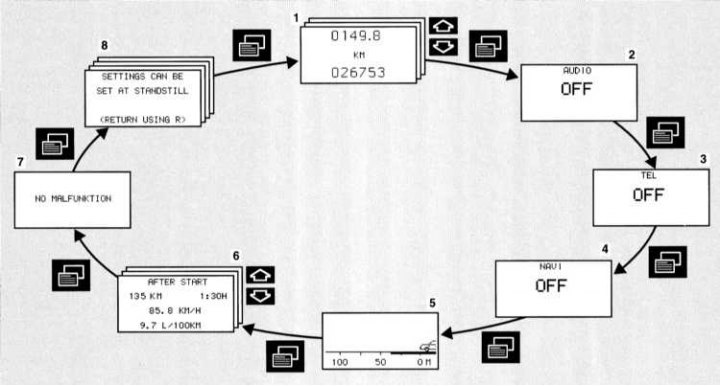
Depending on the configuration of your vehicle, the buttons on the multifunctional steering wheel can be used to call up the following systems on the multi-information display, control them and set their parameters:
1. Trip meter and total mileage counter:
- Active Maintenance Warning System (ASSYST)
- Engine oil level warning light
2. Sound systems:
- Radio
- CD player
- Cassette recorder
3. Telephone
4. Navigation system
5. Distronic (DTR) system
6. On-board computer:
- Starting from the start
- Starting from the reset
- Fuel tank capacity
7. Fault memory
8. Individual installation
Button
 press repeatedly until the desired system is displayed.
With each new press of the button, the next system is displayed.
In some systems, additional indications may be called up by pressing a button
 or
or  .
.
Note: Depending on the installation, the multi-information display is displayed in German, English, French, Italian or Spanish. (To change to another language, refer to the section "Individual installation").
Regardless of the language set in vehicles with radio receivers of the "audio 10" or "audio 30" systems, the sound system indications (radio, compact disc player, cassette recorder), as well as the indications on the telephone of the "audio 30" system appear in English. The indications on the telephone of the "audio 10" system are missing.
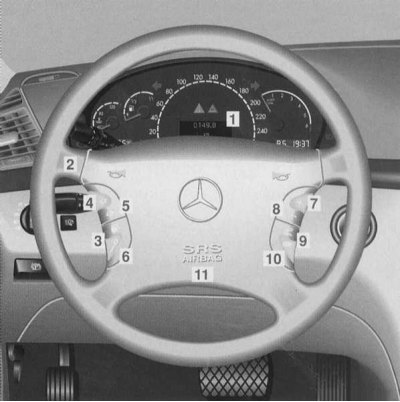
Turn the electronic key in the ignition switch to position 1 or 2.
Press the buttons:
3
 next system
4
 next indication on the system
5
 previous indication on the system
6
 activate or deactivate the voice control system "Lingvatronic"
7
 increase volume
8
 decrease volume
9
 dialing a telephone number, receiving an incoming telephone conversation
10
 ending a telephone conversation, refusing to accept an incoming telephone conversation
11 sound signal on soft cover
Button
 press repeatedly until the desired system is displayed.
With each new press of the button, the next system is displayed.
In some systems, additional indications may be called up by pressing a button
 or
or  .
.
Odometer and total mileage counter with subsystems
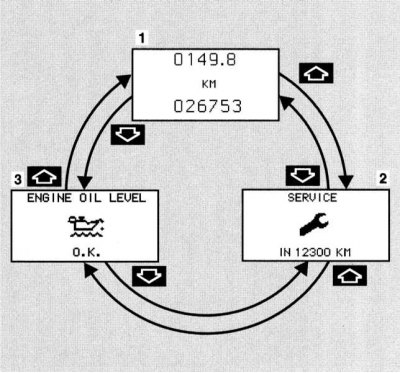
1. Odometer and total mileage counter.
Resetting the trip meter (Section Dashboard).
2. Active Maintenance Warning System (ASSYST).
3. Engine oil level warning light.
Button
 press repeatedly until the trip meter and total mileage counter display "1" appears.
Button
 or
or  press repeatedly until the desired indication appears (2, 3, 1).
At the push of a button
 the following system is indicated.
Sound systems
Depending on the sound system that is switched on, a corresponding indication appears on the display.
Radio
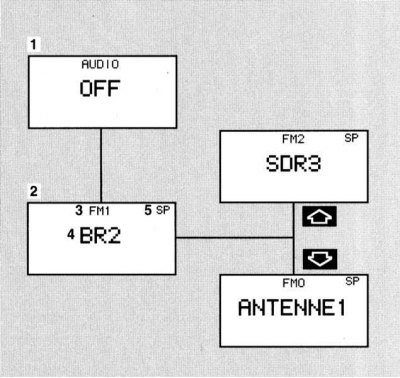
1. No sound system is turned on.
2. The radio is turned on.
3. The established frequency band and, if necessary, the additional memory cell number.
4. The name of the tuned radio station or the frequency of the radio station.
5. Appears only if "MEMORY" has been set in "Custom Installation" and not "FREQUENCY".
Turning on the radio
Button
 press repeatedly until the () indicator appears.
Button
 or
or  press repeatedly until the desired radio station or frequency is displayed.
With the button
 or
or  the stored radio station or radio station frequency can be selected. This depends on the setting in the setup menu "STATION SEARCH USING" (SEARCH FOR RADIO STATION VIA) (refer to the "Custom Installation" subsection).
At the push of a button
 the following system is indicated.
CD player
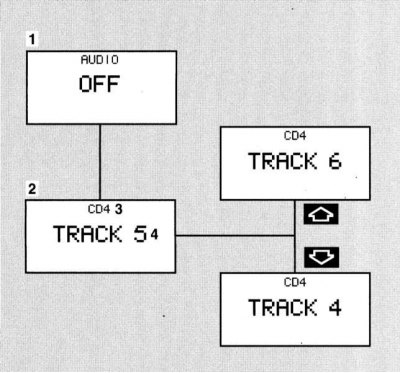
1. No sound system is turned on.
2. The CD player is turned on.
3. The CD changer displays the number of the currently playing CD.
4. Title number.
Turning on the CD player
Button
 press several times until the indication "2" appears.
Button
 or
or  press several times until the desired title of the musical piece is displayed "4".
At the push of a button
 the following system is indicated.
Cassette recorder
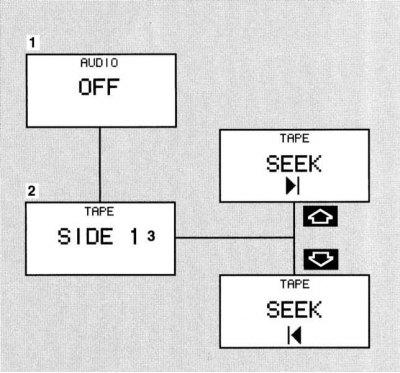
1. No sound system is turned on.
2. The cassette recorder is turned on.
3. The side being played.
Turning on the cassette recorder
Button
 press several times until the indication "2" appears.
Click the button
 , rewinding is performed until the beginning of the next piece of music.
When you press the button
 , rewinds to the beginning of the piece of music being played.
At the push of a button
 the following system is indicated.
Telephone
Phone book
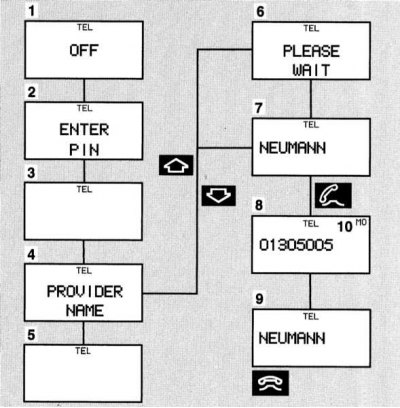
1. The phone is turned off.
2. Entering the PIN code (personal identification code) sIM cards - please refer to the relevant phone User Guide.
3. A search for the appropriate telephone network is performed
4. The phone is ready for use. The corresponding telephone network and provider name are displayed.
5. The vehicle is currently out of transmitting or receiving range.
6. The phone book stored on the phone card or in the phone is read. Duration is about 30 seconds.
7. A surname selected from the phone book.
8. The number of the selected subscriber, the dialing process begins.
9. The dialing process is complete and the last name is displayed. The display remains for the entire telephone conversation.
10. Memory cell number.
Turning on the phone
Button
 press repeatedly until the corresponding telephone network "4" appears. When the indication "2" appears, first enter the PIN code - refer to the corresponding telephone User Guide.
Click the button
 or
or  , the phone book is "flipped" forward or backward alphabetically.
If the button
 or
or  pressed for more than one second, the phone book is scrolled through at high speed. The name of the selected subscriber appears on the display.
Note: If you decide not to call, press the button. The process is interrupted and the indication "4" appears.
Click the button
 , if the display "7" shows the last name of the required subscriber "7". The telephone number "8" is dialed.
If the dialing process is completed, the last name "9" is displayed. The indication "9" remains for the entire duration of the telephone conversation.
Click the button
 , the telephone conversation ends, the indication "4" appears.
At the push of a button
 the following system is indicated.
Calling the subscriber again
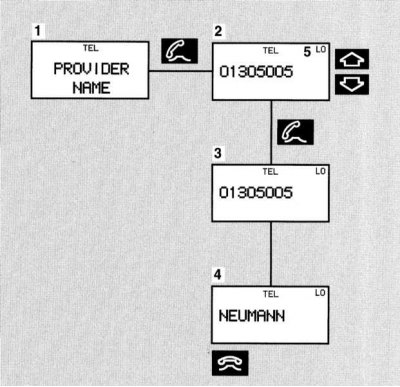
1. The phone is ready for use. The corresponding telephone network and provider are displayed.
2. Number or surname in the subscriber's repeat call memory.
3. Number in subscriber's recall memory - the dialing process has started.
4. The dialing process is completed and the subscriber's last name stored in the phone book or the dialed number is displayed if the subscriber's last name is not stored. The display remains for the entire duration of the telephone conversation.
5. Memory cell number, the last 10 dialed numbers are remembered.
L0, last dialed number, L1 to L9, previously dialed numbers
The phone is on
Button
 press several times until provider "1" is displayed.
Click the button
 , the subscriber's repeat call memory is activated and the subscriber's last dialed number is displayed.
Click the button
 or
or  , the subscriber's repeat call memory is "scrolled" forward or backward. The corresponding selected number appears on the display.
Note: If you decide not to call, press the button. The process is interrupted and the indication "1" appears.
Click the button
 , if the display "2" shows the required number or the surname of the required subscriber.
The phone number "3" is dialed.
If the dialing process is completed, the last name "4" is displayed if the last name is stored in the phone book, otherwise the phone number indication is retained. The indication is retained during the entire telephone conversation.
Click the button
 , the telephone conversation ends, the indication "1" appears.
At the push of a button
 the following system is indicated.
Incoming call
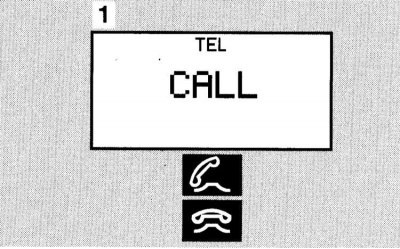
1. "CALL - You are receiving a call.
Click the button
 and accept the challenge.
Click the button
 , the conversation ends, and an indication appears with the corresponding telephone network.
Note: If you do not want to accept the incoming call, press the button.
Navigation system
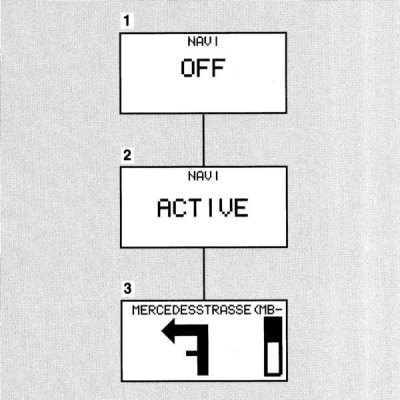
1. The navigation system is turned off.
2. The navigation system is on, but no destination has been entered.
3. The navigation system is turned on and target tracking is activated.
Button
 press repeatedly until the desired system is displayed.
(Navigation system - refer to the appropriate COMMAND system Operating Manual (Cockpit Management and Data System).
At the push of a button
 the following system is indicated.
Distronic system (DTR)
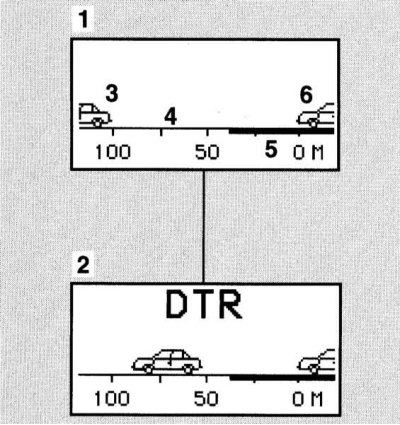
1. The "Distronic" system is switched off. The actual distance "4" and the set distance "5" to the vehicle in front "3" are displayed
2. Distronic (DTR) system is switched on.
3. Vehicle in front. Appears only if a vehicle in front has been identified.
4. Actual distance to the vehicle in front.
5. Specified distance to the vehicle in front
6. Own car.
Button
 press repeatedly until the desired system is displayed.
The "Distronic" (DTR) system is described in Section Vehicle control and auxiliary systems.
At the push of a button
 the following system is indicated.
Trip computer
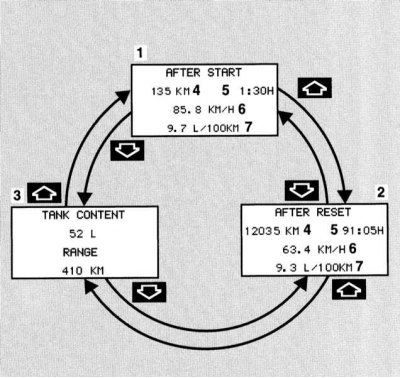
1. "AFTER START" (FROM THE START) - short distance counter.
2. "AFTER RESET" (FROM THE MOMENT OF RESET) - long distance counter.
3. Remaining fuel supply with approximate mileage.
4. Mileage in km "AFTER START" (FROM THE START) or "AFTER RESET" (FROM THE MOMENT OF RESET).
5. Time "AFTER START" (FROM THE START) or "AFTER RESET" (FROM THE MOMENT OF RESET).
6. Average speed calculated "AFTER START" (FROM THE START) or "AFTER RESET" (FROM THE MOMENT OF RESET).
7. Average fuel consumption calculated "AFTER START" (FROM THE START) or "AFTER RESET" (FROM THE MOMENT OF RESET).
Button
 press several times until the indication appears (1, 2 or 3).
Button
 or
or  press until the short distance counter appears "FFTER START" (FROM THE START) "1", long distance counter "AFTER RESET" (FROM THE MOMENT OF RESET) "2" or fuel reserve indication "3".
At the push of a button
 the following system is indicated.
Note: If the trip computer is called up again, the last selected indication always appears (1, 2 or 3).
Receiving parameters from the previous movement cycle into the short distance counter "AFTER START" (FROM THE START) flashes during the passage of a distance of about two kilometers, or for two minutes. In this phase, the parameters from the previous driving cycle can be adopted by pressing the R button on the instrument panel.
Resetting the short distance counter "AFTER START" "1" or long distance counter bolts "AFTER RESET" (FROM THE MOMENT OF RESET) "2":
With the button
 or
or  call up the appropriate indication (1 or 2) and press the R button on the instrument panel until it resets to "0".
Fault memory
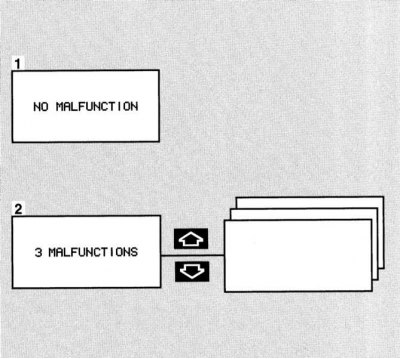
1. There are no faults.
2. Number of faults.
Button
 press repeatedly until the fault memory is displayed.
If the indication "2" appears, press the button
 or . After this, a sequential indication of faults is performed. (Warning system and fault signaling - refer to Section Warning and indicator lamps, as well as multi-information display messages about registered faults). After all fault indications have been completed, the indication "2" appears again.
If faults occur while driving, the "2" indicator appears again if the electronic key in the ignition switch is turned to position 0 or removed. In this case, the fault indicators appear for approximately 5 seconds.
When you press the R button on the instrument panel, the following fault indication appears immediately.
When you turn the electronic key in the ignition switch to position 1 or 2, the fault memory is cleared.
If faults occur again, they are again displayed in the fault memory.
At the push of a button
 the following system is indicated.
Attention! Malfunctions, damages and malfunction signals are registered only by certain systems and are indicated in the established volume. Warning system indications and malfunction signals (Section Warning and indicator lamps, as well as multi-information display messages about registered faults), serve only as a support and do not relieve the driver from the obligation to exercise good faith in ensuring the operational reliability of the vehicle.
Custom installation
1. Basic indication of individual installation.
2. "SET TIME HOURS" (SETTING THE TIME - CLOCK) (only models without COMMAND system).
3. "SET TIME MINUTES" (SETTING THE TIME - MINUTES) (only models without COMMAND system).
4. "AUTOMATIC DOOR LOCK" (AUTOMATIC DOOR LOCKING) (Chapter Locks, keys and bolts. Smart card. Single lock).
5. "HEADLAMP MODE" (HEADLIGHT SWITCHING) 1.
6. "HEADLAMPS DELAYED SWITCH-OFF" (SLOW DOWN HEADLIGHTS) (Chapter Switches).
7. "INT. ILLUMINATION DELAYED SWITCH-OFF" (INTERIOR LIGHT AFTERGLOW DURATION).
8. "STATION SEARCH USING" (SEARCH FOR RADIO STATIONS VIA) — setting the radio receiver "FREQUENCY" (FREQUENCY) — button
 or
or  you can select the frequency "MEMORY" by pressing the button
  or
or  the stored radio station is selected.
9. "TEMP INDICATOR" (TEMPERATURE INDICATION) — the set value is displayed on the outside air temperature indicator on the instrument panel and on the automatic air conditioner display.
10. "SPEEDOMETER" (SPEEDOMETER) - the set value is displayed on the speedometer.
11. "TEXT" (TEXT) — setting the display language on the multi-information display.
12. "SPEED LIMIT (WINTER TYRES)" (SPEED LIMIT (TIRES WITH WINTER TREAD PATTERN)) 2 - constant speed limiter (Section Vehicle control and auxiliary systems).
13. Reset the installation menu to factory settings.
14. Selection marking - indicates the selected installation.
Note: The previous block diagram shows the factory setting for the Federal Republic of Germany.
¹Except in countries requiring headlights to be on at all times.
² Only for the Federal Republic of Germany.
Button
 press repeatedly until the basic display of the "Individual installation" system "1" appears.
Button
 or
or  press repeatedly until the required installation menu is displayed (from 2 to 12).
In the installation menu (1, 2) by pressing the button
 or
or  the time is set, and in the setup menu (from 4 to 12) the selection marking "14" is set.
The settings made are remembered and executed immediately.
If all setup menus have been completed, the basic display of the "Individual setup" system "1" is displayed again.
At the push of a button
 the following system is indicated.
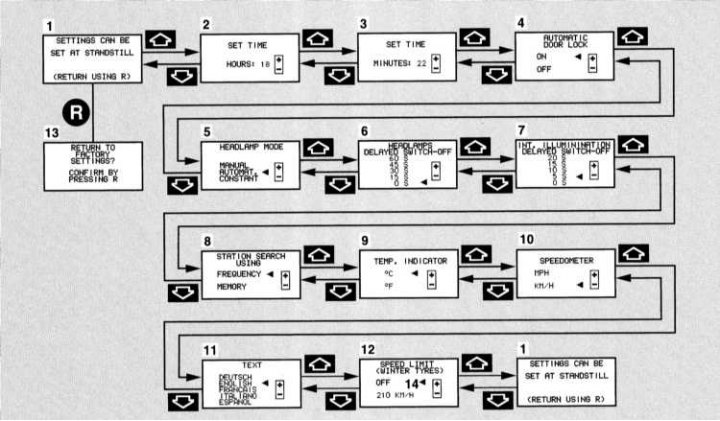
Note: Settings can only be made when the vehicle is stopped or at low speed. When the specified speed is exceeded, the basic indication of the "Individual setting" system "1" is displayed.
If no other system is called up after this, the previously called up setup menu appears again as soon as the vehicle has stopped or is driving at low speed.
Reset the installation menu (from 4 to 12) to factory setting:
- Call up the basic display of the "Individual installation" system "1".
- Press the R button on the instrument panel for about 3 seconds. The display "13" appears.
Press the R button again. If the R button is not pressed, the basic display of the "Individual setting" system "1" appears after about 5 seconds. In this case, the setting menus are not reset.
Volume control
Pressing the button:
 increase volume
 decrease volume.
The volume of only the activated or selected system is adjusted. These are the sound systems, telephone, traffic information service, navigation system voice output and voice control system voice output "Lingvatronic".
Volume control is remembered separately for each system.