
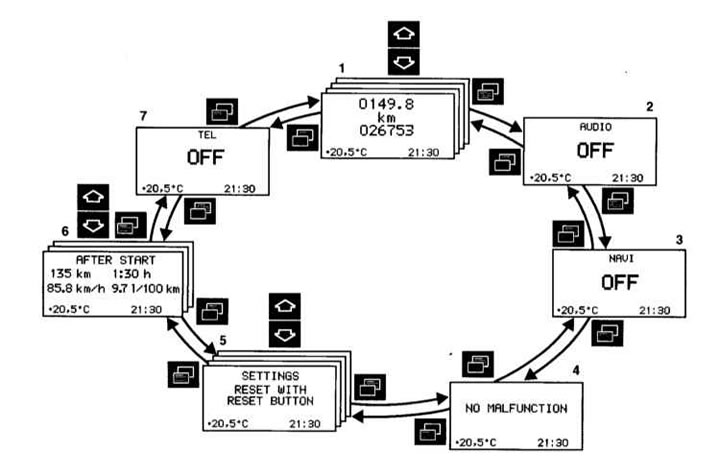
The buttons on the multifunction steering wheel, depending on the equipment of your car, can call up the following systems on the universal display, control them and set their parameters:
- 1 - Mileage meter since reset and total mileage counter
- Coolant temperature gauge
- Digital speed display
- Scheduled maintenance due date indicator (ASSYST)
- Engine oil level indicator
- 2 - Audio systems
- Radio
- CD player
- Cassette deck
- 3 - Navigation system
- 4 - Fault indication memory
- 5 - Individual installation
- 6 - Trip computer
- From the start
- Since reset
- Power reserve
- 7 - Phone
Press the
In some systems, additional indications can be called up by pressing the
Note. The indications on the universal display are, depending on the installation, in German, English, French, Italian or Spanish. Switching to another language - see menu «INSTRUMENT CLUSTER» (DASHBOARD) systems «Individual installation» setup menu «TEXT» (TEXT LANGUAGE).
Regardless of the language set, on models with Audio 10, Audio 10 CD, or Audio 30 APS radios, audio indicators (radio, CD player, cassette deck), and the phone displays appear in English.
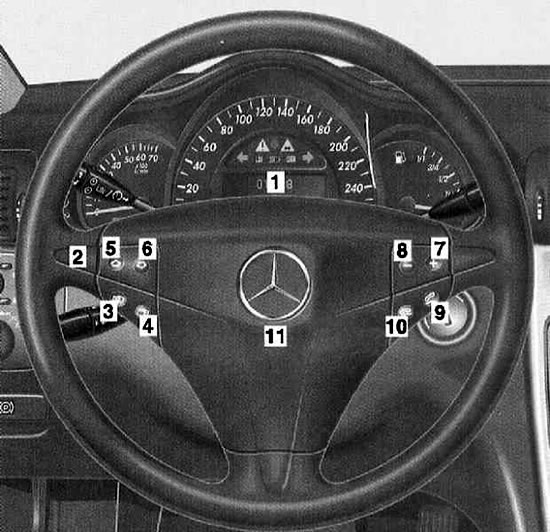
1 - Universal display
2 - Multifunctional steering wheel
Turn the key in the ignition switch to position 1 or 2.
Click button:
3 - Next system
4 - Previous system
5 - Next indication within the system
6 - Previous indication within the system
7 - Volume up
8 - Volume down
9 - Dialing a phone number, receiving an incoming telephone conversation
10 - End of a telephone conversation, refusal to receive an incoming telephone conversation
11 — a sound signal on a soft cover
Press the
Each time the button is pressed, the next system is displayed.
In some systems, additional indications can be called up by pressing the
Mileage meters, service interval indicators and indicators - speed, coolant temperature and oil level
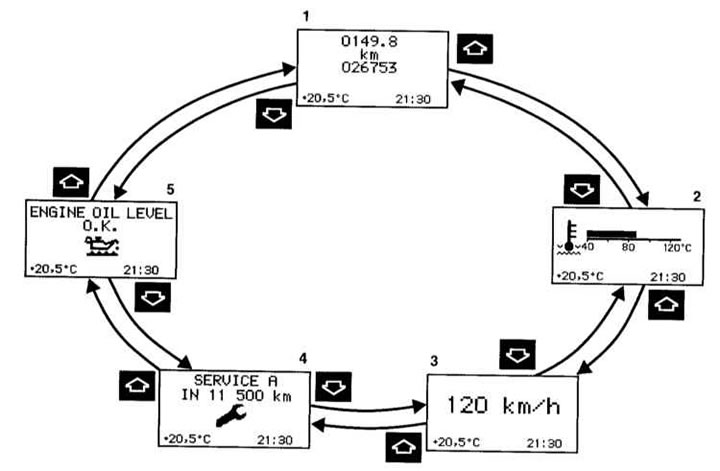
1 - Resetting the mileage meter from the moment of reset (see below)
2 - Coolant temperature gauge (see below)
3 - Digital speed indication - if in the system «Individual installation» on the menu «INSTRUMENT CLUSTERS» (DASHBOARD), in the installation menu «SELECT DISPLAY» (INDICATION SELECTION), setting selected «SPEED» (SPEED) (see below)
Outdoor temperature display1 - if the system «Individual installation», on the menu «INSTRUMENT CLUSTERS» (DASHBOARD), in the installation menu «SELECT DISPLAY» (INDICATION SELECTION), setting selected «OUTSIDE TEMPERATURE» (OUTDOOR TEMPERATURE) (see below)
4 - Indicator of the due date of scheduled maintenance (ASSYST) (Chapter Current service)
5 - Indication of the level of impellent oil (Chapter Current service)
1) Except UK
Press the
Press the
By pressing the
Audio systems
Depending on which audio system is switched on, a corresponding indication appears on the display.
Radio receiver - display for audio devices and COMAND system
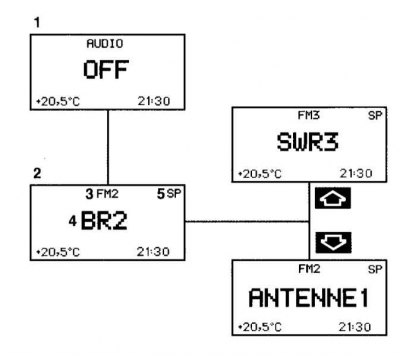
1 - No audio system enabled
2 - Radio is on
3 - The frequency band is set and, if necessary, an additional memory cell number
4 - The name of the tuned radio station or its frequency
5 — «SP» (memory) - if in the system «Individual installation», on the menu «VEHICLE» (AUTOMOBILE), in the installation menu «PRESS BUTTON IN AUDIO MODE» (PRESSING A BUTTON IN AUDIO MODE), setting selected «MEMORY» (MEMORY), BUT NOT «STATION SEARCH» (RADIO SEARCH)
Turn on the radio (separate «Manual»).
Press the
Press the
The
Pressing the
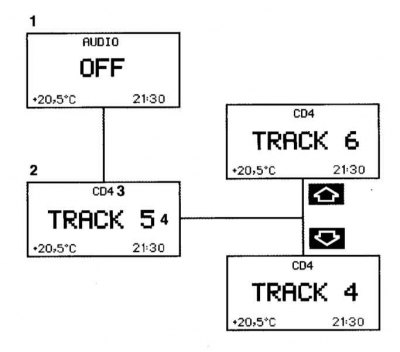
CD player - display for audio devices
CD player - display for COMAND system

1 - No audio system enabled
2 - CD player on
3 - The number of the CD being played is displayed on the CD changer
4 - Number of a piece of music
Turn on your CD player (separate «Manual»).
Press the
Press the
By pressing the
Cassette recorder - indication for Audio 10
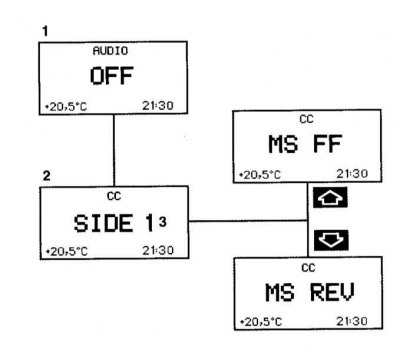
1 - No audio system enabled
2 - Cassette deck on
3 - Losing side
Turn on the cassette deck (separate «Manual»).
Press the
Press the
Press the
Pressing the
Navigation system - display for Audio 30 APS and COMAND system
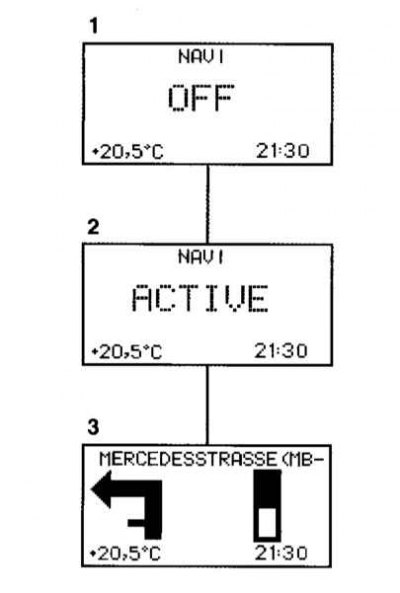
1 - Navigation system off
2 — The navigation system is on, but the target is not tracked
3 - Navigation system is on and target tracking is activated
Press the
(Navigation system - separate «Manual» COMAND systems (Cockpit Management and Data System) or Audio 30 APS).
By pressing the
Fault indication memory
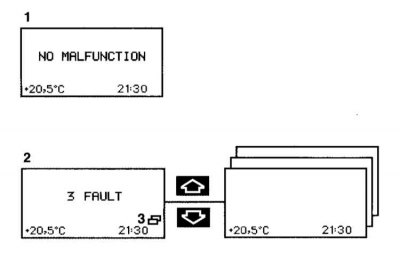
1 - No faults
2 - Number of faults
3 - Faults are stored in the fault indication memory
Press the
If the indication appears (2), press the
(Warning system and fault signaling - see Section Warning and warning lamps, as well as information display messages about registered faults)
When all fault indications are completed, the indication appears again (2).
If malfunctions occur while driving, the display (2) appears again when the key in the ignition switch is turned to position 0 or removed. Repeated indication of malfunctions on the dashboard can be called up by pressing the reset button (Chapter Dashboard).
Turning the key in the ignition switch to position 1 or 2 resets the fault indication memory.
If faults occur again, they are displayed again in the fault indication memory.
Pressing the
Individual installation

1 - Basic indication of individual installation
2 — «SETTING» (SETTINGS) - in this additional menu, you can call the required menu: «INSTRUMENT CLUSTER» (DASHBOARD) (see below)
«LIGHTING» (LIGHTING) (see below)
«VEHICLE» (AUTOMOBILE) (see below)
«HEATER» (HEATING) (see below)
«CONVENIENCE» (COMFORTABLE CONTROL) (see below)
Each menu has in turn additional submenus - the setup menu. Appropriate settings can then be made in them.
3 - Reset additional menu «SETTINGS» (SETTINGS), confirmation request (see below)
4 - Confirmation message Press the
Press the
Press the
- «INSTRUMENT CLUSTER» (DASHBOARD) (see below)
- «LIGHTING» (LIGHTING)
- «VEHICLE» (AUTOMOBILE) (see below)
- «HEATER» (HEATING) (see below)
- «CONVENIENCE» (COMFORTABLE CONTROL) (see below)
By pressing the
Reset Menu «SETTINGS» (SETTINGS) (2):
If you reset the menu «SETTINGS» (SETTINGS) (2), all settings are reset to the factory settings.
Call up the system basic display «Individual installation» (1) or «SETTINGS» (SETTINGS) (2).
Reset button on dashboard (Chapter Dashboard) press and hold for approximately 3 seconds. The display appears (3).
Press the reset button again. The display appears for confirmation (4).
If the reset button is not pressed, the system's basic display appears after approximately 5 seconds «Individual installation» (1). In this case, the setup menus are not reset.
Note. When resetting while driving for safety reasons in the menu «LIGHTING» (LIGHTING) AND «VEHICLE» (AUTOMOBILE) not all setup menus are reset (see below).
Menu «DASHBOARD»
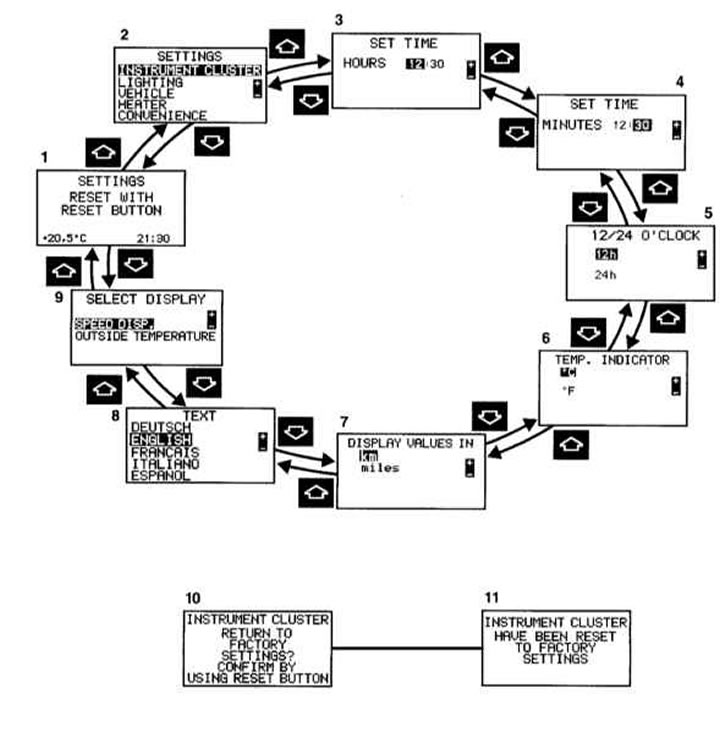
1 - Basic indication of individual installation
2 — «SETTINGS» (SETTINGS) - additional menu for menu selection
3 — «SET TIME» (TIME SETTING) «HOURS» (WATCH) 1
4 — «SET TIME» (TIME SETTING) «MINUTES» (MINUTES)
5 — «12/24 O’CLOCK» - 12 or 24 hour display
6 — «TEMP. INDICATOR» (TEMPERATURE INDICATOR) - the set unit of measurement is displayed on the outside temperature indicator on the dashboard, and on models with automated air conditioning with comfort control also on the display of this system
7 — «DISPLAY VALUES IN» (VALUES ON DISPLAY B) - the setting is valid for all indications on the universal display (not for speedometer)
8 — «TEXT» (TEXT LANGUAGE) - setting the language for indication on the universal display
9 — «SELECT DISPLAY» (INDICATOR SELECTION) 2 - selected option «SPEED DISP.» (SPEED) or «OUTSIDE TEMPERATURE» (OUTDOOR TEMPERATURE) permanently displayed on the universal display.
«SPEED DISP.» (SPEED), for example, can be used to additionally display the speed in miles, if the settings menu (7) «SPEEDOMETER» (SPEEDOMETER) installed on «MILES» (MILES)
10 - Reset menu «DASHBOARD», confirmation request (see below)
11 - Confirmation message
Note. The block diagram shows an example of a possible installation.
1 Only models without COMAND or without Audio 30 APS. (COMAND or Audio 30 APS system - separate «Manual»).
2 Excludes UK.
Press the
Press the
Press the
Press the
In the setup menu (3, 4) by pressing the
The selected setting is marked.
The settings made are saved and executed immediately.
After going through all the setup menus, the system's basic display is displayed again «Individual installation» (1).
By pressing the
Reset Menu «INSTRUMENT CLUSTER» (DASHBOARD) (5-9) to factory setting:
Call up one of the setup menus (5-9).
Reset button on dashboard (Chapter Dashboard), press and hold for about 3 seconds. The display appears (10).
Press the reset button again. The display appears for confirmation (11).
If the reset button is not pressed, the additional menu is displayed after approximately 5 seconds «SETTINGS» (SETTINGS) (2). In this case, the setup menus are not reset.
Menu «LIGHTING»
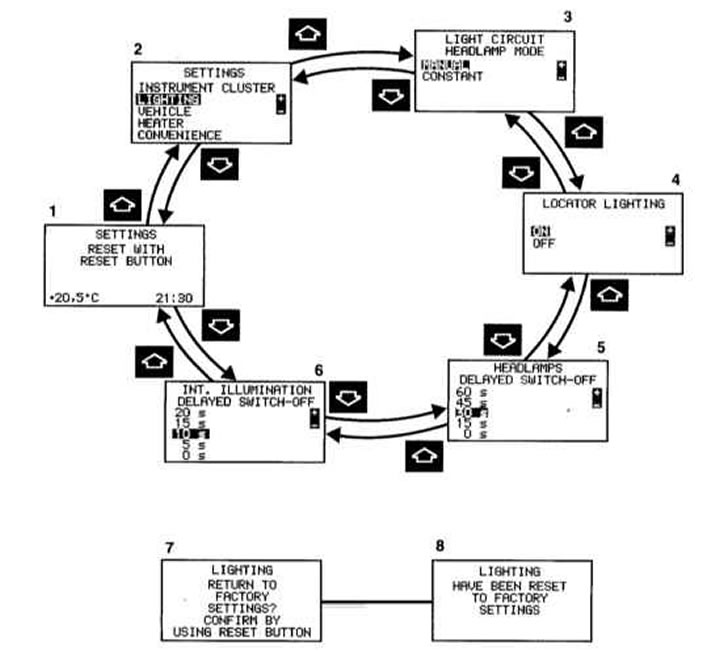
1 - Basic indication of individual installation
2 — «SETTINGS» (SETTINGS) - additional menu for menu selection
3 — «LIGHT CIRCUIT HEADLAMP MODE» (HEADLIGHT SWITCHING) (Chapter Switches)
4 — «LOCATOR LIGHTING» (LIGHTING FOR ORIENTATION) (Chapter Switches)
5 — «HEADLAMPS DELAYED SWITCH-OFF» (SLOW DOWN HEADLIGHTS (Chapter Switches)
6 — «INT. ILLUMINATION DELAYED SWITCH-OFF» (INTERIOR LIGHTING OFF WITH TIME DELAY) (Chapter Power windows, sunroof)
7 - Reset menu «LIGHTING» (LIGHTING), confirmation request (see below)
8 - Confirmation message
Note. The block diagram above shows an example of a possible installation.
Press the
Press the
Press the
Press the
In the setup menu (3-6) the setting is selected by pressing the
The settings made are saved and executed immediately.
After going through all the setup menus, the system's basic display is displayed again «Individual installation» (1).
Pressing the or button displays the next or previous system.
Reset Menu «LIGHTING» (LIGHTING) (3-6) to factory setting:
Call up one of the setup menus (3-6).
Reset button on dashboard (Chapter Dashboard) press and hold for approximately 3 seconds. The display appears (7).
Press the reset button again. The display appears for confirmation (8).
If the reset button is not pressed, the additional menu is displayed after approximately 5 seconds «SETTINGS» (SETTINGS) (2). In this case, the setup menus are not reset.
Note. When resetting while driving for safety reasons, the setup menu «HEADLAMP MODE» (HEADLIGHT SWITCHING) is not reset. The message appears «LIGHTING CANNOT BE COMPLETELY RESET TO FACTORY SETTINGS WHILE DRIVING» (LIGHTING WHILE DRIVING IS NOT FULLY RESET TO FACTORY SETTINGS).
Menu «AUTOMOBILE»

1 - Basic indication of individual installation
2 — «SETTINGS» (SETTINGS) - additional menu for menu selection
3 — «SPEED LIMIT (WINTER TYRES)» (SPEED LIMIT, WINTER TIRES)» 1, - permanent speed limiter (Chapter Vehicle control and assistance systems).
Choice of models with petrol engine: «Off», «240 km/h» before «160 km/h» in steps of 10 km/h.
Choice of models with diesel engine: «Off», «210 km/h», «190 km/h», «160 km/h».
4 — «PRESS BUTTON IN AUDIO MODE» (PRESSING A BUTTON IN AUDIO MODE) - installation of a radio receiver
«STACION SEARCH» (RADIO SEARCH) - use the
«MEMORY» (MEMORY) - using the
5 — «AUTOMATIC DOOR CLOCK» (AUTOMATIC DOOR LOCKING) (Chapter Locks, keys and locks. Single lock)
6 - Reset menu «AUTOMOBILE», confirmation request (see below)
7 - Confirmation message
Note. The block diagram above shows an example of a possible installation.
Press the
Press the
Press the
Press the
In the setup menu (3-5) the desired setting is selected by pressing the
After going through all the setup menus, the system's basic display is displayed again «Individual installation» (1).
Pressing the
Reset Menu «VEHICLE» (AUTOMOBILE) (3-5) to factory setting:
Call up one of the setup menus (3-5).
Press and hold the reset button on the instrument panel for approximately 3 seconds. The display appears (6).
Press the reset button again. The display appears for confirmation (7).
If the reset button is not pressed, the additional menu is displayed after approximately 5 seconds «SETTINGS» (SETTINGS) (2). In this case, the setup menus are not reset.
Note. When resetting while driving for safety reasons, the setup menu «SPEED LIMIT (WINTER TYRES)» (SPEED LIMIT, WINTER TIRES) is not reset. The message appears «VEHICLE CANNOT BE COMPLETELY RESET TO FACTORY SETTINGS WHILE DRIVING!» (THE VEHICLE IS NOT FULLY RESET TO FACTORY SETTINGS WHILE DRIVING).
Menu «Heating»
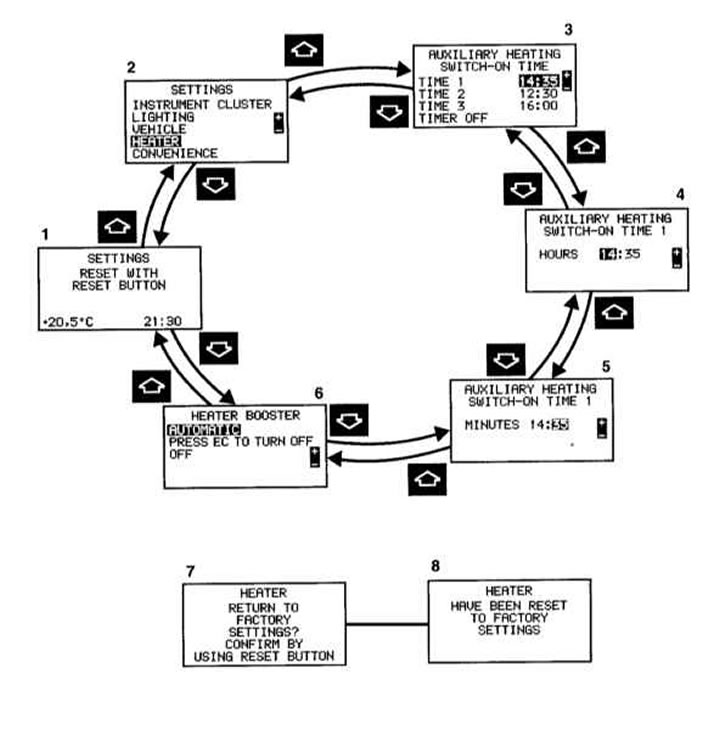
1 - Basic indication of individual installation
2 — «SETTINGS» (SETTINGS) - additional menu for menu selection
3 — «AUXILIARY HEATING» (INDEPENDENT HEATER)
4 — «AUXILIARY HEATING SWITCH-ON TIME 1 HOURS» (INDEPENDENT HEATER, ON TIME 1 - HOURS) 1, 2
5 — «AUXILIARY HEATING SWITCH-ON TIME 1 MINUTS» (INDEPENDENT HEATER, ON TIME 1 - MINUTES)
6 — «HEATER BOOSTER» (ADDITIONAL HEATING DEVICE) 3
7 - Reset menu «HEATER» (HEATING), confirmation request
8 - Confirmation message
Note. The block diagram above shows an example of a possible installation.
- 1) Only models with independent heater
- 2) Appears only if in the setup menu (3) «AUXILIARY HEATING» (INDEPENDENT HEATER) selected «TIME» (TIME).
- 3) Diesel models only.
Press the
Press the
Press the
Press the
In the setup menu (4, 5) by pressing the
The settings made are saved and executed immediately.
After going through all the setup menus, the system's basic display is displayed again «Individual installation» (1).
By pressing the
Reset Menu «HEATING» (HEATING) (3-6) to the factory setting.
Call up one of the setup menus (3-6).
Reset button on dashboard (Chapter Dashboard) press and hold for approximately 3 seconds. The display appears (7).
Press the reset button again. The display appears for confirmation (8).
If the reset button is not pressed, the additional menu is displayed after approximately 5 seconds «SETTINGS» (SETTINGS) (2). In this case, the setup menus are not reset.
Installation menu «INDEPENDENT HEATER»
Do not turn on the independent heater at filling stations and in enclosed spaces without an extractor hood (e.g. in garages).
Setting and selecting the desired switch-on time
Call up the installation menu (3) «AUXILIARY HEATING» (INDEPENDENT HEATER).
By pressing the button
Call up the installation menu (4) «AUXILIARY HEATING» (INDEPENDENT HEATER) «SWITCH-ON TIME 1 HOURS» (ON TIME 1, HOURS) and press the
Call up the installation menu (5) «AUXILIARY HEATING» (INDEPENDENT HEATER) «SWITCH-ON TIME 1 MINUTES» (ON TIME 1, MINUTES) and press the
The activation time for the independent heater has been set and selected.
Selecting the required switching time:
Call up the installation menu (3) «AUXILIARY HEATING» (INDEPENDENT HEATER).
By pressing the button
The activation time for the independent heater has been selected.
Note. Only one switch-on time can always be selected (additional information - see «Independent heater», Chapter Automatic heater and air conditioner. Ventilation. Independent heater).
Menu «Comfort control» (models with memory function)
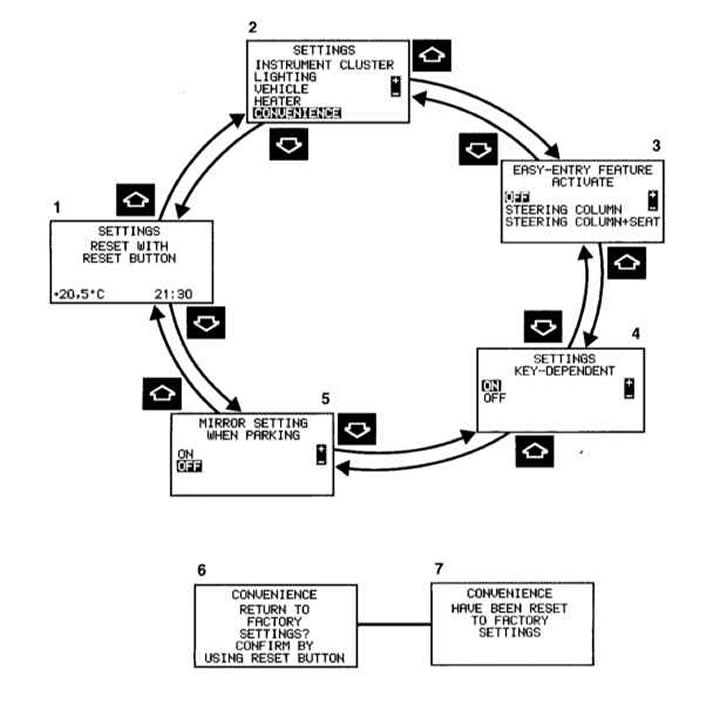
1 - Basic indication of individual installation
2 — «SETTINGS» (SETTINGS) - additional menu for menu selection
3 — «EASY-ENTRY FEATURE ACTIVATE» (ACTIVATE ASSISTED LANDING SYSTEM) (Chapter Facilitate getting in and out of the car)
4 — «SETTINGS» (SETTINGS) «KEY-DEPENDENT» (DEPENDING ON THE KEY) - if installation is selected «ON» (ON), all settings made in the system menu «Individual installation», can be entered into memory depending on the key. (Memory function - see section Memory for seats, steering wheel and exterior mirrors)
5 — «MIRROR SETTING WHEN PARKING» (ADJUSTING THE PARKING MIRRORS) (Chapter Steering wheel, mirrors)
6 - Reset menu «CONVENIENCE» (COMFORTABLE CONTROL), confirmation request (see below)
7 - Confirmation message
Note. The block diagram above shows an example of a possible installation.
Press the
Press the
Press the
Press the
In the setup menu (3-5) the desired setting is selected by pressing the
After going through all the setup menus, the system's basic display is displayed again «Individual installation» (1).
By pressing the
Reset Menu «CONVENIENCE» (COMFORTABLE CONTROL) (3-5) to factory setting:
Call up one of the setup menus (3-5).
Reset button on dashboard (Chapter Dashboard) press and hold for approximately 3 seconds. The display appears (6).
Press the reset button again. The display appears for confirmation (7).
If the reset button is not pressed, the additional menu is displayed after approximately 5 seconds «SETTINGS» (SETTINGS) (2). In this case, the setup menus are not reset.
Trip computer
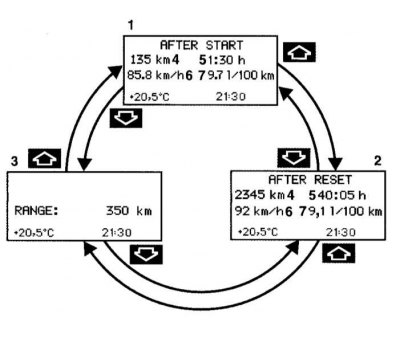
1 — «AFTER START» – distance meter since launch
2 — «AFTER RESET» - mileage meter since reset
3 — «RANGE» (POWER RESERVE) - indication of the presence of fuel in the fuel tank with an approximate indication of the distance that can be covered with the available fuel supply
4 - Mileage since start or reset in km «AFTER START» or «AFTER RESET»
5 - Time since startup or reset «AFTER START» or «AFTER RESET»
6 - Average speed since start or reset «AFTER START» or «AFTER RESET»
7 - Average fuel consumption since start or reset «AFTER START» or «AFTER RESET»
Press the
Press the
Pressing the
Note. Recalling the trip computer always displays the meter from the start «AFTER START» (1).
Reset mileage meter since startup «AFTER START» (1) or mileage meter since reset «AFTER RESET» (2)
Use the
Note. Turning the key in the ignition switch to position 0 or removing it after about 4 hours automatically resets the mileage meter from the moment it was started «AFTER START» (1), if the key is not turned back to position 1 or 2 within this time.
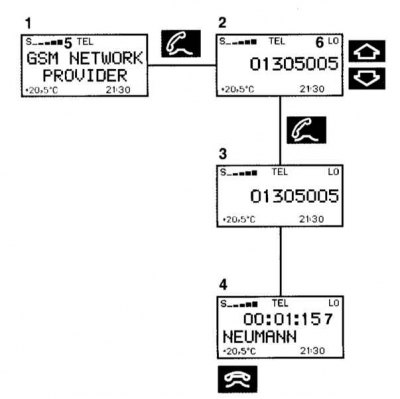
Telephone
Phone book - display for audio devices
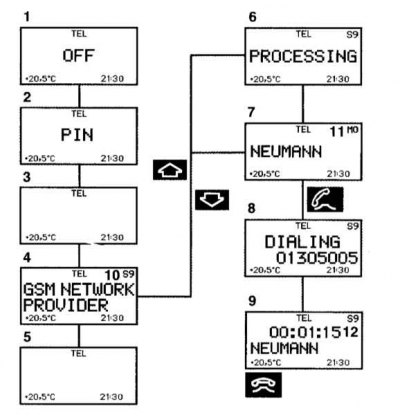
Phone book - display for COMAND system
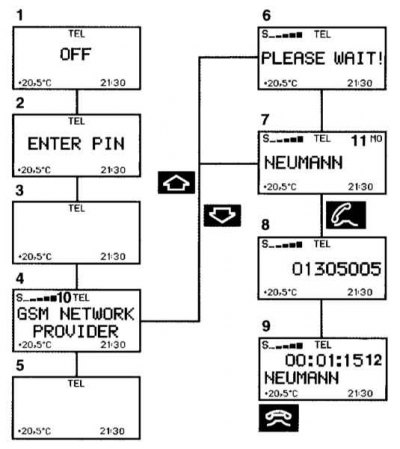
1 - Phone off
2 - Enter PIN code (personal identification code) SIM cards - separate «Phone User Guide» or respectively «Manual» systems «Linguatronic»
3 - Search for the appropriate telephone network
4 - The phone is ready for use. The corresponding GSM network provider is displayed
5 - Vehicle is currently out of transmit or receive range
6 - The phone book stored on the phone card or in the phone is being read. Duration - about 30 seconds
7 - Surname selected from the phone book
8 - Number of the selected subscriber, the dialing process begins
9 - The dialing process is completed and the last name is displayed. The indication is kept during the whole telephone conversation
10 - Signal strength - on the right side of the display on models with audio devices: the higher the number, the stronger the received GSM network signal
Signal strength - on the left of the display on models with the COMAND system: the more bars are displayed, the stronger the received GSM network signal
11 - Memory cell number
12 - Indication of the duration of the conversation
The phone and audio device or COMAND system must be turned on.
Press the
Press the button
Models with Audio 10 CD radio or Comand system:
If the
Note. If you decide not to call, press the button. The process is interrupted and the display appears (4).
Press the
If the dialing process is completed, the last name is displayed (9). Indication (9) persists throughout the call.
Press the
By pressing the
Recalling a subscriber - indication for audio devices
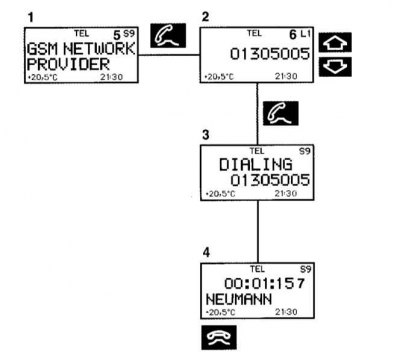
Recalling a subscriber - indication for the COMAND system
1 - The phone is ready for use. The corresponding GSM network provider is displayed
2 - Number or surname in the subscriber's recall memory
3 - Number in the subscriber's recall memory - the dialing process has begun
4 - The dialing process is completed, and the subscriber's last name stored in the phone book or the dialed number is displayed if the subscriber's last name is not remembered. The indication is kept during the whole telephone conversation
5 - Signal strength - on the right side of the display on models with audio devices:
the higher the number, the stronger the received GSM network signal
Signal strength - on the left of the display on models with the COMAND system:
the more bars are displayed, the stronger the received signal of the GSM network
6 - Memory cell number of the COMAND system: the last 10 dialed numbers are stored.
L0, last dialed number,
L1-L9, previous dialed numbers
Audio device memory number:
the last 9 dialed numbers are remembered,
LO, last dialed number,
L1-L9, previous dialed numbers
7 - Indication of the duration of the conversation
The phone and audio device or COMAND system must be turned on.
Press the
Press the
Press the
Note. If you decide not to call, press the button. The process is interrupted and the display appears (1).
Press the
Phone number dialed (3).
If the dialing process is completed, the last name is displayed (4), if it is stored in the phone book; otherwise, the telephone number display is retained. The indication is kept during the whole telephone conversation.
Press the
Pressing the
Incoming call
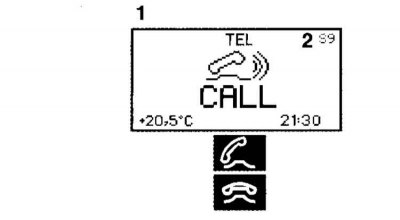

1 - You are being called
2 - Signal strength - on the right side of the display on models with audio devices:
the higher the number, the stronger the received GSM network signal
Signal strength - on the left of the display on models with the COMAND system:
the more bars are displayed, the stronger the received signal of the GSM network.
The phone must be turned on.
Press the
Press the
Note. If you do not want to accept an incoming call, press the button.
Volume control
Press the
Only the volume of the activated or selected system can always be adjusted.
These are audio systems, telephone, radio traffic information service, navigation system speech output and voice control system speech output «Linguatronic».
Note. On models with the COMAND system, the volume adjustment made is memorized for each system separately.
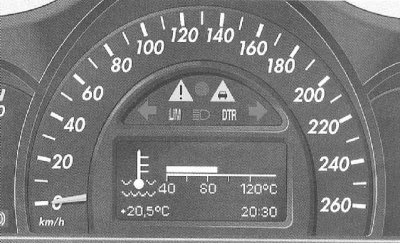
Coolant temperature gauge
Turn the key in the ignition switch to positions 1 and 2;
If the mileage meter since reset and the total mileage meter are not displayed, press the
Press the
When properly charged with antifreeze with anti-corrosion additives, the boiling point of the coolant in the pressurized cooling system is reached at a temperature of approximately 130°C.
At high outside temperatures and when driving in mountains, the coolant temperature may rise to the end of the scale.
Note. Too high coolant temperature is displayed automatically (see «Warning system and fault signaling», Chapter Warning and warning lamps, as well as information display messages about registered faults).