



Contents: Manual adjustment of the front seats ↡ Headrest height ↡ Electric adjustment of front seats ↡ Switches in the front doors ↡ Releasing and fixing the front seat…↡ Heated seats ↡ Switch on the middle console. ↡ Rear seat headrests ↡ Headrest height ↡ Removal and installation headrests ↡ Electrically adjustable front seat ↡
Manual adjustment of the front seats
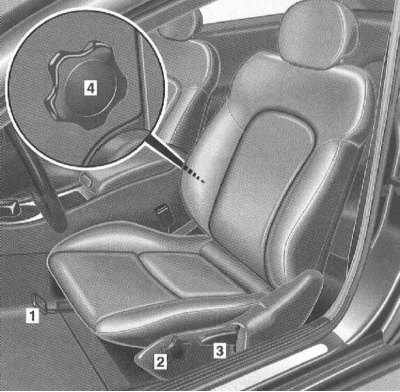
It is recommended to make adjustments as follows:
1. Longitudinal movement of the seat.
- Lift the handle and adjust the seat to a position where the accelerator and brake pedals are easily reached.
2. Tilt the seat cushion.
- Rotate the handle forward or backward until you reach a position that provides light support to your thighs.
3. Seat height.
- Pull the lever - raise the seat cushion
- Press the lever - lowers the seat cushion
4. Backrest tilt.
- Rotate the handle until the seat back is in the desired position. For safety reasons, a position close to vertical is recommended.
Note: When changing position, relieve the back.
Headrest height
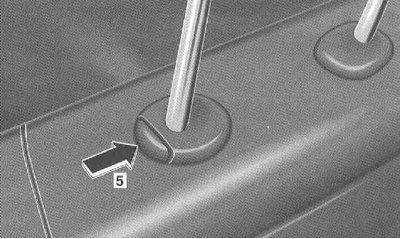
5 Releasing the headrest
Higher installation: Pull the headrest up.
Installation below: press the release button (5) and lower the headrest by pressing it from above.
Adjust the headrest so that the back of your head rests on it at approximately eye level.
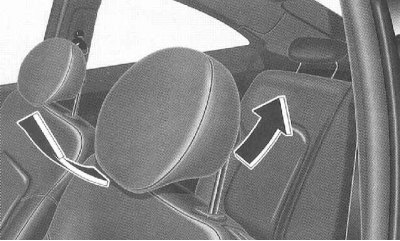
Adjust the headrest angle manually. Pull or push the headrest from the front.
Electric adjustment of front seats
Turn the ignition key to position 1 or 2.
With the driver's door open, the driver's seat position can be adjusted with the key inserted.
The front passenger seat position can also be adjusted with one door open.
Note: When adjusting the seat position from the reclining or far-back position, ensure that the rear vanity mirrors are covered.
Switches in the front doors
The seat position can be adjusted if the key in the ignition switch is turned to position 1 or 2 or the corresponding door is open.
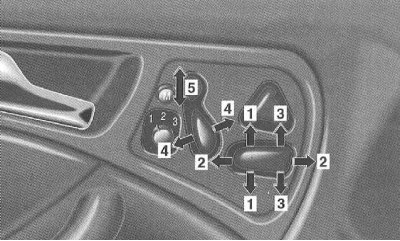
It is recommended to perform the basic adjustment as follows:
1. Seat height.
- Move the switch at the rear in the direction of the arrow until the highest position is reached, while maintaining sufficient headroom.
2. Longitudinal movement of the seat.
- Move the switch in the direction of the arrow until a position is reached where the accelerator and brake pedals are comfortably reached.
3. Tilt the seat cushion.
- Move the switch in front in the direction of the arrow until you reach a position that provides light support for your thighs.
4. Backrest tilt.
- Move the switch in the direction of the arrow until the desired position of the seat back is reached. For safety reasons, we recommend a nearly vertical position. Adjust the steering wheel so that your arms resting on the steering wheel are slightly bent at the elbows.
5. Height of headrests.
- The height of the head restraints is adjusted by means of a switch so that the back of the head rests on the head restraint at approximately eye level.
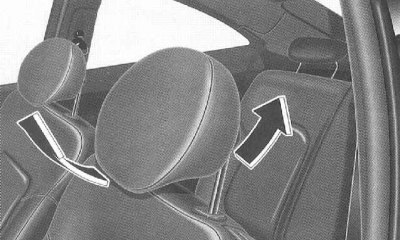
Adjust the headrest angle manually. Pull or push the headrest from the front.
Releasing and fixing the front seat backs
Assisted landing function
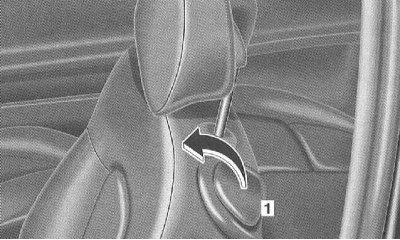
If the seat is in the rear third of the seat adjustment range, the seat cushion is folded forward in addition to the seat backrest to make it easier to get in. On models with electric seat adjustment, there is an additional electric drive for lowering the head restraint.
Folding the seat back forward:
- Turn the handle forward and then tilt the backrest forward.
- Note for models with manual seat adjustment:
- Fold the backrest forward towards the seat, lower the headrest if necessary.
Folding the seat back back:
- Tilt the backrest back and press it to lock it into the driving position.
- On models with manual seat adjustment, recline the seatback back against the seat and lower the headrest if necessary.
Heated seats
Turn the ignition key to position 1 or 2.
Note: If too many electrical consumers are switched on or the battery is not sufficiently charged, the seat heater may switch off. In this case, one or both indicator LEDs will flash.
When sufficient voltage is restored, the seat heater turns on automatically.
Switch on the middle console.
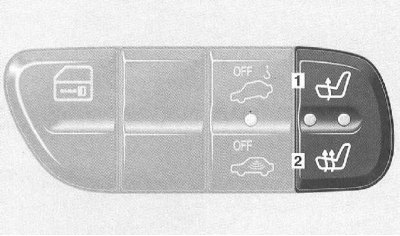
1. "Normal heating mode" button
2. "Maximum heating mode" button
Press the button (1):
- The red control LED on the button lights up.
- Normal heating mode.
- After approximately 30 minutes, the seat heater switches off automatically.
Press the button (2):
- Both red control LEDs on the button light up. Maximum heating mode.
- After approximately 5 minutes, the unit automatically switches to normal heating mode.
Press button (1) or (2) again:
- None of the control LEDs are lit.
- The seat heater is off.
Rear seat headrests
If the rear seats are occupied, drive only with the head restraints in place. This reduces the risk of injury to rear seat passengers in an accident.
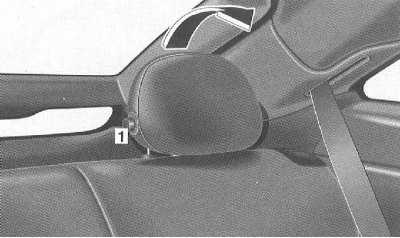
1 Key
Folding: Press the button (1). The headrest folds down.
Upward installation: Fold the headrests up manually (arrow) until they lock into place.
Tilt: The headrests can be locked in 2 positions. To do this, press the button (1) and set the headrests to the desired position. Set the headrest as close to the head as possible.
Headrest height
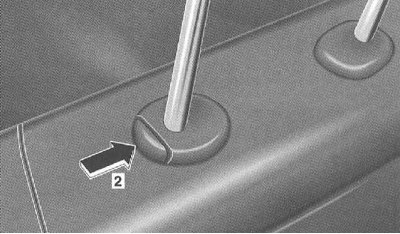
2 Releasing the headrest
The headrests can be adjusted in height.
Higher installation: Pull the headrest upwards. If the headrest has been pushed all the way in, press the release button (2).
Installation below: Press the release button (2) and lower the headrest by pressing it from above.
Removal and installation headrests
Note: To make it easier to install and remove the head restraints, tilt the seat back slightly.
Manually adjustable front seats, rear bench seat
Removing the head restraint: Lift the head restraint up to the stop. Press the release button (1) and pull out the head restraint.
Installing the headrest: Install the headrest so that the fork lock is on the left in the direction of vehicle travel.
Press the headrest down until it locks into place.
Electrically adjustable front seat
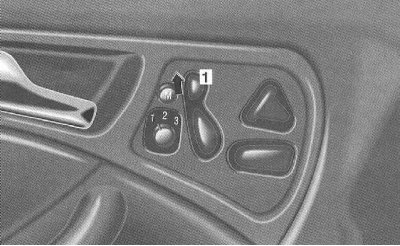
Removal the headrest
Move the switch (1) upward and hold it in this position until the head restraint is fully extended. Pull out the head restraint.
Installing the headrest
Press the switch (1) upwards for approximately 5 seconds.
Install the headrest so that the fork lock is on the left in the direction of vehicle travel.
Press the headrest down until it locks into place.
Using the switch, lower the headrest down to the stop and raise it up to the stop.