



Contents: Petrol models ↡ Diesel models ↡
Petrol models
Examination
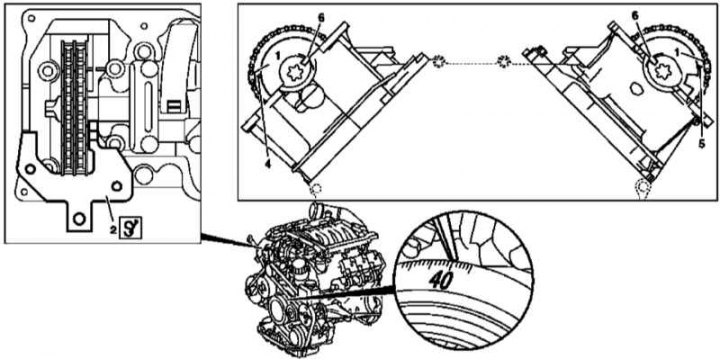
Setting the basic position of the camshafts of gasoline engines M112/113
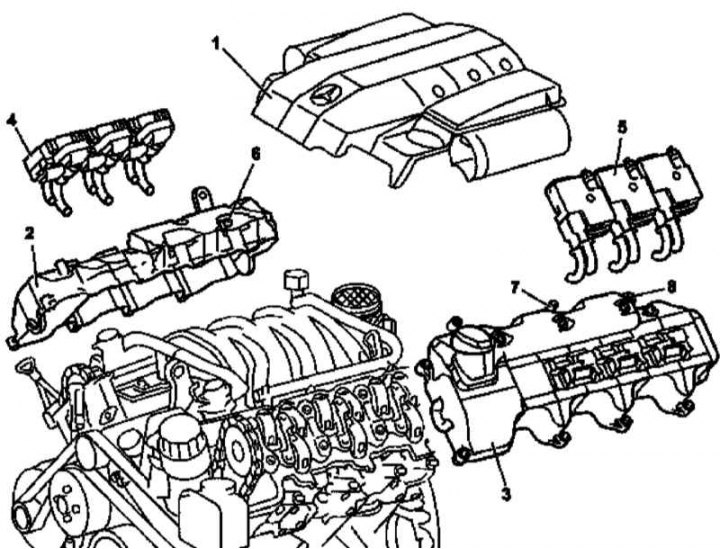
Installation details of cylinder head covers on M112/113 petrol engines (using the M112 as an example)
1 - Upper engine trim panel with integrated air cleaner; 2 - Right cylinder head cover; 3 - Left cylinder head cover; 4 - Assembly of ignition coils of the right bank of cylinders; 5 - Assembly of ignition coils of the left bank of cylinders; 6 - Right breather; 7, 8 - Left breathers
1. Remove the cylinder head covers.
2. To check the correctness of the basic installation of the camshafts, turn the crankshaft in the normal direction and bring the piston of the first cylinder to the position 40° after TDC - the camshafts should turn with their grooves (6) towards the plane of symmetry of the engine and be freely fixed by the locking rods.
Note: On models equipped with an air pump, the combination valve must be unbolted before installing the right-hand locking pin. The copper-plated segments of the chain (1) must align with the marks (4) on the camshaft sprockets - it may be necessary to rotate the crankshaft up to 14 times to achieve the desired result.
3. Remove the chain tensioner.
4. Remove the Hall sensor.
5. After lifting the chain, remove the sprocket first from the right, then from the left camshaft.
6. Using an open-end wrench, rotate the left camshaft to its base position - the grooves (6) rotated toward the plane of symmetry of the engine should align with the joint line of the covers with the heads - and secure it with the locking plate (2), placing the latter flush with the left head and inserting it into the groove (6) of the camshaft.
At the position of the piston of the first cylinder 40° after TDC, the camshaft can turn without the risk of piston collision with the valves.
7. Proceed in a similar manner to set the right camshaft. If necessary, make the necessary adjustments (see below).
8. When threading the chain, install the camshaft sprockets in place (first left, then right).
9. Install the Hall sensor.
10. Install the chain tensioner.
11. Make sure that the timing marks are aligned correctly, then install the cylinder head covers.
12. Finally, check that the ignition timing is set correctly (see Section Checking the correct setting of the ignition timing on gasoline models).
Adjustment
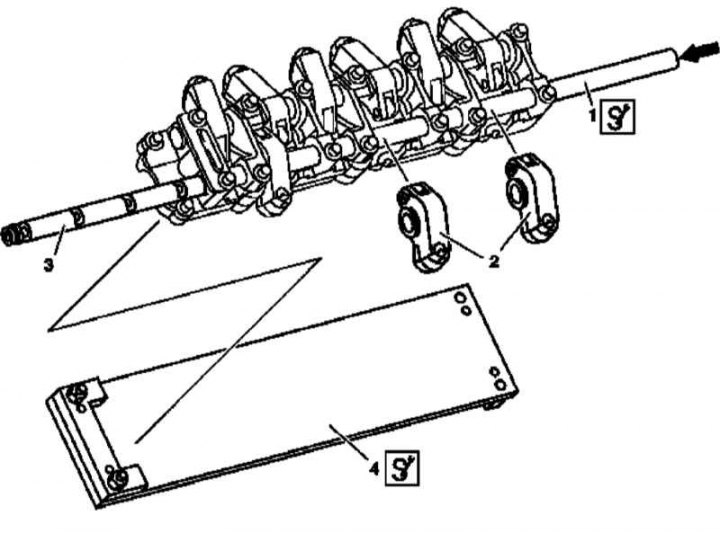
Adjusting the base position of the camshafts on gasoline engines M112/113 (using the M112 as an example)
1. Remove the bearing cap bridge of the corresponding camshaft.
2. Push out the axle (3) using a punch (1) with a diameter of 15 mm and remove the rocker arms (2).
Note: To facilitate the removal of the rocker arm axle, the bridge can be preheated and installed on a special stand (4).
3. Remove the drift (1) and insert the guide shaft into its place (Ø 16 or 18 mm), while simultaneously placing the rocker arms (2) on it.
4. If necessary, preheat the bridge and insert the rocker arm axle (3) into it, pushing out the guide shaft with it - try not to bend the rocker arms aligned in the assembly.
5. Install the bridge assembly in its original place.
Diesel models
M612
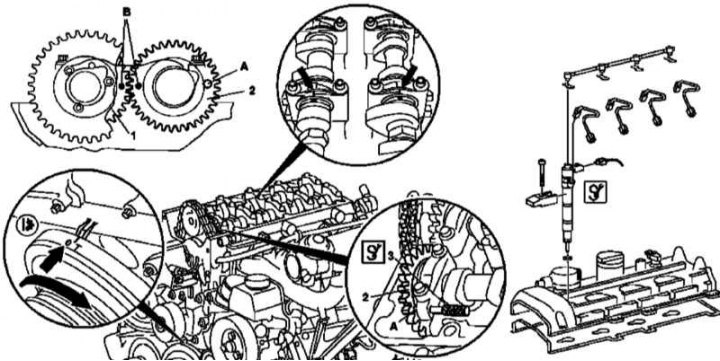
Checking the basic position of the camshafts of the diesel engine M612
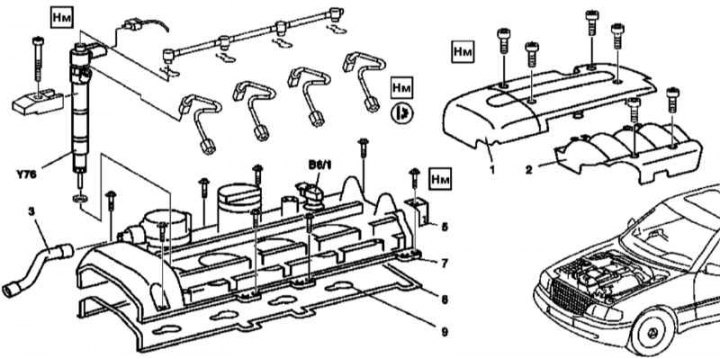
Installation details of the cylinder head cover of the M612 engine
1 - Cylinder head cover trim panel; 2 - Air distributor trim panel; 3 - Breather pipe; 5 - Wiring harness support bracket; 7 - Cylinder head cover; 8 - Sealing gasket; 9 - Sealing elements; B6/1 - Hall sensor; Y76 - Injectors
1. Remove the injectors (Y76) (see Chapter Fuel and exhaust systems).
2. Remove the cylinder head cover.
3. Remove the cooling system fan with viscous coupling (see Chapter Cooling, heating, ventilation and air conditioning systems).
4. Turn the crankshaft in the normal direction, bring the piston of the first cylinder to the TDC position - the marks on the camshaft and its bearing cap should align.
5. Lock the camshafts using a special rod (3) inserted through the hole in the first shaft bearing cap and inserted into the hole (A) in the gear (2) of the intake camshaft.
6. When the basic installation is correct, the marks (B) of the camshaft gears (1 and 2) should be aligned. In addition, the marks applied to the shaft bodies and their bearing caps (arrows) should be aligned.
7. If necessary, remove the camshafts and install them in place, ensuring that the marks are correctly aligned.
8. Reinstall the removed components in the reverse order of removal.
9. Finally, read the DTC codes and clear the on-board diagnostic system memory using the STAR DIAGNOSIS scanner (6511 1801 00) (See Chapter Engine electrical systems).
M628
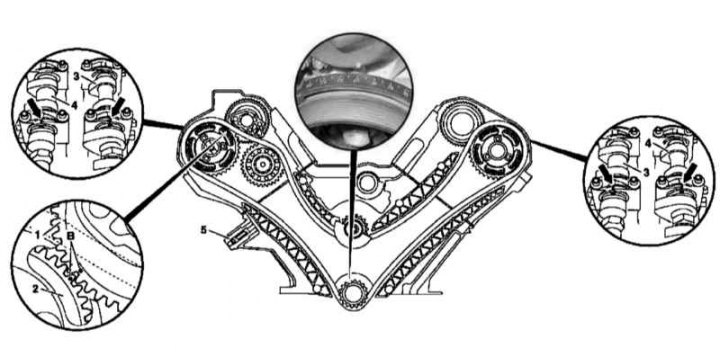
Setting the base position of the camshafts of the 628 series engine
1 - Intake camshaft gear; 2 - Exhaust camshaft gear; 3 - Intake camshaft; 4 - Exhaust camshaft; 5 - Chain tensioner; B - Installation marks
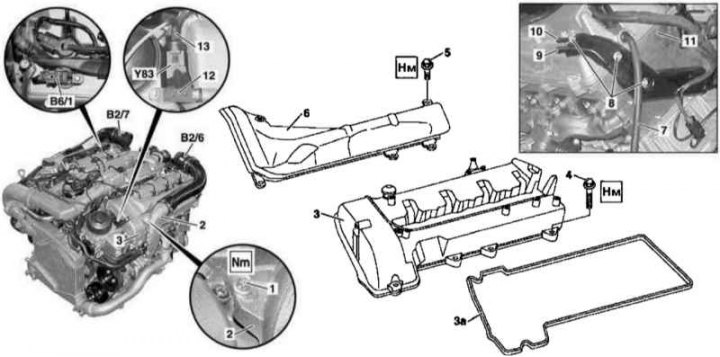
Installation details of cylinder head covers for the M682 engine (1 of 2)
1, 4, 5 - Screws; 2 - Air intake duct; 3 - Cylinder head cover; 3a - Sealing gasket; 6 - Lid; 7 - Drainage hose; 8 - Bolts; 9 - Fuel supply line; 10 - Fuel return line; 11 - Cylinder head; 12 - Support bracket; 13 - Vacuum hose; B2/6 - Left MAF sensor; B2/7 - Right MAF sensor; B6/1 - Camshaft Hall Sensor; Y83 - Intake Port Shut-Off Switch Valve
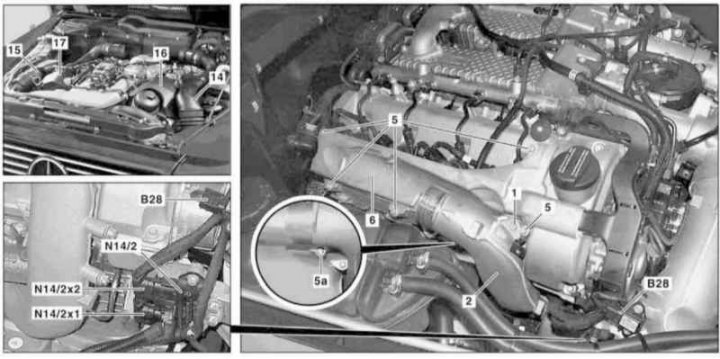
Installation details of cylinder head covers for the M682 engine (2 of 2)
5 - Screw; 5a— Bolt; 6 - Lid; 14— Left air intake duct; 15— Right air intake duct; 16 - Left cylinder head trim panel; 17 - Right cylinder head trim panel; B28 - Pressure sensor; N14/2 - Output stage of the preheating system; N14/2x1— Pre-heater output stage wiring connector; N14/2x2 - Preheater Output Stage Wiring Connector
1. Remove the cylinder head covers.
2. Remove the intercooler (Intercooler) turbocharging systems (see Chapter Fuel and exhaust systems).
3. Turn the crankshaft in the normal direction, bring the piston of the first cylinder to the TDC position.
4. Check the basic position of the camshafts - the gears should be turned with the marks (B) towards each other, in addition, the marks applied to the shaft bodies and their bearing caps (arrows) should be aligned.
5. Make appropriate adjustments if necessary.
6. Reinstall the removed components in the reverse order of removal.