



Contents: Switching headlights ↡ Manual mode ↡ Automatic mode ↡ Important! ↡ Constant light mode 1 ↡ Headlight switch-off function with…↡ Lighting for orientation ↡ Headlight range control ↡ Headlight cleaner ↡ Combination switch1 ↡ Windscreen wiper arm lock ↡ Streaks on the windshield ↡ Emergency alarm system ↡
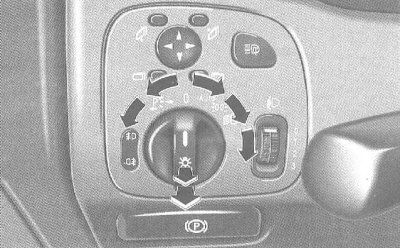
 Light switch.
 Turned off.
 Automatic switching of headlights.
 Side lights, license plate lighting.
 Low beam, side lights, license plate light.
High beam (combined steering column switch press away from you).
 Parking lights, right.
 Parking lights, left.
Pull the switch to the 1st locking position:
 Fog light in addition to parking and low beam.
The green control LED is on.
Pull the switch to the 2nd locking position:
 Rear fog light in addition to fog lights.
The yellow control LED is on.
Note: When the key is removed and the door is open, a signal will sound if the vehicle's exterior lighting is on (except for parking lights) not turned off.
Switching headlights
The headlights can be switched on/off manually or automatically, or switched to constant mode.
Select the appropriate function - refer to the subsection "Individual installation" of the Section Multifunctional steering wheel, universal display.
Manual mode
The low beam, parking lights and number plate light are switched on and off via the light switch.
(Light switch - see above).
Automatic mode
Light switch in position
 .
.
Turn the key in the ignition switch to position 1.
The parking light switches on and off automatically depending on the external light level.
Turn the key in the ignition switch to position 2 (+ engine on).
The low beam, parking light and number plate light are switched on and off automatically depending on the external light level.
The low beam, parking light and number plate light can still be switched on manually using the light switch.
Important!
In fog, the headlights do not turn on using the automatic headlight switching function.
If necessary, turn on the vehicle lighting manually.
Constant light mode 1
The low beam, parking light and number plate light are switched on when the engine is running. The high beam and hazard warning light can still be switched on and off manually.
When turning the light switch to the positions
 ,
,  ,
,  or
or  the light is switched on in accordance with the position of the switch.
(Activation of the function - see the "Individual installation" system, "LIGHTING" menu, Section Multifunctional steering wheel, universal display).
¹ In accordance with the legislation of some countries.
Headlight switch-off function with time delay (SLOW DOWN HEADLIGHTS)
In the dark, after the engine is turned off, the parking light, tail light, license plate light and fog light come on.
After the doors are closed, the delay time for the headlights' slow-down function begins to count down. The duration of the delay can be adjusted in several steps between 0 (off) and 60 seconds.
Note: Within 10 minutes after the doors are closed, this function can be reactivated by opening one of the doors.
If no doors are opened after the engine is turned off, or if the doors are not fully closed after they are opened, the delayed dimming function will automatically turn off after approximately 60 seconds.
(Activation of the function - see the "Individual installation" system, "LIGHTING" menu, Section Multifunctional steering wheel, universal display).
Temporary disabling of the headlight switch-off function with a time delay:
Before leaving the vehicle, turn the ignition switch key to position 0, then to position 2, and then back to position 0.
Lighting for orientation
In the dark, after unlocking the vehicle with the master key, the parking light, tail light, license plate light and fog light come on.
When the driver's door is opened, or after 40 seconds at the latest, the lights go out.
The function can be switched on or off in the "LIGHTING" menu of the "Individual Installation" system, in the installation menu, "LOCATOR LIGHTING" (ORIENTATION LIGHTING) (Chapter Multifunctional steering wheel, universal display).
Headlight range control
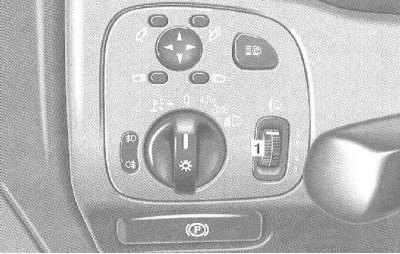
1 Headlight range control
0 Front seats occupied.
1 Front and rear seats are occupied.
The driver's seat is occupied and the trunk is loaded to the permissible load on the rear axle.
2 The front and rear seats are occupied and the luggage compartment is loaded to the permissible rear axle load.
Note: On models with xenon headlights, the headlight range is adjusted automatically.
Headlight cleaner
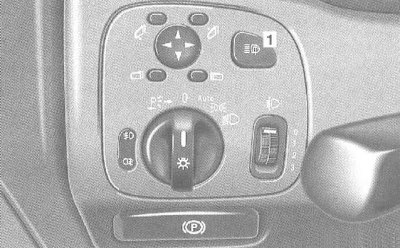
1 Headlight cleaner
Turn the key in the ignition switch to position 1 or 2.
Press the button (1) to clean the headlights with a high-pressure water jet.
Note: Adding detergent to the headlight cleaner reservoir is discussed in Chapter Routine maintenance.
Combination switch1
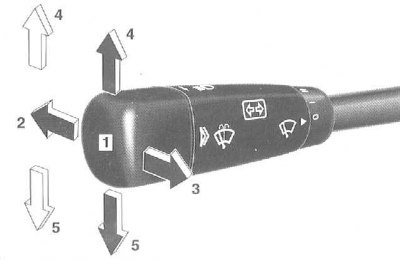
1 Low beam(light switch position)
2 High and low beam(light switch position)
3 Warning light (high beam, regardless of the position of the light switch)
4 Direction indicator lights, right
5 Direction indicator lights, left
Direction indication: Lock the combination switch. Return to the original position is carried out automatically when the steering wheel is turned.
Indicating a turn when changing lanes: Move the combination switch only to the point of resistance and hold it in this position.
¹ In accordance with the legislation of some countries.
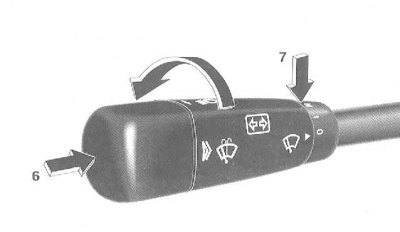
6 Press the switch lightly: one movement of the wiper blades without water supply (turn on only when the windshield is wet)
Press the switch past the resistance point: windshield washer, windshield wiper
(Adding water to the windshield washer reservoir is discussed in Chapter Routine maintenance).
7 Windshield wiper
0 Off.
I Interval mode
Rain sensor models: When switched on, the wipers perform one stroke. After that, the intervals are automatically adjusted depending on the amount of moisture on the glass.
II Normal mode
III Accelerated mode
Models without rain sensor: When the car stops, the windshield wiper mode switches down one step. In interval mode, the interval increases.
Windscreen wiper arm lock
If the windshield wiper arm cannot be moved, eliminate the cause (for example, snow). For safety, remove the key from the ignition.
Then turn the windshield wiper back on (turn the ignition key to position 1).
Streaks on the windshield
When the windshield wiper is on, turn on the windshield washer, including during rain.
(Adding water to the windshield washer reservoir is discussed in Chapter Routine maintenance).
Emergency alarm system
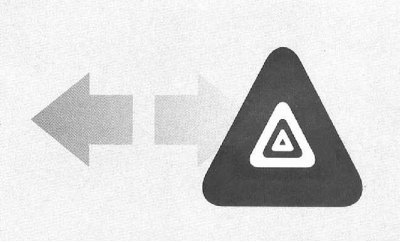
The vehicle's hazard warning system can be activated manually using a switch on the center console, or it can be activated automatically after one of the airbags has been deployed.
When the hazard warning lights are on, only the left or right turn signal light flashes when the combination switch is switched on. After the combination switch is returned to its original position, all turn signal lights flash again.