
Removing
1. Moisten the windshield with water.
2. Turn on the wiper and let it run for a short time. Turn off the purifier. The cleaner brush should return to its original position.
3. Remove the key from the ignition lock.
4. Mark the position of the wiper blade on the windshield using, for example, adhesive tape. It is understood that the position of the wiper lever is adjusted correctly and the marks made will be the standard (see illustration).

5. Remove cap 1 and unscrew nut 2 about two turns, but do not unscrew completely (see illustration).
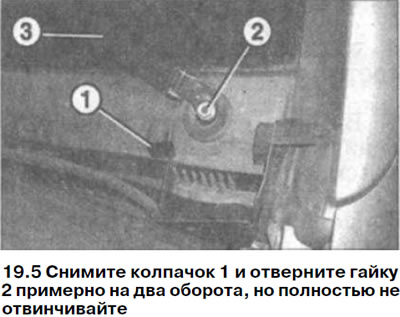
6. Feed the glass cleaner lever 3 in one direction and then in the other direction to loosen its fit on the shaft. After that, completely unscrew the nut, remove the washer and the lever from the shaft (see illustration 19.5).
Attention! If the lever is too tight on the shaft, place a wrench under the lever and carefully lift the lever.
Installation
7. Make sure the wiper motor is in the home position. If necessary, switch on the ignition, then briefly switch on the wiper motor and switch it off.
8. Install the wiper arm on the shaft, using the marks made with tape before removing the wiper.
9. Put on the washer, screw on the lever fastening nut and tighten it by hand.
10. Check again the original position of the lever. To do this, moisten the windshield with water and briefly turn on the cleaner. The lever should return to its original position, and the brush during operation should not go beyond the edge of the windshield.
Attention! When checking the operation of the brush, set it to the top position, and only then turn on the cleaner. This technique allows you to correctly determine the position of the parking brush.
11. Tighten the nut with a torque of 20 Nm.
12. Put protective cap 1 on the nut and lever (see illustration 19.5).