
Cars BMW Cars Volkswagen Cars Chevrolet Cars Land Rover Cars Lada Cars Honda Cars Peugeot
English Русский
Български
Беларускі
Український
Српски
Hrvatski
Română
Polski
Slovenský
Magyar
Bookmark News and articles Sitemap Feedback Site search
MercedesMan.ru


A-Class C-Class E-Class G-Class M-Class S-Class Others
W168 (1997-2004)
  • Main
  • A-Class
  • W168 (1997-2004)
  • Electrical equipment
  • Windshield wipers and washers
  • Windscreen wiper arm angle — checking and adjusting

Windscreen wiper arm angle — checking and adjusting (Mercedes-Benz A-Class W168)

0
Contents: Examination ↡ Adjustment ↡
The angle of the windscreen wiper arms must be checked or adjusted if the wipers "scrape" the glass during operation or operate with a high noise level. Special tool required: special device HAZET 4851-1.

Examination


1. Wet the glass with water.

2. Return the windshield wiper arm to its original position. To do this, turn on the windshield wiper and let it run for about a minute.

3. Remove the wiper blade.

4. Move the wiper arm 2 away from the glass and install it in the special device HAZET 4851-1, securing it with the clamping bolt 3 (see illustration).
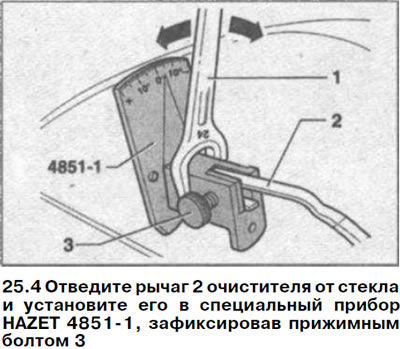
4. Move the wiper arm 2 away from the glass and install it in the special device HAZET 4851-1,…


5. Carefully lower the windshield wiper arm together with the special device onto the glass.

Attention! The special device HAZET 4851-1 must contact the glass at three points.


6. Read the tilt angle shown by the device and compare it with the table of nominal values.

Nominal value:
  • Left lever - -6.5°
  • Right lever - +5°
  • Rear window wiper - +7°

Adjustment


7. Raise the windscreen wiper arm and carefully turn the special tool HAZET 4851-1 with a spanner 1 (see illustration 25.4), to set the desired angle value on the scale. Hold the wiper arm on the shaft with pliers to prevent damage to the arm.


8. Carefully lower the wiper arm together with the device onto the glass. Repeat the procedure until the nominal values confirmed by the readings on the instrument scale are reached.

9. Remove the device and install it again to check the angle of the wiper arm. Correct the angle if necessary.

10. Replace the glass wiper blade.

Caution: The plastic windshield wiper arms cannot be adjusted in this way.
This article is available at: russian, bulgarian, belarusian, ukrainian, serbian, croatian, romanian, polish, slovak, hungarian
The article has been verified: Lukyanov Nikita Ilyich
Share with friends:
◀ Previous
A-Class W168 / Windshield wipers and washers
Next ▶

Washer Pump Motor — Removal and Installation
Rear Window Wiper Motor — Removal and Installation
Rear Window Wiper Blade Holder — Removal and Installation
Windshield Wiper Motor — Removal and Installation
Windscreen wiper — removal and installation
 
More similar articles for repairing other models

☛ Checking and adjusting the ignition timing angle Mercedes W203 (2000-2007)
☛ Checking and adjusting the ignition timing angle Mercedes W124 (1984-1995)
☛ Checking and adjusting the ignition timing angle Mercedes W463 (1999-2019)
☛ Checking and adjusting the ignition timing angle Mercedes W163 (1997-2005)
☛ Checking and adjusting the ignition timing angle Mercedes W140 (1991-1998)
☛ Checking and adjusting the vehicle level Mercedes Vito 1 (1996-2003)
Link in different formats to this article
Comments and feedback from visitors
No comments yet


How much will 18 + 40 ?


W168 (1997-2004) 
  • General information
  • User manual
  • Maintenance
  • Troubleshooting
  • Power unit
  • Engine repair
  • Cooling and heating
  • Injection system (gasoline)
  • Fuel system (diesel)
  • Fuel system
  • Exhaust system
  • Ignition system
  • Transmission
  • Clutch
  • Transmission
  • Chassis
  • Brake system
  • Suspension
  • Steering
  • Body
  • Interior (all models)
  • Interior (since 1997)
  • Interior (since 2001)
  • Exterior
  • Doors and windows
  • Electrical equipment
  • Equipment and devices
  • Power devices
  • Windshield wipers and washers
  • Headlights and lighting
  • Electrical circuits
 
MercedesMan.ru © 2017–2026 · Mobile version · Read about Mercedes · Sitemap: EN BG BY UA RS HR RO PL SK HU · Feedback · Site search · Bookmark A-Class (W168) · C-Class (W201) · C-Class (W202) · C-Class (W203) · E-Class (W123) · E-Class (W124) · E-Class (W210) · G-Class (W463) · M-Class (W163) · S-Class (W116, petrol) · S-Class (W126, petrol) · S-Class (W140) · S-Class (W220) · Sprinter · Vito 1 · Vito 2 · Vario 814D ·
 
We only use cookies without which some of the site's features may not be available.