
Cars BMW Cars Volkswagen Cars Chevrolet Cars Land Rover Cars Lada Cars Honda Cars Peugeot
English Русский
Български
Беларускі
Український
Српски
Hrvatski
Română
Polski
Slovenský
Magyar
Bookmark News and articles Sitemap Feedback Site search
MercedesMan.ru


A-Class C-Class E-Class G-Class M-Class S-Class Others
190 (W201) (1982-1993) W202 (1993-2000) W203 (2000-2007)
  • Main
  • C-Class
  • W202 (1993-2000)
  • Electrical equipment
  • Equipment and devices
  • Windscreen wiper and its motor — removal and installation

Windscreen wiper and its motor — removal and installation (Mercedes-Benz C-Class W202)

0
Contents: Removal ↡ Installation ↡

Removal


1. Activate the windshield washer and wiper and leave the wiper running. Turn off the ignition.

Warning! When working on the windscreen wiper Remove the ignition key. When moving the wiper blade lever or linkage, starting from position "1" of the ignition key, the automatic wiper retention mechanism in the initial position may be activated. That is, the windscreen wiper operates in idle mode as long as it is in the initial position. There is a risk of injury!

Warning! When working on the windscreen wiper Remove the ignition key. When moving the wiper blade…


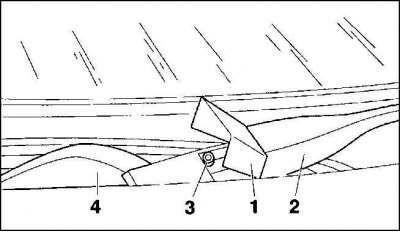
2. Remove the plastic protective cover (1) and unscrew the Allen bolt (3).

3. Lift the arm (2) off the windshield wiper blade. While doing this, hold the windshield wiper blade arm on the fastener to prevent it from slamming against the windshield.

4. Remove the air inlet for heating.

5. Remove the protective cover under the windshield wiper.
5. Remove the protective cover under the windshield wiper.


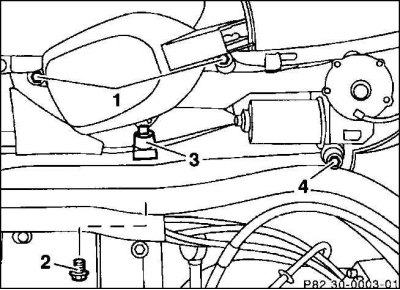
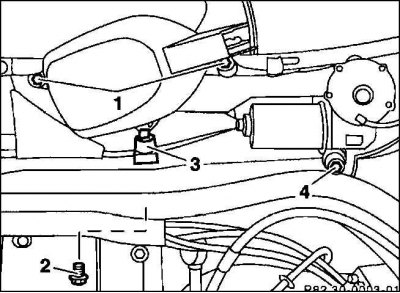
6. Remove the nuts (1) and bolt (2) to the rubber support. Bolt (2) is installed behind the engine compartment shield and is difficult to access.


7. Remove the multi-pin connector from the windshield wiper motor.

8. Lift the wiper from its support and remove it.
8. Lift the wiper from its support and remove it.


9. Before removing the windshield wiper motor, mark the relative positions of the windshield wiper arm and the linkage with a pencil. Some parts are serially marked.
9. Before removing the windshield wiper motor, mark the relative positions of the windshield wiper…


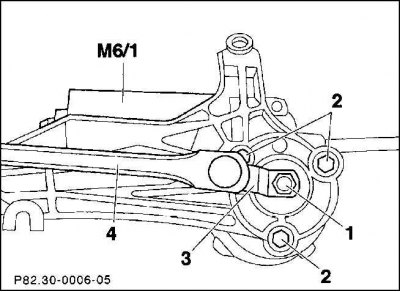
10. Press the crank cheek away from the car engine shaft, having first unscrewed the nut (1).

11. Unscrew the bolts (2), remove the windshield wiper motor.

Installation


Caution! Make sure that the windscreen wiper motor is in the home position. If not, connect the multi-pin plug. Briefly switch on the windscreen wiper motor and then switch it off using its switch. To do this, briefly switch on the ignition. Then disconnect the electrical connection again.


1. Tighten the windscreen wiper motor with bolts (2) to a torque of 5 Nm.

2. Orient the wiper arm together with the linkage according to the markings made during disassembly.

3. Insert the crank cheek onto the engine shaft and align it so that the crank cheek (3) forms a single line with the windscreen wiper linkage (4). Tighten the fastening nut (1) firmly to a torque of 20 Nm.

4. Insert the windshield wiper into the vehicle and attach the multi-pin plug.

5. Place the rubber support on and screw the bolt into it.

6. Screw on the windshield wiper.

7. Place the wiper arm on, screw in the Allen bolt and close the protective cover.
7. Place the wiper arm on, screw in the Allen bolt and close the protective cover.


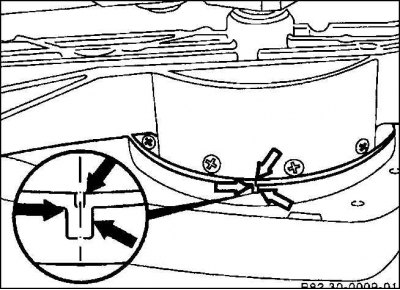
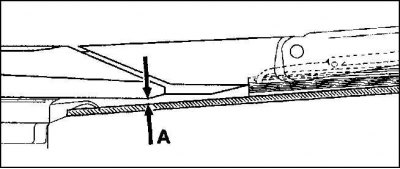
8. Check the gap size (A) between the wiper drive head and the windshield with a measuring template. It should be 5 mm.
8. Check the gap size (A) between the wiper drive head and the windshield with a measuring…


9. If this dimension is not maintained, then loosen the bolt (2) and adjust the gap between the wiper drive head and the windshield. At the same time, move the wiper arm upward.


9. If this dimension is not maintained, then loosen the bolt (2) and adjust the gap between the…


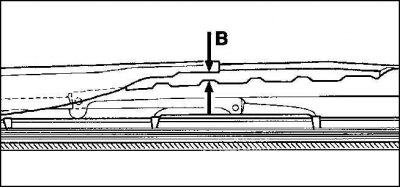
10. Then check the gap (B) between the wiper arm and the wiper blade with a feeler gauge. If the gap is less than 5 mm, bend the arc of the wiper arm toward the windshield until the gap is approximately slightly more than 5 mm.

11. Install a protective cover for the air inlet of the heating system.

12. Close the engine hood and check the normal operation of the windshield wiper.

13. Install the spare tire and secure with bolts, tightening them slightly. Lower the wheel. Tighten the wheel mounting bolts in a diagonal sequence to the required torque.
This article is available at: russian, bulgarian, belarusian, ukrainian, serbian, croatian, romanian, polish, slovak, hungarian
The article has been verified: Khromov Roman Mikhailovich
Share with friends:
◀ Previous
C-Class W202 / Equipment and devices
Next ▶

Headlight Washer Nozzles
Windscreen washer jets
Diagnosing Windscreen Wiper Blade Faults
Rubber Windscreen Wiper Blades — Removal and Installation
Speakers — Removal and Installation
Protect your car yourself
Anti-theft «immunodeficiency»
Checking the operation of alarms/external lighting
More similar articles for repairing other models

☛ Windscreen wiper — removal and installation Mercedes W168 (1997-2004)
☛ Windscreen wiper motor terminals Mercedes W210 (1996-2002)
☛ Removal and installation the electric motor of the ventilation flap… Mercedes W463 (1999-2019)
☛ Removal and installation the intake port shutoff motor (612 series… Mercedes W163 (1997-2005)
☛ Checking the windshield wiper motor Mercedes W140 (1991-1998)
☛ Removal and installation the windshield wiper motor and arms Mercedes Sprinter (1995-2000, diesel)
Link in different formats to this article
Comments and feedback from visitors
No comments yet


How much will 13 + 47 ?


W203 (2000-2007) 
  • General information
  • Introduction to guide
  • User manual
  • Maintenance
  • Power unit
  • Gasoline engines
  • Diesel engines
  • Cooling system
  • Ventilation and heating
  • Supply system
  • Injection system (gasoline)
  • Injection system (diesel)
  • Exhaust system
  • Ignition and control system
  • Charge and launch systems
  • Transmission
  • Mechanical gearbox
  • Automatic gearbox
  • Clutch and drive shafts
  • Differential
  • Chassis
  • Brake system
  • Car suspension
  • Steering
  • Body
  • Exterior (external elements)
  • Interior (internal elements)
  • Electrical equipment
  • Equipment and devices
  • Lighting system
  • Electrical diagrams (2000)
  • Electrical diagrams (since 2001)
W202 (1993-2000) 
  • General information
  • User manual
  • Driving a car
  • Car care
  • Maintenance
  • Power unit
  • Gasoline engines
  • Diesel engines
  • Lubrication system
  • Cooling system
  • Heating and ventilation
  • Ignition system
  • Fuel system
  • Injection system (gasoline)
  • Injection system (diesel)
  • Exhaust system
  • Transmission
  • Clutch
  • Car gearbox
  • Chassis
  • Suspension, wheels and tires
  • Steering
  • Brake system
  • Body
  • Exterior (external elements)
  • Interior (internal elements)
  • Doors and windows
  • Electrical equipment
  • Equipment and devices
  • Power devices
  • Lighting system
  • Electrical circuits
190 (W201) (1982-1993) 
  • General information
  • Introduction to the guide
  • Operation and care
  • Maintenance (gasoline)
  • Maintenance (diesel)
  • Troubleshooting
  • Power unit
  • Petrol engine I4
  • Petrol engine V6
  • Diesel engines
  • Engine overhaul
  • Cooling and heating
  • Power system (carburetor)
  • Injection system (gasoline)
  • Injection system (diesel)
  • Exhaust system
  • Charge and start system
  • Ignition system (I4)
  • Ignition system (V6)
  • Diesel heating system
  • Transmission
  • Clutch
  • Mechanical gearbox
  • Automatic gearbox
  • Cardan shaft and axle shafts
  • Chassis
  • Brake system
  • Car suspension
  • Steering
  • Body
  • Exterior (external elements)
  • Interior (internal elements)
  • Doors, locks and windows
  • Electrical equipment
  • Equipment and devices
  • Electrical circuits
 
MercedesMan.ru © 2017–2026 · Mobile version · Read about Mercedes · Sitemap: EN BG BY UA RS HR RO PL SK HU · Feedback · Site search · Bookmark A-Class (W168) · C-Class (W201) · C-Class (W202) · C-Class (W203) · E-Class (W123) · E-Class (W124) · E-Class (W210) · G-Class (W463) · M-Class (W163) · S-Class (W116, petrol) · S-Class (W126, petrol) · S-Class (W140) · S-Class (W220) · Sprinter · Vito 1 · Vito 2 · Vario 814D ·
 
We only use cookies without which some of the site's features may not be available.