
Cars BMW Cars Volkswagen Cars Chevrolet Cars Land Rover Cars Lada Cars Honda Cars Peugeot
English Русский
Български
Беларускі
Український
Српски
Hrvatski
Română
Polski
Slovenský
Magyar
Bookmark News and articles Sitemap Feedback Site search
MercedesMan.ru


A-Class C-Class E-Class G-Class M-Class S-Class Others
W168 (1997-2004)
  • Main
  • A-Class
  • W168 (1997-2004)
  • Electrical equipment
  • Windshield wipers and washers
  • Windscreen wiper — removal and installation

Windscreen wiper — removal and installation (Mercedes-Benz A-Class W168)

0
Contents: Windscreen wiper rubber band -…↡ Removal ↡ Installation ↡ Windscreen washer jets - adjustment ↡
Warning! Carrying out maintenance and repair work on the windshield wiper is associated with the risk of injury. To avoid triggering the windshield wiper mechanism, remove the key from the ignition switch while performing work.


Windscreen wiper rubber band - replacement


The rubber strip is subject to replacement if the glass cleaning quality is poor. Both windshield wiper blades as a set and rubber strips for the blades separately are available for sale. If only the rubber strip is replaced, do not bend its holder when replacing it.

Caution! If the wiper blade vibrates when moving across the glass, this does not always mean that the blade or rubber band needs to be replaced. The angle of the wiper arms should be checked or adjusted again.


Removal


1. Move the wiper arms together with the blades away from the glass.

2. Place the brush at a right angle to the lever.

3. Press the lock lever A and remove the brush holder B from the lever by pulling it down (see arrows in the illustration).
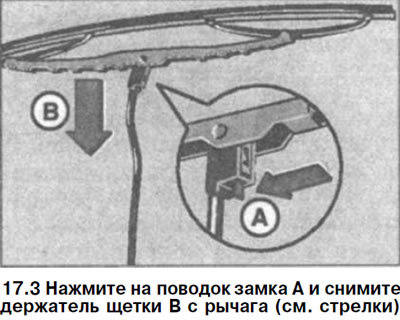
3. Press the lock lever A and remove the brush holder B from the lever by pulling it down (see…


4. Squeeze both steel guide bars with pliers and loosen the tape fastening bracket at the upper end of the brush. Then loosen the brackets along the entire length of the brush and remove the rubber strip together with the steel guides (see illustration).
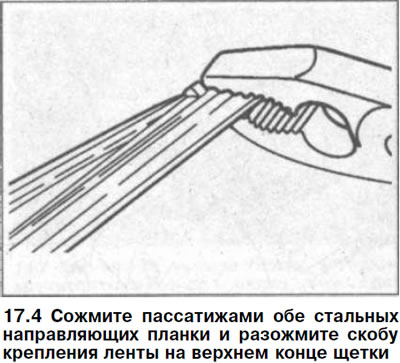


4. Squeeze both steel guide bars with pliers and loosen the tape fastening bracket at the upper end…


Installation


5. Attach the new rubber band to the brackets without installing the guide bar.

6. Place both guide strips on the end of the rubber band so that the protrusions on the guides face the band and fit into the grooves.

7. Use pliers to squeeze both guides on the rubber band and secure them to the upper end of the brush by inserting them into the locking holes of the mounting bracket (see illustration).
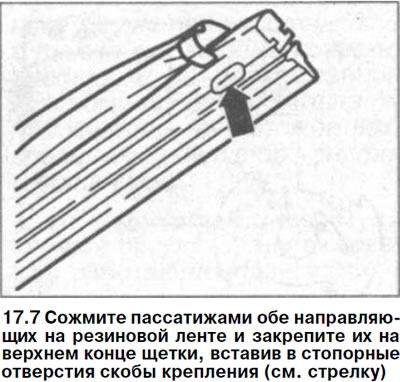
7. Use pliers to squeeze both guides on the rubber band and secure them to the upper end of the…


8. Place the brush on the arm and secure it to the retaining hook. If the cleaner has a fairing, it should be facing downwards.

9. Return the windshield wiper arm to its original position. Make sure that the rubber strip is in contact with the glass along its entire length. If necessary, carefully bend the arm.


Windscreen washer jets - adjustment


10. Adjust with a needle (see illustration) direction of the jet of washing liquid from the jets. To do this, insert a needle into the jet nozzle and mark the point on the glass where the opposite end of the needle points.
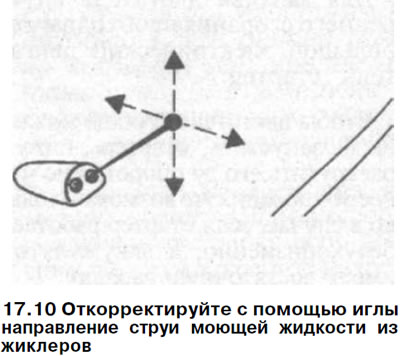
10. Adjust with a needle (see illustration) direction of the jet of washing liquid from the jets.…


11. Adjust the position of the jets so that the jets of washer fluid hit the points marked on the windshield.

The jets can be cleaned with compressed air. To do this, the jets must be removed and blown with compressed air through the windshield washer hose connection.

Caution! Do not blow out the jets from the nozzle side.


If the jet cannot be adjusted or the fluid is supplied unevenly, the jet should be replaced.
This article is available at: russian, bulgarian, belarusian, ukrainian, serbian, croatian, romanian, polish, slovak, hungarian
The article has been verified: Lukyanov Nikita Ilyich
Share with friends:
◀ Previous
A-Class W168 / Windshield wipers and washers
Next ▶

 
Windscreen washer jets — removal and installation
Rear Window Washer Nozzle — Removal and Installation
Windshield Wiper Arm — Removal and Installation
Windscreen wiper — removal and installation
Windshield Wiper Motor — Removal and Installation
More similar articles for repairing other models

☛ Rubber Windscreen Wiper Blades — Removal and Installation Mercedes W202 (1993-2000)
☛ Windscreen wiper blades Mercedes W124 (1984-1995)
☛ Removal and installation windshield wiper arms Mercedes W463 (1999-2019)
☛ Removal and installation windshield wiper arms Mercedes W163 (1997-2005)
☛ Replacing headlight and windshield wiper blades Mercedes W140 (1991-1998)
☛ Windscreen wiper switch Mercedes Vito 1 (1996-2003)
Link in different formats to this article
Comments and feedback from visitors
No comments yet


How much will 26 + 29 ?


W168 (1997-2004) 
  • General information
  • User manual
  • Maintenance
  • Troubleshooting
  • Power unit
  • Engine repair
  • Cooling and heating
  • Injection system (gasoline)
  • Fuel system (diesel)
  • Fuel system
  • Exhaust system
  • Ignition system
  • Transmission
  • Clutch
  • Transmission
  • Chassis
  • Brake system
  • Suspension
  • Steering
  • Body
  • Interior (all models)
  • Interior (since 1997)
  • Interior (since 2001)
  • Exterior
  • Doors and windows
  • Electrical equipment
  • Equipment and devices
  • Power devices
  • Windshield wipers and washers
  • Headlights and lighting
  • Electrical circuits
 
MercedesMan.ru © 2017–2026 · Mobile version · Read about Mercedes · Sitemap: EN BG BY UA RS HR RO PL SK HU · Feedback · Site search · Bookmark A-Class (W168) · C-Class (W201) · C-Class (W202) · C-Class (W203) · E-Class (W123) · E-Class (W124) · E-Class (W210) · G-Class (W463) · M-Class (W163) · S-Class (W116, petrol) · S-Class (W126, petrol) · S-Class (W140) · S-Class (W220) · Sprinter · Vito 1 · Vito 2 · Vario 814D ·
 
We only use cookies without which some of the site's features may not be available.