
Cars BMW Cars Volkswagen Cars Chevrolet Cars Land Rover Cars Lada Cars Honda Cars Peugeot
English Русский
Български
Беларускі
Український
Српски
Hrvatski
Română
Polski
Slovenský
Magyar
Bookmark News and articles Sitemap Feedback Site search
MercedesMan.ru


A-Class C-Class E-Class G-Class M-Class S-Class Others
190 (W201) (1982-1993) W202 (1993-2000) W203 (2000-2007)
  • Main
  • C-Class
  • W202 (1993-2000)
  • Electrical equipment
  • Equipment and devices
  • Rubber Windscreen Wiper Blades — Removal and Installation

Rubber Windscreen Wiper Blades — Removal and Installation (Mercedes-Benz C-Class W202)

0
Contents: Removal ↡ Installation ↡
Rubber windshield wiper blades should be replaced if the quality of cleaning the glass is poor. The trade offers complete windshield wiper blades (rubber brush with holder), as well as individual rubber wiper blades. If only the rubber blade is replaced, make sure that its holder is not bent.
Rubber windshield wiper blades should be replaced if the quality of cleaning the glass is poor. The…


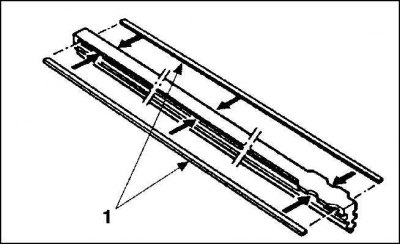
The rubber brush is inserted into two metal retaining guides (1), which must be disassembled separately when removed.

Removal


Warning! When working on the windscreen wipers Remove the ignition key. When moving the wiper arm or linkage, starting from position "1" of the ignition key, the automatic return of the wipers to the initial position may be activated. That is, the windscreen wiper operates in idle mode as long as it is in the initial position. There is a risk of injury!


1. Lift the wiper arm without locking it.
1. Lift the wiper arm without locking it.


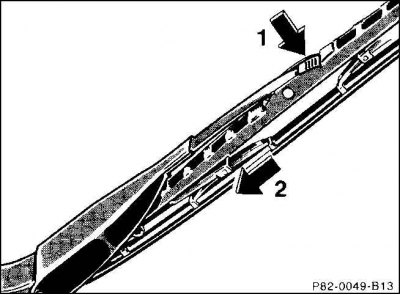
2. Press down the plastic clip on the knurled part (1) and slide the wiper blade down (2) from the hook on the wiper blade arm.


2. Press down the plastic clip on the knurled part (1) and slide the wiper blade down (2) from the…


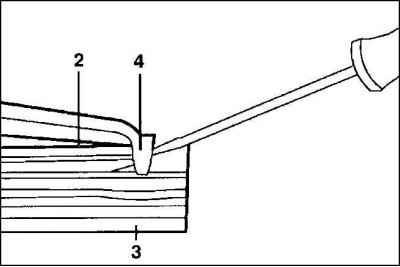
3. Using a narrow screwdriver (2), push the rubber brush back from both steel guides (2) on the closed side and carefully pull the rubber brush out of the guides.

4. Unhook the rubber brush (3) from the clamps (4) on the windshield wiper.

Installation


1. Place the rubber blade loosely into the wiper blade clips rather than into the retaining guides.
1. Place the rubber blade loosely into the wiper blade clips rather than into the retaining guides.


2. Insert both guides with the open profile side into the rubber brush so that the grooves of the guides face the rubber and are fixed in the protrusions of the groove. The bend of the guides should face the glass.

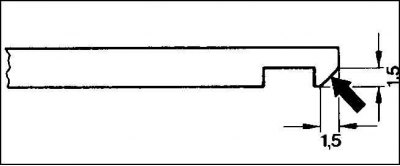
3. The spring latches fit more easily into the groove of the retainer if its front end is first beveled with a file and lubricated with soapy water (detergent).


4. Lubricate the rubber brush on the closed side with soapy water to help it slide better in the clamps.

5. Clamp both steel guides and the rubber brush with pliers and hang them on the clamps of the windshield wiper itself.

Information copied from the website: www.mercedesman.ru

6. Position the wiper blade so that it is positioned between both guide pins on the wiper arm.

Caution: If installing a new wiper blade, press the plastic clips down onto the ribbed parts.


7. Slide the wiper blade into the hooks on the wiper arm, press the plastic clips and secure the wiper blade in place.

8. Press the wiper arm down, making sure that the rubber blade is in contact with the glass all the way around.

9. Turn on the windshield wiper. The cleaning sector should be easy to clean.

Attention! The rubber sponge of the windshield wiper blade must bend when changing the direction of movement (overturn). If this does not happen, carefully bend the wiper arm so that its end is parallel to the glass.
This article is available at: russian, bulgarian, belarusian, ukrainian, serbian, croatian, romanian, polish, slovak, hungarian
The article has been verified: Khromov Roman Mikhailovich
Share with friends:
◀ Previous
C-Class W202 / Equipment and devices
Next ▶

Speakers — Removal and Installation
Automatic Antenna Telescope — Removal and Installation
Antenna — removal and installation
Radio receiver — removal and installation
Light switch — removal and installation
Diagnosing Windscreen Wiper Blade Faults
Windscreen washer jets
Headlight Washer Nozzles
Windscreen wiper and its motor — removal and installation
Protect your car yourself
More similar articles for repairing other models

☛ Windscreen wipers — checking the rubber bands of the brushes Mercedes W168 (1997-2004)
☛ Windscreen wiper blades Mercedes W124 (1984-1995)
☛ Replacing the rubber bushing of the trailing arm Mercedes W463 (1999-2019)
☛ Removal and installation windshield wiper arms Mercedes W163 (1997-2005)
☛ Replacing headlight and windshield wiper blades Mercedes W140 (1991-1998)
☛ Windscreen wiper switch Mercedes Vito 1 (1996-2003)
Link in different formats to this article
Comments and feedback from visitors
No comments yet


How much will 41 + 16 ?


W203 (2000-2007) 
  • General information
  • Introduction to guide
  • User manual
  • Maintenance
  • Power unit
  • Gasoline engines
  • Diesel engines
  • Cooling system
  • Ventilation and heating
  • Supply system
  • Injection system (gasoline)
  • Injection system (diesel)
  • Exhaust system
  • Ignition and control system
  • Charge and launch systems
  • Transmission
  • Mechanical gearbox
  • Automatic gearbox
  • Clutch and drive shafts
  • Differential
  • Chassis
  • Brake system
  • Car suspension
  • Steering
  • Body
  • Exterior (external elements)
  • Interior (internal elements)
  • Electrical equipment
  • Equipment and devices
  • Lighting system
  • Electrical diagrams (2000)
  • Electrical diagrams (since 2001)
W202 (1993-2000) 
  • General information
  • User manual
  • Driving a car
  • Car care
  • Maintenance
  • Power unit
  • Gasoline engines
  • Diesel engines
  • Lubrication system
  • Cooling system
  • Heating and ventilation
  • Ignition system
  • Fuel system
  • Injection system (gasoline)
  • Injection system (diesel)
  • Exhaust system
  • Transmission
  • Clutch
  • Car gearbox
  • Chassis
  • Suspension, wheels and tires
  • Steering
  • Brake system
  • Body
  • Exterior (external elements)
  • Interior (internal elements)
  • Doors and windows
  • Electrical equipment
  • Equipment and devices
  • Power devices
  • Lighting system
  • Electrical circuits
190 (W201) (1982-1993) 
  • General information
  • Introduction to the guide
  • Operation and care
  • Maintenance (gasoline)
  • Maintenance (diesel)
  • Troubleshooting
  • Power unit
  • Petrol engine I4
  • Petrol engine V6
  • Diesel engines
  • Engine overhaul
  • Cooling and heating
  • Power system (carburetor)
  • Injection system (gasoline)
  • Injection system (diesel)
  • Exhaust system
  • Charge and start system
  • Ignition system (I4)
  • Ignition system (V6)
  • Diesel heating system
  • Transmission
  • Clutch
  • Mechanical gearbox
  • Automatic gearbox
  • Cardan shaft and axle shafts
  • Chassis
  • Brake system
  • Car suspension
  • Steering
  • Body
  • Exterior (external elements)
  • Interior (internal elements)
  • Doors, locks and windows
  • Electrical equipment
  • Equipment and devices
  • Electrical circuits
 
MercedesMan.ru © 2017–2026 · Mobile version · Read about Mercedes · Sitemap: EN BG BY UA RS HR RO PL SK HU · Feedback · Site search · Bookmark A-Class (W168) · C-Class (W201) · C-Class (W202) · C-Class (W203) · E-Class (W123) · E-Class (W124) · E-Class (W210) · G-Class (W463) · M-Class (W163) · S-Class (W116, petrol) · S-Class (W126, petrol) · S-Class (W140) · S-Class (W220) · Sprinter · Vito 1 · Vito 2 · Vario 814D ·
 
We only use cookies without which some of the site's features may not be available.