



Contents: Automatic lowering or raising of…↡ Adjustment of side windows ↡ Sun protection blind ↡ Automatic opening of sun blinds ↡ Panoramic sliding roof panel ↡ Opening, closing, raising or…↡ Automatic opening of panoramic…↡ Stopping the panoramic sliding roof…↡ Adjusting the panoramic sliding roof…↡ Manual control of panoramic sliding…↡
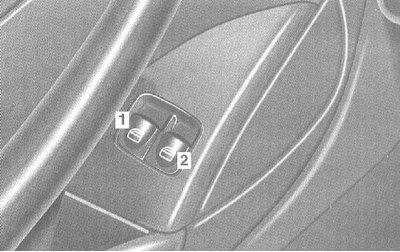
The central control panel is located on the driver's door.
Switch:
- 1 front left window lifter
- 2 front right window lifters
There is a switch for the side window on the front passenger door.
Original material on the website (www.mercedesman.ru)
The key position in the ignition switch is 1 or 2.
Lowering the side windows: press the switch until the first point of resistance.
Raising the side windows: pull the switch to the first point of resistance.
Release the switch until the desired position is reached.
Automatic lowering or raising of side windows
Press or pull the switch past the point of resistance and then release.
To stop the side windows from lowering or raising:
Press or pull the switch.
If something interferes with the movement of the glass, the lifting process is interrupted and the glass lowers slightly.
If you continue to pull or hold the switch, the lifting process is also interrupted in this case, but the glass does not lower.
Note: The side windows can also be lowered and raised using the summer opening/comfort closing function (Section Locks, keys and bolts. Single lock).
Adjustment of side windows
If the power supply was interrupted (as a result of disconnection of clamps or discharge of the battery), the side windows no longer slide up or down automatically. In this case, re-align the windows.
Pull the switches until the side windows are fully raised and hold them in this position for approximately 1 more second.
Sun protection blind
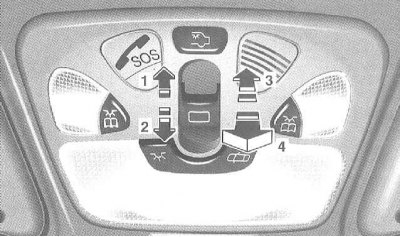
Press the switch:
- 1 - Opening
- 2 - Closing
- 3 - Opening
- 4 - Closing
Turn the key in the ignition switch to position 1 or 2.
Both sunblinds can only be operated when the panoramic sliding roof panel is closed.
Both sunshades open or close together.
Opening or closing the sun blinds: Press the switch in the desired direction.
Release the switch when the desired position is reached.
Automatic opening of sun blinds
Press the switch past the point of resistance and then release.
Stopping the sunshade: Press the switch in any direction.
Panoramic sliding roof panel
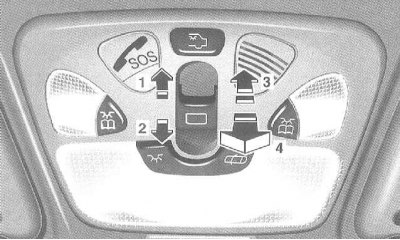
Press the switch:
- 1 - Opening
- 2 - Closing
- 3 - Rise
- 4 - Lowering
Turn the key in the ignition switch to position 1 or 2.
The panoramic sliding roof panel can only be operated when the sun blinds are open.
Opening, closing, raising or lowering the panoramic sliding roof panel
Press the switch in the required direction.
Release the switch when the desired position is reached.
Note: The panoramic sliding roof panel can only be opened when the roof is not covered with snow and ice. Otherwise, it may cause malfunction.
Automatic opening of panoramic sliding roof panel
Press the switch past the point of resistance in the opening direction and then release.
Stopping the panoramic sliding roof panel
Press the switch in any direction.
Note: To avoid damaging the weatherstrips, do not transport items with sharp edges protruding from the panoramic sliding roof panel.
Adjusting the panoramic sliding roof panel/sun blinds
If there is a power outage (as a result of disconnection or discharge of the battery) or manual closing of the panoramic sliding roof panel, the panoramic sliding roof panel/sun blinds open jerkily or if a malfunction occurs during operation, then the panoramic sliding roof panel/sun blinds must be readjusted:
Press the panoramic sliding roof switch in the "Close" direction and hold it down until the panoramic sliding roof is completely closed. Continue holding the switch down for approximately 1 more second.
Press the panoramic sliding roof switch again in the "Close" direction and hold it down until the sun blinds are fully closed. Continue holding the switch down for approximately 1 more second.
Press the panoramic sliding roof switch in the "Open" direction and hold it down until the sun blinds open fully. Continue holding the switch down for approximately 1 second.
The adjustment is complete if the panoramic sliding roof panel opens automatically; repeat the adjustment if necessary.
Manual control of panoramic sliding roof panel
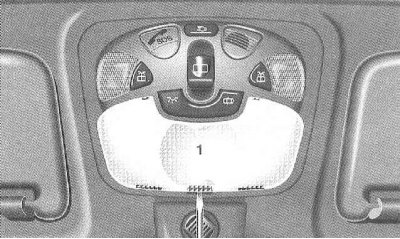
If the electric drive fails, the panoramic sliding roof panel can be closed or opened manually using a crank.
The drive for the panoramic sliding roof panel is located behind the ceiling light.
Press the diffuser (1) of the lampshade with a suitable object (for example, with a screwdriver).
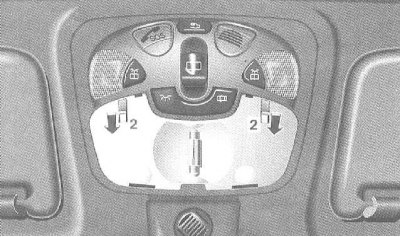
Press both release buttons (2) in the direction of the arrow, fold the lamp down and remove.
Note: Do not disconnect the plug connections.
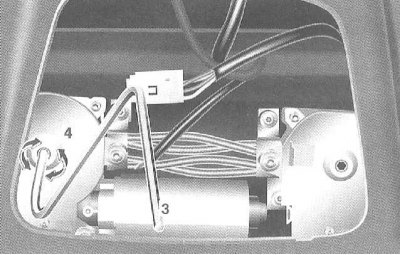
Remove the key.
Remove the ratchet from the "Operating Manual" folder.
Insert the ratchet (3) into the left (in the direction of movement) engine (4).
Move forward - rotate clockwise.
Lowering - rotate counterclockwise.
Slide back - rotate counterclockwise.
Lift - rotate clockwise.
After manual closing, adjust the panoramic sliding roof panel.