
Automated heating system (Heizmatic)
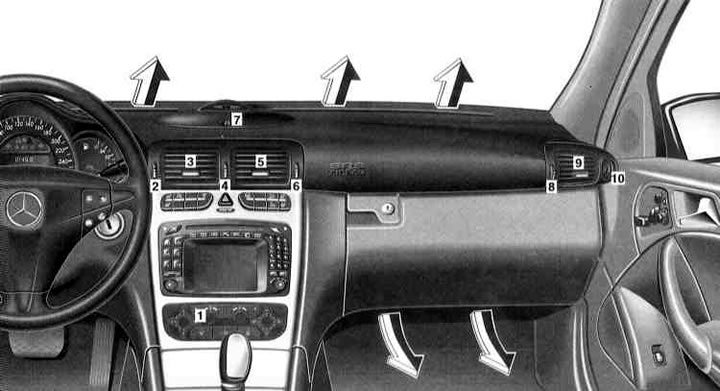
1 - Control panel
2 - Air supply adjustment wheel for the left middle deflector
3 - Rotatable middle deflector, left
4 - Adjusting wheel for mixing cold air for the middle vents, side vents and ventilation vent on the instrument panel, top and middle vents in the rear (on models with automated Thermatic or Thermotronic)
5 - Rotatable middle deflector, right
6 - Air supply adjustment wheel for the right middle deflector
7 - Ventilation deflector on the instrument panel, from above, with an air supply adjustment wheel
8 - Adjusting wheel for air supply for the side deflector
9 - Rotatable side deflector
10 - Defrost deflector side glass
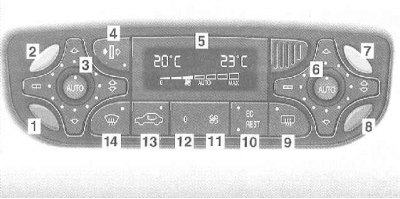
Control Panel
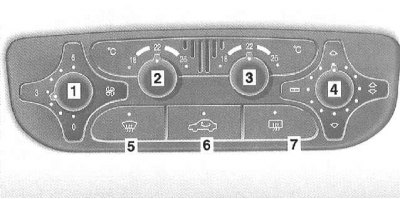
1 - Rotary air supply switch
2 - Temperature controller for the left side
3 - Temperature controller for the right side
4 - Air distribution regulator
5 - Defrosting glass
6 - Button for switching to the air circulation mode, the mode of using the residual heat of the engine on appropriately equipped models
7 - Rear window heater (Chapter Rear window heater)
The set temperature is reached in heating mode as quickly as possible and kept constant. The temperature can be set for each side separately.
Change the set temperature only in small increments.
Models with the function of using the residual heat of the engine:
When using the function «Engine residual heat utilization mode» the vehicle interior can also be heated when the engine is switched off.
We recommend setting the thermostats to 22°C as a basic setting for interior temperature control.
General notes on automated heating system
The dust filter completely traps pollen and dust particles up to a certain size.
If the passenger compartment is heated by the sun, air it out quickly before driving.
Note. Do not block the air vents in the space between the rear seat backrest and the rear window.
Keep the air inlets on the hood clear of snow.
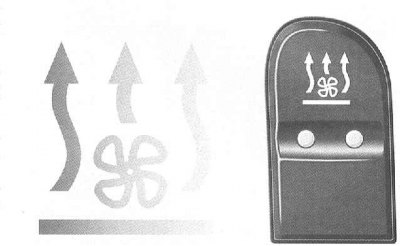
Manual regulation of air distribution
The air distribution is controlled simultaneously for the left and right sides.
Basic position of controls in heating mode (winter)
Temperature controllers (2 and 3) set as desired.
Set the air supply regulator as desired, but not less than position 2, otherwise the windows may fog up.
Air distribution controller (4) install as shown in the illustration above.
To reduce the temperature in the space under the ceiling, open the adjusting wheel for mixing cold air as desired.
Open the middle and side vents as desired.
Basic position of controls in ventilation mode (in summer)
Temperature controllers (2 and 3) set as desired.
Air regulator (1) set as desired, but not less than position 1.
Air distribution controller (4) turn to
Open the middle deflectors.
Open the side deflectors.
In order to evenly distribute air, open the ventilation deflector on the top of the instrument panel.
With this installation, good ventilation of the cabin is ensured.
Special provisions - choose only for a short time
Switching off and on the automated heating system
Turn the air supply rotary switch to 0.
To turn on the automated heating system, turn the air supply rotary switch to the desired fan position.
Defrosting windows
Press the
If necessary, turn off the air circulation mode
Fogging windows from the inside
If necessary, turn off the air circulation mode
Air distribution controller (4) rotate to position
Air regulator (1) set to a higher fan stage.
Temperature controllers (2 and 3) set to a higher temperature.
Fogging the windshield from the outside
Turn on the windshield wiper.
Close the air vent on the top of the instrument panel.
Turn the air distribution regulator to position
The penetration of unpleasant odors from the outside into the cabin
Switch on the air circulation mode only for a short time, otherwise the windows may fog up.
Turn on the air circulation mode: press the
The air circulation mode will automatically turn off after approximately 5 minutes.
Engine residual heat utilization mode
With the engine switched off, interior heating is still possible for some time. The duration of heating depends on the set temperature.
Set both temperature controls as desired.
Set the air distribution through the ventilation deflectors as desired.
Note. Regardless of the position of the air supply regulator, the fan operates at a low level.
Before switching on: turn the key in the ignition switch to position 1 or 0 or remove it.
Enabling the use of the residual heat of the engine
Click on the
Switching on is not possible if the battery is not sufficiently charged.
Disabling the use of the residual heat of the engine
Click on the
The control LED does not go out.
Automatic shutdown is performed:
- if the ignition key is turned to position 2,
- after about 30 minutes,
- if the battery voltage drops.
Automated air conditioner (Thermatic)
The location of the controls and deflectors is shown in the illustration at the beginning of the Section.
Deflectors in the rear
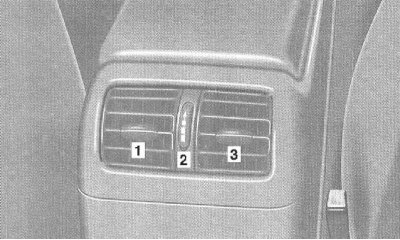
1 Swiveling center vent in the rear, left
2 Adjusting wheel for the middle vents in the rear
Opening: turn the adjusting wheel upwards.
3 Swiveling center vent in the rear, on the right
Note. The temperature of the air leaving the middle vents at the rear corresponds to the temperature of the air leaving the middle vents at the instrument panel.
Control Panel
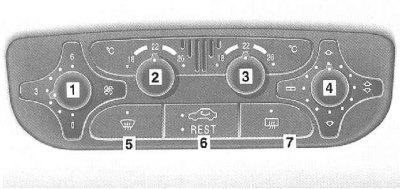
1 Rotary air supply switch
2 Temperature controller for left side
3 Temperature controller for right side
4 Air distribution regulator
5 Rear window heater (Chapter Rear window heater)
6 Economy mode (without cooling), engine residual heat utilization mode
7 Automatic control of air distribution and fan performance
8 Air circulation mode button
9 Defrosting windows
The automated air conditioner is operational only when the engine is running. If economy mode
In automatic mode, the automated air conditioner performs cooling or heating depending on the outside temperature and the desired temperature in the vehicle interior. When the automatic mode function is off, the air supply and distribution can also be adjusted manually.
When using the function «Engine residual heat utilization mode» the vehicle interior can also be heated when the engine is switched off.
The temperature can be set for each side separately. Change the set temperature only in small increments.
General Notes on Automated Air Conditioning
The dust filter completely traps pollen and dust particles up to a certain size.
If the passenger compartment is heated by the sun, air it out quickly before driving.
In the storage compartment between the front seats, air conditioning can be carried out in the compartment on the middle console under the armrest console - see below in this Section).
Note. Do not block the air vents in the space between the rear seat backrest and the rear window.
Keep the air inlets on the hood clear of snow.
Condensation may form on the underside of the vehicle.
In the event of a refrigerant leak, the A/C compressor will automatically shut down to protect against damage.
The cooling system no longer works. Economy mode
Basic position of controls in automatic mode
Click on the
Set the temperature controls to 22°C as the basic setting for interior temperature control. Change the set temperature in small increments.
Heating mode
To reduce the temperature in the space under the ceiling, open the adjusting wheel for mixing cold air as desired.
Cooling mode
In order to evenly distribute air, open the ventilation deflector on the top of the instrument panel.
Special provisions - choose only for a short time.
Switching off and on the automated air conditioner
Rotary air supply switch turn to 0. Automated air conditioner off.
To turn on the automated air conditioner, turn the air supply rotary switch to the desired fan position.
Manual regulation of air supply and distribution
Click on the
6 fan stages and air distribution can be selected manually.
Return to automatic mode:
Click on the
Manual regulation of air distribution:
The air distribution is controlled simultaneously for the left and right sides.
Defrosting windows
Fogging windows from the inside
Click on the
Turn off the air circulation mode
Fogging the windshield from the outside
Turn on the windshield wiper.
Close the air vent on the top of the instrument panel.
Manual mode: turn the air distribution knob to position
Air circulation mode
Turn on the air circulation mode:
The control LED on the
Lightly press the
Switching off the air circulation mode:
The control LED on the
Switching on the air circulation mode and activating comfort closing:
The control LED on the
Switching off the air circulation mode and activating comfort opening:
The control LED on the
If, after convenience closing, one of the windows is lowered manually or the glass roof panel is opened, it does not return to the position in which it was before closing during convenience opening.
Switching from the air circulation mode to the outdoor air supply mode is carried out automatically:
- after 30 minutes at an outside temperature above approximately 5°C,
- after 5 minutes at an outside temperature below approximately 5°C,
- after 5 minutes if economy mode
 was selected.
At high outside temperatures, automatic switching to air circulation mode takes place. Approximately 30 minutes later, outside air is introduced.
Economy mode
Activating economy mode:
Press the
The control LED on the button lights up.
The cooling system is not working and dehumidification is not performed.
Note. Pressing the button again switches back to the previously selected mode.
Engine residual heat utilization mode
With the engine switched off, interior heating is still possible for some time. The duration of heating depends on the set temperature.
Set both temperature controls as desired.
Set the air distribution through the ventilation deflectors as desired.
Note. Regardless of the position of the air supply regulator, the fan operates at a low level.
Before switching on: turn the key in the ignition switch to position 1 or 0 or remove it.
Switching on the mode of using the residual heat of the engine: press the
Switching on is not possible if the battery is not sufficiently charged.
Switching off the use of the residual heat of the engine:
Click on the
The control LED on the button goes out.
Automatic shutdown is performed:
- if the ignition key is turned to position 2,
- after about 30 minutes,
- if the battery voltage drops.
Automated air conditioner with comfort control (Thermotronic)
The location of the controls and deflectors is shown in the illustration at the beginning of the section. Deflectors in the rear compartment are located similarly to models with Thermatic (see above).
Display and keyboard
1 Temperature on the left side, decrease
2 Left side temperature rising
3 Air distribution on the left side (automatically, manually)
4 Active carbon filter
5 Display
6 Air distribution on the right side (automatically, manually)
7 Right side temperature rising
8 Temperature on the right side, decrease
9 Rear window heater (Chapter Rear window heater)
10 Economy mode (without cooling), engine residual heat utilization mode
11 Air supply rocker switch «+»
Switching on the automated air conditioner with comfort control
12 Air supply rocker switch -
Switching off the automated air conditioner with comfort control
13 Air circulation mode button
14 Defrosting windows
Display indication
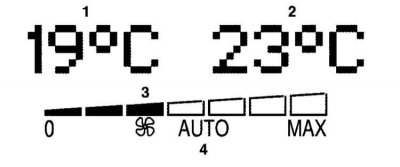
1 Temperature on the left side
2 Temperature on the right side
3 fan stages
4 AUTO function enabled (auto mode)
The automated air conditioner with comfort control is only ready when the engine is running.
In economy mode
In automatic mode, the automatic air conditioner performs cooling or heating depending on the intensity of the sun, the outside temperature and the desired temperature in the vehicle interior. When using the function «Engine residual heat utilization mode» heating or ventilation of the vehicle interior can also be performed with the engine off.
Change the set temperature only in small steps. The automatic air conditioner can be installed for the left and right sides separately.
The set temperature is reached as quickly as possible and kept constant.
General recommendations for automatic air conditioning
Refer to the relevant subsection relating to Thermatic HF earlier in this Section.
Basic position of controls - in automatic mode
Press both
The EU economy mode and air recirculation functions are disabled. At the same time, the automatic fan mode is activated.
We recommend setting the temperature indication on the display to 22°C as a basic setting for interior temperature control. Change the set temperature only in small increments.
Heating mode
To reduce the temperature in the space under the ceiling, open the adjusting wheel for mixing cold air as desired.
Cooling mode
In order to evenly distribute air, open the ventilation deflector on the top of the instrument panel.
Special provisions - choose only for a short time.
Switching off and on the automated air conditioner with comfort control
Press the air supply key switch on the left
To turn on the automated air conditioner with comfort control, press the air supply key switch
Manual air supply control
7 fan stages can be selected.
Press the air supply key switch on the right
Indication «AUTO» the display goes out and the automatic fan mode is turned off.
To turn on the automatic fan mode, press the left or right air distribution knob
Manual regulation of air distribution
Press the
Return to automatic mode: Press and lock the
Defrosting windows
Fogging windows from the inside
Press the
If necessary, turn off the air circulation mode
Fogging the windshield from the outside
Turn on the windshield wiper.
Close the air vent on the top of the instrument panel.
Manual mode: Turn the air distribution regulator to position
Air circulation mode
Turn on the air circulation mode: The control LED on the
Briefly press the
Switching off the air circulation mode: The control LED
Briefly press the
Switching on the air circulation mode and activating comfort closing:
The control LED on the button is off.
Press and hold the
Switching off the air circulation mode and activating comfort opening:
The control LED on the
If, after convenience closing, a window is manually lowered or a sliding and lifting sunroof is opened, comfort opening does not reach the position they were in before closing.
Switching from the air circulation mode to the outdoor air supply mode is carried out automatically:
- after 30 minutes at an outside temperature above approximately 5°C,
- after 5 minutes at an outside temperature below approximately 5°C,
- after 5 minutes if economy mode
 was selected.
At high outside temperatures, automatic switching to air circulation mode takes place. Approximately 30 minutes later, outside air is introduced.
Enabling Eco Mode
Click on the
The control LED on the button lights up.
The cooling system is not working and dehumidification is not performed.
Note. Pressing the button again switches back to the previously selected mode.
Activated carbon filter and automatic air circulation considering outside air pollution
The filter significantly reduces the concentration of harmful substances and largely retains odors.
Automatic switching to air circulation mode is performed if the concentration of carbon monoxide in the outdoor air has increased (SO) or nitric oxide (NOx).
The automatic air circulation mode is not available when the economy mode
Turning on the carbon air filter and air circulation, taking into account the pollution of the outside air with exhaust gases:
The control LED on the
Switching off the carbon filter for air circulation, taking into account the pollution of the outside air with exhaust gases:
The control LED
Briefly press the
Switching on the charcoal filter and automatic air circulation and activation of comfort closing:
The control LED on the
Switching off the charcoal filter and activating comfort opening:
The control LED on the
If, after comfort closing, a window is lowered manually or a sliding and lifting sunroof is opened, comfort opening no longer reaches the position they were in before closing.
Engine residual heat utilization mode
Refer to the relevant subsection relating to Thermatic HF earlier in this Section.
Air-conditioned compartment in the center console under the armrest
(models with automated air conditioning)
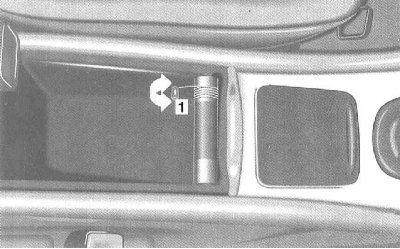
There is a ventilation deflector in the compartment.
Opening: handle (1) slide up.
Closing: handle (1) slide down.
The air supply depends on:
- from the set air distribution,
- from the installed air supply,
- from the opening position of the ventilation deflectors on the instrument panel.
The air temperature approximately corresponds to the temperature of the air leaving the middle vents. It cannot be installed separately.
Note. Extremely high temperatures can occur in the compartment due to limited space. Therefore, when transporting heat-sensitive cargo, it is necessary to close the ventilation deflector when the heating is on.
Do not cover the ventilation deflector in the compartment with objects.
Independent heater
An independent heater heats or ventilates the car interior depending on the value set on the automatic air conditioner and the temperature of the air in the cabin.
All functions of the independent heater can be called up by the remote control. Independent heater can be turned on immediately (immediate heating) or programmed so that it automatically turns on at the required time (program heating).
The switch in the center console can switch the independent heater on and off and reset the activated switch-on time.
The independent heater is switched on only when the coolant temperature is below 70°C.
Note. Under appropriate temperature and weather conditions, it may happen that the system, for example, first produces ventilation and then heating. This ensures that the required temperature can be reached as quickly as possible.
To achieve the maximum range of the remote control, it is recommended that the antenna be fully extended during transmission and the remote control held vertically. Transmission continues as long as the display flashes.
The maximum range of the remote control is 1000 m. From enclosed spaces or due to massive obstacles, the range may be limited.
The factory-set operating time for the independent heater is 50 minutes. However, it can also be set individually. Any maintenance station will provide information on this issue «Mercedes-Benz».
The independent heater remote control device can be stored in the storage compartment, in front of the selector lever, in the holder.
The car is equipped with a remote control device. One additional remote control device of the same design is provided for each vehicle. Any maintenance station will provide information on this issue «Mercedes-Benz».
The independent heater switch is located on the center console.
The left - red - LED indicates the switched on state of the heater.
Right - yellow - indicates the activation status of the heater start time selection
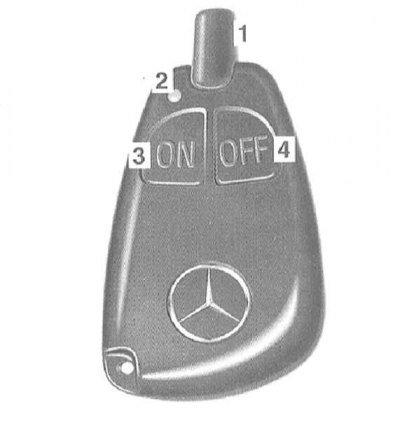
1 Antenna
2 Control LED
3 ON
4 OFF
Before switching on
Set the desired temperature for the cabin (see above in this Section). The recommended temperature on the left and right is 22°C.
The independent heater automatically sets the selected temperature.
Immediate activation
Switching on the independent heater with the switch
Click the switch on the symbol. The red control LED lights up.
Switching on an independent heater with a remote control device
Press the ON button on the remote control until the green control LED on the remote control lights up. On models with automated air conditioning with comfort control, the display on the control panel is activated.
When the independent heater is switched on, the red control LED on the switch in the center console lights up.
Shutdown
The independent heater can be turned off by a remote control or a switch in the center console.
Switching off with the switch: Press the switch on the center console on the symbol. The red control LED goes out.
Switching off the remote control: Press the OFF button on the remote control until the red control LED lights up. The red control LED on the center console switch also goes out.
Activating the preset function
Three switch-on times can be set via the universal display of the independent heater, one of them can be respectively activated as the switch-on time.
When the preset function is activated, the yellow LED on the switch lights up. When the independent heater is activated, the yellow LED on the switch goes out, and the red LED on the switch lights up.
(Setting the turn-on time - see Section Multifunction steering wheel, universal display).
(Calling the switch-on time - see Section Multifunction steering wheel, universal display)
(Activation of the preset function is discussed in Section Multifunction steering wheel, universal display).
Turning off the preset function
The preset function can be turned off with the switch (see above).
Note. After 50 minutes of heating/ventilation operation, the independent heater switches off automatically. The control LED goes out.
Replacing the Batteries
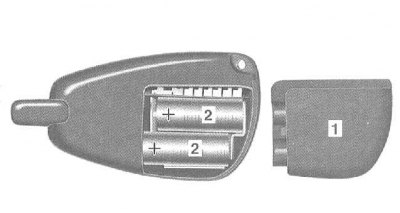
1 Lid
2 Batteries
Remove the cover -1- downwards overcoming the locking position.
Take out the old battery.
Insert a new battery -2- in accordance with the markings of the + and - poles cast on the body of the remote control device.
Push the cover down.