
Cars BMW Cars Volkswagen Cars Chevrolet Cars Land Rover Cars Lada Cars Honda Cars Peugeot
English Русский
Български
Беларускі
Український
Српски
Hrvatski
Română
Polski
Slovenský
Magyar
Bookmark News and articles Sitemap Feedback Site search
MercedesMan.ru


A-Class C-Class E-Class G-Class M-Class S-Class Others
190 (W201) (1982-1993) W202 (1993-2000) W203 (2000-2007)
  • Main
  • C-Class
  • W203 (2000-2007)
  • General information
  • User manual
  • First aid kit, fire extinguisher, tools, warning triangle and spare tire compartment

First aid kit, fire extinguisher, tools, warning triangle and spare tire compartment (Mercedes-Benz C-Class W203)

0
Contents: First aid kit ↡ Fire extinguisher ↡ Warning triangle ↡ Additional storage compartment under…↡ Removal the spare folding tire ↡ On-board tool kit ↡ TIREFIT tire puncture sealant ↡ Tire sealing ↡

First aid kit
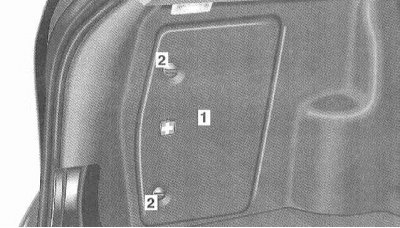


The first aid kit is located behind the left side trim in the trunk.


The first aid kit is located behind the left side trim in the trunk.

Opening: Turn the latches (2) and move the side panel (1) to the side.
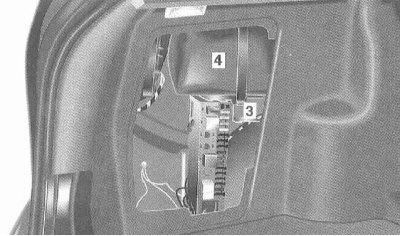
Detach the fastening tape (3) and remove the first aid kit (4).


Detach the fastening tape (3) and remove the first aid kit (4).

Note: Check the contents of the first aid kit regularly to ensure they are complete.


Fire extinguisher
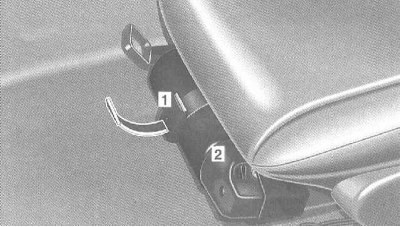


The fire extinguisher is located in front of the driver's seat.


The fire extinguisher is located in front of the driver's seat.


After each use, the fire extinguisher must be refilled. The fire extinguisher must be checked every 1-2 years.

Removing the fire extinguisher: Pull the handle (1) upwards and remove the fire extinguisher (2).

Warning triangle
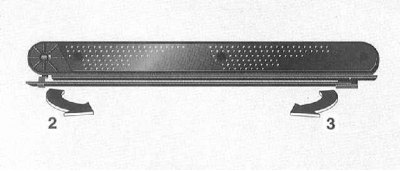


The warning triangle is located in an additional compartment under the boot floor.


The warning triangle is located in an additional compartment under the boot floor.

Turn the right legs to the right (2).

Turn the left legs to the left (3).
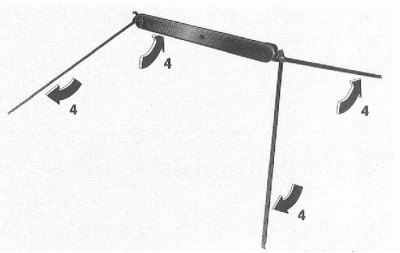
Spread the legs (4).

Spread the legs (4).

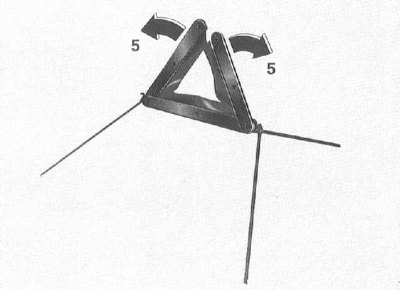
Turn both side reflectors upwards (5) and connect them together using the button.


Turn both side reflectors upwards (5) and connect them together using the button.


Additional storage compartment under the trunk floor
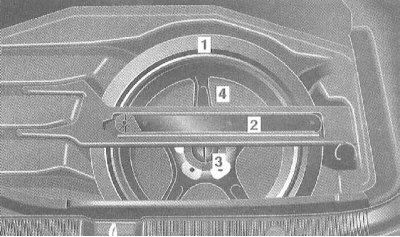


1 Models with a folding spare tire. Folding spare tire.

1 Models with a folding spare tire. Folding spare tire.
2 Emergency stop sign
3 Spare wheel/tool kit cover mounting bolt
4 Compartment for on-board tool kit


Removal the spare folding tire


Remove the warning triangle with the holder.

Turn the mounting bolt to the left and remove the spare folding tire.

Remove the on-board tool kit.

Remove the warning triangle with the holder.

Turn the mounting bolt to the left and remove the spare folding tire if necessary.

On-board tool kit


The on-board tool kit is located in an additional compartment under the trunk floor.
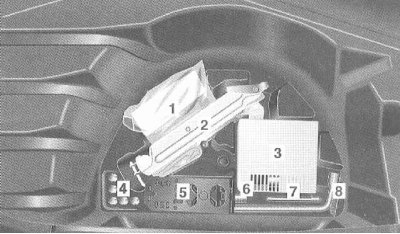
1 Models with TIREFIT sealant: TIREFIT sealant

1 Models with TIREFIT sealant: TIREFIT sealant
2 Car jack
3 Compressor
4 Wheel mounting bolts for spare folding tire
5 Wheel chock
6 Towing eyes
7 Centering pin for aluminum rims
8 Wheel wrench


TIREFIT tire puncture sealant


Small punctures, particularly on the tread, can be sealed with TIREFIT sealant.

Foreign objects stuck in the tire (for example, bolts or nails) if possible, do not delete.

TIREFIT sealant can be used at outside temperatures down to approximately -20°C.

Tire sealing


Set the parking brake.

Shift the manual transmission to 1st gear or reverse gear, and the automatic transmission to position "P".

(Material based on data from the portal MercedesMAN)

TIRIFIT sealant and the attached sticker with the inscription "max km/h" ("max. 80 km/h." remove from the trunk.

Place the sticker on the dashboard in the driver's field of vision.
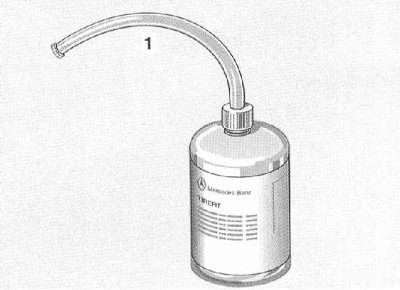
Shake the can several times.


Shake the can several times.

Screw the hose (1) onto the cylinder.

The can of TIREFIT sealant is then opened.

Unscrew the valve cap from the tire valve.

Unscrew the valve core with a valve extractor. Do not place the valve core on sand or dirt.

Remove the plug from the hose.

Attach the hose to the tire valve.

Holding the can with the hose pointing down, squeeze it.

Squeeze the entire contents of the can into the tire.

Remove the hose and screw the valve core into the tire valve until it stops using a valve remover.


Note: A spare valve core is included with the valve remover.


Plug the hose with a cap.
This article is available at: russian, bulgarian, belarusian, ukrainian, serbian, croatian, romanian, polish, slovak, hungarian
The article has been verified: Rodionov Artyom Semyonovich
Share with friends:
◀ Previous
C-Class W203 / User manual
Next ▶

Warning lights, warning lights, and fault messages
Vehicle control and auxiliary systems
Salon equipment
Power windows, sunroof
Rear window defroster
 
More similar articles for repairing other models

☛ Cars with a spare tire Mercedes W168 (1997-2004)
☛ Removal and installation the rear storage compartment (sedan models) Mercedes W123 (1976-1985)
☛ Purchase of spare parts Mercedes W463 (1999-2019)
☛ Purchase of spare parts Mercedes W163 (1997-2005)
☛ First aid kit, fire extinguisher, warning triangle and spare tire… Mercedes W220 (1998-2005)
☛ Working conditions and tools Mercedes Sprinter (1995-2000, diesel)
Link in different formats to this article
Comments and feedback from visitors
No comments yet


How much will 13 + 23 ?


W203 (2000-2007) 
  • General information
  • Introduction to guide
  • User manual
  • Maintenance
  • Power unit
  • Gasoline engines
  • Diesel engines
  • Cooling system
  • Ventilation and heating
  • Supply system
  • Injection system (gasoline)
  • Injection system (diesel)
  • Exhaust system
  • Ignition and control system
  • Charge and launch systems
  • Transmission
  • Mechanical gearbox
  • Automatic gearbox
  • Clutch and drive shafts
  • Differential
  • Chassis
  • Brake system
  • Car suspension
  • Steering
  • Body
  • Exterior (external elements)
  • Interior (internal elements)
  • Electrical equipment
  • Equipment and devices
  • Lighting system
  • Electrical diagrams (2000)
  • Electrical diagrams (since 2001)
W202 (1993-2000) 
  • General information
  • User manual
  • Driving a car
  • Car care
  • Maintenance
  • Power unit
  • Gasoline engines
  • Diesel engines
  • Lubrication system
  • Cooling system
  • Heating and ventilation
  • Ignition system
  • Fuel system
  • Injection system (gasoline)
  • Injection system (diesel)
  • Exhaust system
  • Transmission
  • Clutch
  • Car gearbox
  • Chassis
  • Suspension, wheels and tires
  • Steering
  • Brake system
  • Body
  • Exterior (external elements)
  • Interior (internal elements)
  • Doors and windows
  • Electrical equipment
  • Equipment and devices
  • Power devices
  • Lighting system
  • Electrical circuits
190 (W201) (1982-1993) 
  • General information
  • Introduction to the guide
  • Operation and care
  • Maintenance (gasoline)
  • Maintenance (diesel)
  • Troubleshooting
  • Power unit
  • Petrol engine I4
  • Petrol engine V6
  • Diesel engines
  • Engine overhaul
  • Cooling and heating
  • Power system (carburetor)
  • Injection system (gasoline)
  • Injection system (diesel)
  • Exhaust system
  • Charge and start system
  • Ignition system (I4)
  • Ignition system (V6)
  • Diesel heating system
  • Transmission
  • Clutch
  • Mechanical gearbox
  • Automatic gearbox
  • Cardan shaft and axle shafts
  • Chassis
  • Brake system
  • Car suspension
  • Steering
  • Body
  • Exterior (external elements)
  • Interior (internal elements)
  • Doors, locks and windows
  • Electrical equipment
  • Equipment and devices
  • Electrical circuits
 
MercedesMan.ru © 2017–2026 · Mobile version · Read about Mercedes · Sitemap: EN BG BY UA RS HR RO PL SK HU · Feedback · Site search · Bookmark A-Class (W168) · C-Class (W201) · C-Class (W202) · C-Class (W203) · E-Class (W123) · E-Class (W124) · E-Class (W210) · G-Class (W463) · M-Class (W163) · S-Class (W116, petrol) · S-Class (W126, petrol) · S-Class (W140) · S-Class (W220) · Sprinter · Vito 1 · Vito 2 · Vario 814D ·
 
We only use cookies without which some of the site's features may not be available.