



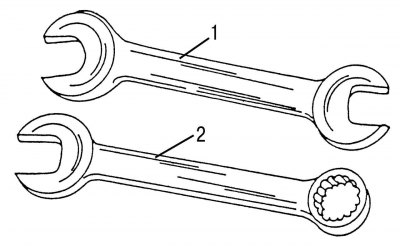
Figure 3. Double-ended open-end wrench (top) and combination open-end wrench (bottom)
In addition, you will need a complete set of tools. A high-quality tool will last longer and justify all the costs of its purchase. The core of the kit is a set of open-end wrenches that can be used in any easily accessible place in the car. It is also advisable to have a set of open-end wrenches: they can be used to loosen rusty and stuck nuts and bolts, and fasteners in places with limited space. For cost-effectiveness reasons, you can purchase a set of combination open-end and ring spanners, which have an open-end wrench on one end and a ring spanner on the other end of the same size. Similar keys are shown in the figure 3.
A set of socket heads can be used for repairs. If the outer diameters of the socket heads are not very large, they can be used to loosen bolts and nuts located in recesses.
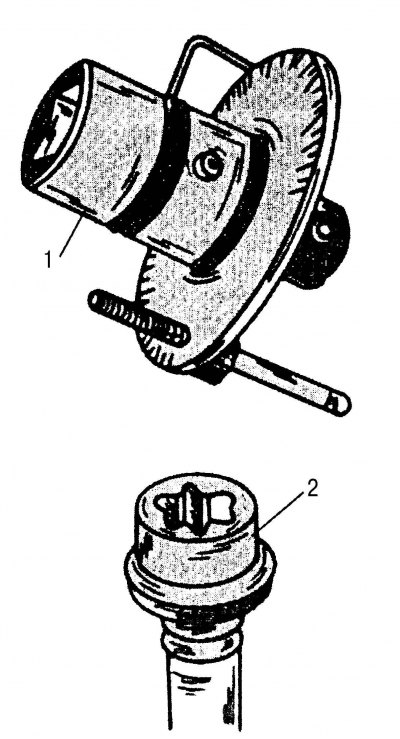
Figure 4. Angle measuring disc (top) for angular tightening of bolts and nuts. Torx head bolts and screws (bottom)
Other necessary tools include Phillips screwdrivers, pliers and a hammer. Recently, in the automotive industry, bolts and screws with so-called Torx heads are increasingly used (shown below in the figure 4). To unscrew fasteners with such heads, special socket heads of various sizes are used, similar to standard hex socket heads.
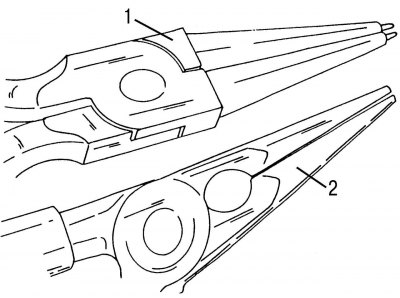
Figure 5. Snap ring pliers (top) and needle nose pliers (bottom)
In addition to the basic set of tools, you can also purchase a special tool, which often provides invaluable assistance, especially in cases where repairs have to be done quite often. An example of such a tool is an impact wrench, without which it is almost impossible to loosen tightly tightened bolts and Phillips-head screws without damaging them. Naturally, it can also be used to tighten such fasteners. Quite often there is a need for special pliers for removing elastic retaining rings, which are used to secure gears, shafts and other parts of the car and which are very difficult to remove with just a screwdriver. There are two types of snap ring pliers: for expanding and removing external snap rings (figure 5, top) and for compressing and removing internal retaining rings. Similar tweezers exist with straight and curved at a certain angle jaws. One of the most useful tools is a torque wrench, which can be adjusted so that it begins to slip once a set torque is reached on a particular bolt or nut. Such keys are sometimes equipped with an arrow indicator showing the torque achieved during tightening.
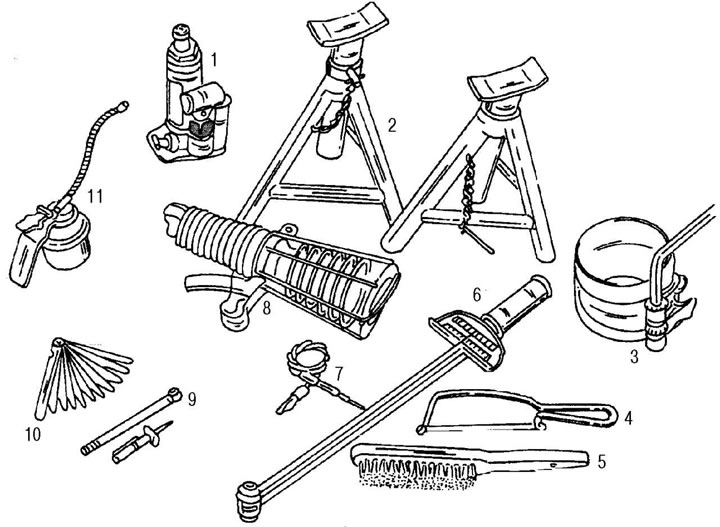
Figure 6. The main and auxiliary tools offered for performing repair and maintenance work on a vehicle: 1 - hydraulic jack; 2 - tripod supports; 3 - device for installing a piston with rings into a cylinder; 4 - hacksaw for metal; 5 - brush with metal bristles; 6 - torque wrench; 7 — indicator lamp (12 V); 8 - manual lamp-"carrying"; 9 - tire tread wear gauge; 10 - set of control probes; 11 - oiler
The torque wrench is shown in the figure 6.
It is necessary to mention the angle measuring disk (see figure 4). The degree of tightening of some fasteners is indicated in degrees of key rotation. To obtain an accurate angle, a protractor disc is best suited.
Article was borrowed from the website www.MercedesMan.ru
Unfortunately, some specific jobs cannot be performed without the proper special equipment. In such cases, you need to be very careful: some work must be done by a specialist.
Even if this repair manual shows how to dismantle and mount individual vehicle components without special tools (those cases where the use of a special tool is not necessary), you still need to think about purchasing a special tool. Figure 6 shows the most frequently used primary and secondary tools that you have to resort to from time to time.
However, even with the help of the proposed improvised methods and tools, it is possible to remove and install various parts of the car without fear of damage.
Before you begin any work, we recommend that you carefully read the following instructions to avoid any kind of damage:
- under no circumstances should you rely on a car jack. Always provide additional special supports. Even two wheels removed and stacked on top of each other can provide additional support if placed under the vehicle near the area where the repair work is being performed. If the car slips off the jack, it will fall onto the wheels placed underneath it;
- do not perform final tightening of wheel nuts on a raised vehicle;
- do not open the radiator cap when the engine is hot. If this is unavoidable, use a thick cloth placed around the plug and, turning the plug to the first lock, allow the steam to escape;
- do not allow brake fluid and antifreeze to come into contact with painted or varnished surfaces. The remaining stains are very difficult to remove, and sometimes cannot be removed at all;
- do not inhale brake dust under any circumstances. Although the material of brake linings and shoes does not contain asbestos, it is still harmful to health. If you use compressed air to blow out the brake mechanism, then turn away from the areas where dust is blown out. At service stations or in trade organizations selling auto accessories, you can inquire about the availability of aerosols used to coat brake parts to prevent dust formation;
- when working on a car, under no circumstances should you work in a tie, long-sleeved shirts, or any fluttering clothing. Long hair must be tied up before work is carried out. It is also better to remove rings on your fingers, bracelets and watches - they are good conductors when in contact with electrical equipment;
- do not smoke near the car under any circumstances. This is the reason why the battery is disconnected when the fuel lines are disconnected. Short circuits caused by metal objects may result in sparking. For safety reasons, always keep a fire extinguisher handy;
- avoid working with poor quality tools that may cause injury or damage to nuts, bolts, etc.