
Cars BMW Cars Volkswagen Cars Chevrolet Cars Land Rover Cars Lada Cars Honda Cars Peugeot
English Русский
Български
Беларускі
Український
Српски
Hrvatski
Română
Polski
Slovenský
Magyar
Bookmark News and articles Sitemap Feedback Site search
MercedesMan.ru


A-Class C-Class E-Class G-Class M-Class S-Class Others
W463 (1999-2019)
  • Main
  • G-Class
  • W463 (1999-2019)
  • Power unit
  • Heating and ventilation
  • Checking the refrigerant level in the working path of the A/C system

Checking the refrigerant level in the working path of the A/C system (Mercedes-Benz G-Class W463)

0
Caution! Observe all necessary precautions related to servicing the A/C systems (see Section General information and safety precautions)!
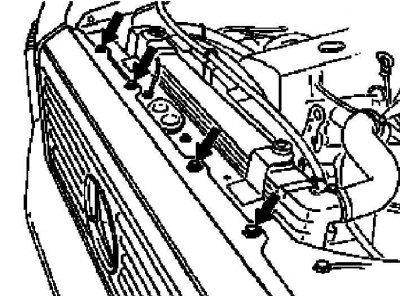

Front decorative grille mounting bolts
Front decorative grille mounting bolts


Location of the viewing window of the receiver-dryer in the engine compartment of models produced…

Location of the viewing window of the receiver-dryer in the engine compartment of models produced since 12.2000.
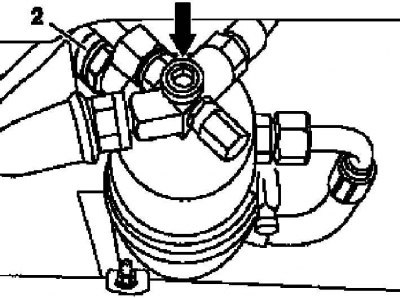

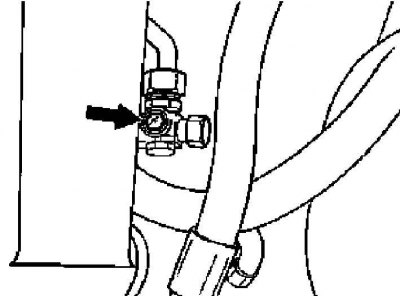
Location of the receiver-dryer inspection window located in front of the radiator

Location of the receiver-dryer inspection window located in front of the radiator
2 — Low pressure switch sensor connector
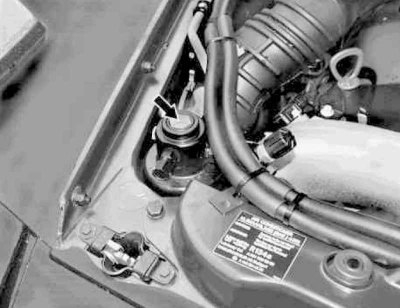


Location of the viewing window of the receiver-dryer in the engine compartment of models produced…

Location of the viewing window of the receiver-dryer in the engine compartment of models produced up to 12.2000.


1. If the A/C receiver-dryer is placed in front of the radiator, remove the front decorative grille (see Chapter Body).

2. Wipe the viewing window glass (arrow) on the receiver-dryer assembly.

3. Disconnect the connector (2) of the low-pressure sensor-switch and short-circuit the terminals of the latter.

(Original published on the website: MercedesMan)

4. Start the engine at idle speed.

5. Turn on the heater fan and activate the air conditioning system in maximum cooling capacity mode.

6. Remove the jumper from the pressure switch connector and, looking into the viewing window of the receiver-dryer, make sure that there are no signs of refrigerant bubbling (during the initial start-up of a freshly filled system, the formation of air bubbles should not cause concern - wait about 10 minutes - the bubbles should disappear, minor bubbling is also acceptable at high [>35°C] ambient temperatures)

Note: When the compressor electromagnetic clutch is activated, the fluid flow rate should increase.


7. Carefully examine the external condition of all components of the refrigeration system, using a special detector, check them for signs of developing leaks.

8. Set the fan to speed mode "1" and measure the temperature of the air coming out through the central deflectors of the instrument panel using a special meter. After 5 minutes of system operation, the temperature of the air supplied to the cabin should be within the range of +2°C÷+12°C, and the A/C compressor should switch to cyclic mode (on-off), otherwise, check the condition of the evaporator temperature switch sensor.

9. Turn off the air conditioner and stop the engine - more detailed checks of the air conditioning system should be carried out in a car service workshop.
This article is available at: russian, bulgarian, belarusian, ukrainian, serbian, croatian, romanian, polish, slovak, hungarian
The article has been verified: Polyakov Zakhar Grigorievich
Share with friends:
◀ Previous
G-Class W463 / Heating and ventilation
Next ▶

Removal and installation rear ventilation flaps
Removal and installation the heater circulation pump
Removal and installation the heater heat exchanger
Removal and installation the heater/air conditioner fan and its control module
Removal and installation the control panel of the heating / ventilation / air conditioning systems
Removal and installation of sensors of the K/V system
Removal and installation the auxiliary fan assembly
Removal and installation the electric motor of the ventilation flap drive
Removal and installation the stepper motor of the air circulation mode switching flap drive
Removal and installation the electric motor of the mixing flap drive
More similar articles for repairing other models

☛ Checking the engine oil level using a dipstick Mercedes W168 (1997-2004)
☛ Air Conditioner: Checking the Refrigerant Level Mercedes W202 (1993-2000)
☛ Checking the injection system Mercedes W123 (1976-1985)
☛ Checking the condition of the exhaust system Mercedes W163 (1997-2005)
☛ Checking the brake system Mercedes W140 (1991-1998)
☛ Checking the level of liquid in the cooling system Mercedes Sprinter (1995-2000, diesel)
Link in different formats to this article
Comments and feedback from visitors
No comments yet


How much will 49 + 34 ?


W463 (1999-2019) 
  • General information
  • Introduction to the guide
  • Controls and instruments
  • Driving and operation
  • Maintenance
  • Power unit
  • Engine repair
  • Cooling system
  • Heating and ventilation
  • Power system (gasoline)
  • Fuel system (diesel)
  • Exhaust system
  • Ignition and control system
  • Charging and starting system
  • Transmission
  • Automatic gearbox
  • Transfer case
  • Axles front and rear
  • Chassis
  • Brake system
  • Front suspension
  • Rear suspension
  • Steering
  • Body
  • Exterior (external elements)
  • Interior (internal elements)
  • Doors, locks and windows
  • Electrical equipment
  • Equipment and devices
  • Switches in salon
  • Headlights and lighting
  • Audio system and navigation
  • Electrical circuits
 
MercedesMan.ru © 2017–2026 · Mobile version · Read about Mercedes · Sitemap: EN BG BY UA RS HR RO PL SK HU · Feedback · Site search · Bookmark A-Class (W168) · C-Class (W201) · C-Class (W202) · C-Class (W203) · E-Class (W123) · E-Class (W124) · E-Class (W210) · G-Class (W463) · M-Class (W163) · S-Class (W116, petrol) · S-Class (W126, petrol) · S-Class (W140) · S-Class (W220) · Sprinter · Vito 1 · Vito 2 · Vario 814D ·
 
We only use cookies without which some of the site's features may not be available.