
Remove the cylinder head only when the engine is cold.
The cylinder head for eight-cylinder engines is of a different design than cylinder heads made after 1978 for the same engines.
If the mating plane of the cylinder head is damaged, it can be milled.
Each cylinder head is fixed to the cylinder block with two dowel pins and secured with 18 bolts, 6 bolts for each cylinder.
The cylinder head gasket of 3.5 and 4.5 liter engines differ from each other in the diameter of the cylinder bore. In addition, the design of gaskets has changed throughout the year, so be sure to include the engine number when purchasing a gasket.
During operation, tightening the cylinder head bolts is not required.
The cylinder head must only be mounted on a cold engine.
The threads of the cylinder head bolts are nickel-plated: to avoid damage to the threads in the block, use only such bolts when replacing.
To protect the threads, it is recommended to use paste "Helicoil".
Removal and installation of the cylinder head can be performed on the engine installed on the vehicle.
Place the hood of the car in a vertical position as when removing the engine (see fig. 9).
Disconnect the wires from the battery.
Drain the coolant from the cooling system by unscrewing the drain plugs on the left and right sides of the cylinder block (see fig. 10 and 11).
Remove fuel pipes.
Loosen the exhaust pipe bolts on both cylinder heads.
Turn the engine crankshaft to TDC in the 1st cylinder. In this case, the mark on the end side of the surface of the cylinder block and the zero mark on the pulley must match as shown in fig. 13.
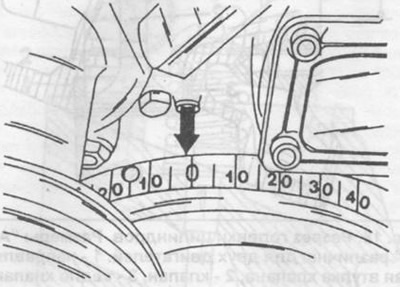
Fig. 13. The position of TDC in the engine.
In vehicles with adjustable wheel suspension, unscrew the four bolts securing the suspension hydraulic pump, remove the pump together with the hoses and set aside. Remove hydraulic drive parts.
Mark the camshaft sprockets and drive chain with paint, even if only one cylinder head is removed (see _ fig. 14).
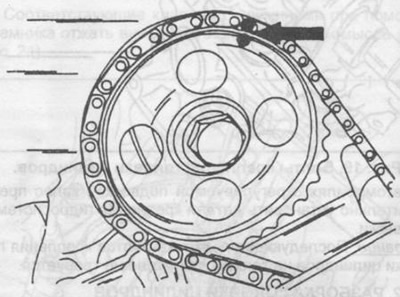
Pic. 14. Marking the camshaft sprockets and drive chain.
Loosen the sprocket mounting bolt on the camshaft, holding the camshaft in the middle part from turning with a wrench in the middle part or between the sprocket teeth and the drive chain, put a stopper of the appropriate shape. Do not loosen the fastening bolt all the way.
Remove the sprocket from the camshaft, if necessary, with light blows of a hammer with a plastic working surface, then unscrew the sprocket mounting bolt. Secure the chain to prevent the chain from jumping off other sprockets.
When removing the left cylinder head:
Remove power steering pump and lay to one side with pipes.
Remove the ignition distributor.
Remove inner drive chain guide from left cylinder head (see relevant section). Remove the damper after removing the camshaft sprocket.
When removing the right cylinder head:
Remove the alternator together with the fasteners. To do this, unscrew the four bolts securing the generator bracket (see fig. 15) and the alternator tensioner bolt and nut. Remove the alternator drive belt.
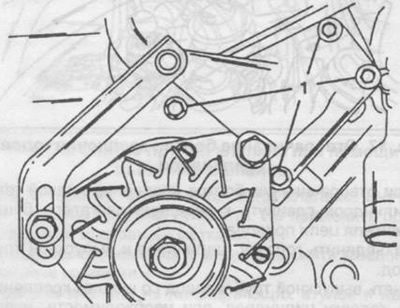
Pic. 15. Mounting the generator.
Remove chain tensioner.
Remove inner chain guide.
When removing both cylinder heads:
Disconnect the exhaust pipe from the exhaust pipes.
Loosen the cylinder head bolts in reverse order as shown in fig. 16 in the order of tightening the cylinder head bolts. Please note that two different wrenches must be used to loosen and tighten the cylinder head bolts. To loosen the mounting bolts, a wrench with an 8 mm hexagon and a 52 mm extension with a swivel is required.
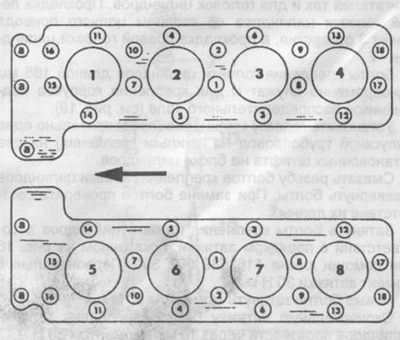
Fig. 16. Order of an inhaling of bolts of fastening of a head of cylinders.

Pic. 17. Unscrewing the cylinder head bolts.
When loosening the bolts securing the right cylinder head, move the drive chain tensioner shoe to the middle of the engine.
Disconnect cylinder head and exhaust pipe.
Remove the exhaust pipe from the mounting studs and remove the cylinder head, if necessary, use a hammer with plastic working surfaces.
Thoroughly clean the mating surfaces of the cylinder head and block.
If necessary, repair the cylinder head as described in section 2.3.2. When installing the cylinder head, install a new gasket following the instructions below.
The cylinder heads of 3.5 and 4.5 liter engines differ from each other in the diameter of the exhaust port "A" and outer diameter of the exhaust channel seat "G", and therefore are not interchangeable. On fig. 18 shows a section of the exhaust valve with the main dimensions.
When installing the cylinder head, observe the following instructions:
Install new gaskets. They are different for both engines and cylinder heads. The left cylinder head gasket on the chain drive side has 3 holes and the right cylinder head gasket has 2.
Cylinder head bolts with a length of 165 mm also serve to fasten the camshaft bearing housings (see fig. 19).
Install cylinder head (having previously put the exhaust pipe on the mounting studs) on two dowel pins on the cylinder block.
Lubricate the threads of the cylinder head bolts and tighten the bolts. When replacing bolts, check that their length is correct.
Tighten the cylinder head bolts in accordance with the tightening order shown in fig. 16 with key 116 589 001 300. Initial tightening torque 30 Nm.
Tighten new bolts to 50 Nm.
The final tightening of the cylinder head bolts is to be carried out after 10 minutes with a torque of 50 Nm.
Perform further work in the reverse order of removal. Install exhaust pipe and secure completely. Install the sprocket with the drive chain on the camshaft, paying attention to the coincidence of the marks on the sprocket and chain. Tighten the sprocket bolt to 100 Nm while holding the camshaft from turning.
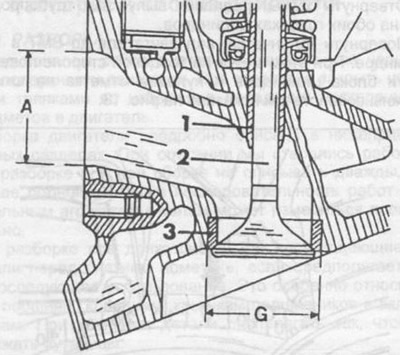
Pic. 18. Section of the cylinder head. Dimensions "A" And "G" different for the two engines. 1 - valve guide, 2 - valve, 3 - valve seat.

Pic. 19. Bolts of fastening of a head of cylinders.
In vehicles with adjustable wheel suspension, pre-install the mounting parts for the suspension hydraulic system.
Note: Subsequent tightening of the cylinder head bolts is not required on a warm engine.