
Cars BMW Cars Volkswagen Cars Chevrolet Cars Land Rover Cars Lada Cars Honda Cars Peugeot
English Русский
Български
Беларускі
Український
Српски
Hrvatski
Română
Polski
Slovenský
Magyar
Bookmark News and articles Sitemap Feedback Site search
MercedesMan.ru


A-Class C-Class E-Class G-Class M-Class S-Class Others
W123 (1976-1985) W124 (1984-1995) W210 (1996-2002)
  • Main
  • E-Class
  • W210 (1996-2002)
  • Gasoline engines
  • Lubrication system
  • Oil and oil filter change

Oil and oil filter change (Mercedes-Benz E-Class W210)

0
Contents: Do-it-yourself oil change ↡ Oil change at a service station ↡

Do-it-yourself oil change


You should only fill with oil recommended by this manual, purchased at a service station or a specialized store. When changing the oil, you must change the oil filter. Install a filter that matches the engine of your car.

Oil change at a service station


It is better to change the oil at a service station where there is a special unit. The advantage of using it is that it "washes" the crankcase, and when changing the oil yourself, even after changing the oil filter, you will not be able to completely clean the crankcase from sludge, and the oil will still have additives.

The stations offer expensive brands of oil, so it is better to buy it in advance.

Sequence of works


"15,000 km 1 year"

Oil drain


1. Stop the engine when it is warmed up to operating temperature and let it cool for 10 minutes. It is better to drain the old engine oil when it is warm.

Warning! Hot oil can cause burns. When unscrewing the drain plug, do not remove it abruptly to avoid hot oil coming out under pressure and getting on your fingers.


2. Raise the vehicle and place it on stands in a horizontal position.

3. Remove the lower engine compartment cover.

4. Place a container under the drain plug to collect the oil.
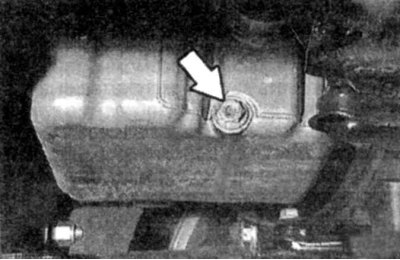
Fig. 5.22. Oil pan drain plug

Fig. 5.22. Oil pan drain plug


5. Unscrew the drain plug of the oil pan and completely drain the old oil (Fig. 5.22). Open the oil filler neck, this will speed up the drain.

6. Clean and check the plug.

7. After draining the oil, tighten the drain plug, installing a new sealing gasket. Tightening torque of the plug: for thread diameter M12 - 30 N·m, for diameter M14 - 25 N·m.

8. Unscrew the oil filter cover using the SW74 wrench.
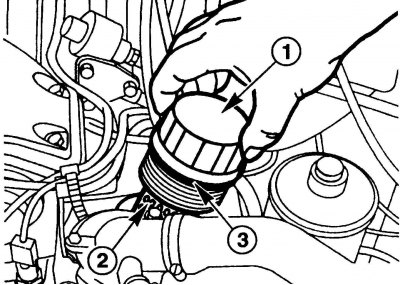
Fig. 5.23. Removing the oil filter: 1 – oil filter cover; 2 – filter element; 3 – sealing ring

Fig. 5.23. Removing the oil filter: 1 – oil filter cover; 2 – filter element; 3 – sealing ring


9. Remove cover 1 (Fig. 5.23) of the oil filter together with filter element 2. Dispose of the replacement element.


Filling with oil


10. Lower the vehicle.

11. Insert the new filter into the housing.

12. Screw on the cap with a new gasket.

13. Fill with the oil recommended by this manual in the volume specified in Table 5.4 and tighten the filler cap. Run the engine for a short time until the oil pressure warning light goes out. This means that the oil has filled the filter and is flowing along the line.

Table 5.4. Volume of oil poured into the engine
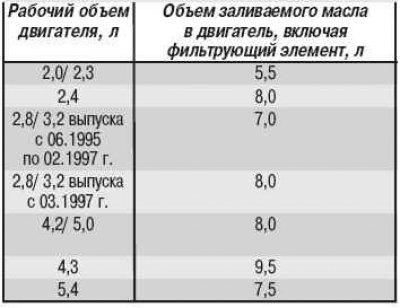


Table 5.4. Volume of oil poured into the engine

Warning! Too much oil is just as harmful to the engine as too little.
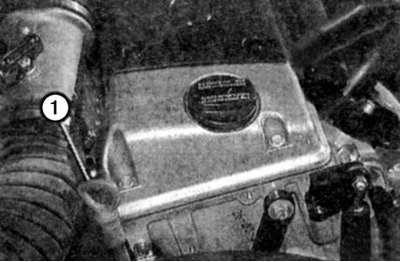

Fig. 5.24. Checking the oil level: 1 – oil level indicator

Fig. 5.24. Checking the oil level: 1 – oil level indicator


14. For a final check, stop the engine and wait 5 minutes until the oil drains into the crankcase. Then check the oil level by removing the dipstick (Fig. 5.24).


15. Check if oil is leaking from the filter or drain plug.

16. Replace the crankcase guard.
This article is available at: russian, bulgarian, belarusian, ukrainian, serbian, croatian, romanian, polish, slovak, hungarian
The article has been verified: Polyakov Zakhar Grigorievich
Share with friends:
◀ Previous
E-Class W210 / Lubrication system
Next ▶

Checking the condition of the engine oil
Oil level control system
Engine oil consumption
Engine crankcase ventilation
Motor oil — classification and selection
Possible malfunctions of the lubrication system, their causes and methods of elimination
More similar articles for repairing other models

☛ Engine Oil and Oil Filter — Replacement Mercedes W168 (1997-2004)
☛ Engine oil and filter change Mercedes 190 (W201) (1982-1993)
☛ Changing engine oil and oil filter Mercedes W463 (1999-2019)
☛ Changing engine oil and oil filter Mercedes W163 (1997-2005)
☛ Changing engine oil and oil filter Mercedes W140 (1991-1998)
☛ Air filter element Mercedes Sprinter (1995-2000, diesel)
Link in different formats to this article
Comments and feedback from visitors
No comments yet


How much will 27 + 34 ?


W210 (1996-2002) 
  • General information
  • Vehicle description
  • Working conditions and tools
  • Car care
  • Diesel engines
  • Engine repair
  • Lubrication system
  • Cooling system
  • Injection system
  • Supply system
  • Exhaust system
  • Gasoline engines
  • Engine repair
  • Lubrication system
  • Cooling system
  • Control system
  • Power and exhaust system
  • Transmission
  • Clutch
  • Mechanical gearbox
  • Automatic gearbox
  • Drive shafts
  • Chassis
  • Car suspension
  • Steering
  • Tires and wheels
  • Brake system
  • Body
  • Exterior (external elements)
  • Interior (internal elements)
  • Doors and windows
  • Heating and ventilation
  • Electrical equipment
  • Equipment and devices
  • Power devices
  • Lighting and signaling
  • Electrical circuits
W124 (1984-1995) 
  • General information
  • Governing bodies
  • Driving and operation
  • Weekly care
  • Maintenance (gasoline)
  • Maintenance (diesel)
  • Troubleshooting
  • Power unit
  • I4 petrol engine
  • V6 petrol engine (SOHC)
  • V6 petrol engine (DOHC)
  • Diesel engines
  • Engine overhaul
  • Cooling system
  • Heating and ventilation
  • Fuel system (carburetor)
  • Injection system «Bosch CIS-E»
  • Injection system «Bosch HFM»
  • Diesel fuel system
  • Supply system
  • Starting and charging system
  • Ignition system (I4)
  • Ignition system (V6)
  • Preheating
  • Transmission
  • Clutch
  • Mechanical gearbox
  • Automatic gearbox
  • Drive shafts
  • Chassis
  • Brake system
  • Car suspension
  • Steering
  • Body
  • Exterior (external elements)
  • Interior (internal elements)
  • Doors, locks and windows
  • Electrical equipment
  • Equipment and devices
  • Switches
  • Headlights and lighting
  • Electrical circuits
W123 (1976-1985) 
  • General information
  • Introduction to the guide
  • Power unit
  • Engine device
  • Repair M102 engines
  • Repair M110 and M123 engines
  • Cooling and lubrication (M102)
  • Cooling (M110 and M123)
  • Ignition system
  • Power system «Stromberg»
  • Power system «Solex 4A1»
  • Fuel injection «K-Jetronic»
  • Fuel injection «L-Jetronic»
  • Transmission
  • Clutch
  • Mechanical gearbox
  • Automatic gearbox
  • Cardan and rear axle
  • Chassis
  • Front suspension
  • Rear suspension
  • Steering
  • Brake system
  • Body
  • Exterior (external elements)
  • Interior (internal elements)
  • Doors, locks and windows
  • Electrical equipment
  • Equipment and devices
  • Power devices
  • Electrical circuits
 
MercedesMan.ru © 2017–2026 · Mobile version · Read about Mercedes · Sitemap: EN BG BY UA RS HR RO PL SK HU · Feedback · Site search · Bookmark A-Class (W168) · C-Class (W201) · C-Class (W202) · C-Class (W203) · E-Class (W123) · E-Class (W124) · E-Class (W210) · G-Class (W463) · M-Class (W163) · S-Class (W116, petrol) · S-Class (W126, petrol) · S-Class (W140) · S-Class (W220) · Sprinter · Vito 1 · Vito 2 · Vario 814D ·
 
We only use cookies without which some of the site's features may not be available.