
General information
Attention! Prolonged skin contact with used engine oil is quite dangerous. Use barrier cream and wear gloves during this procedure. Change oil-soaked clothing immediately.
Note. Regular and frequent engine oil changes are the number one preventive maintenance procedure available to the amateur mechanic. Over time, the oil is susceptible to dilution and contamination, which leads to premature engine wear.
Engine oil, if necessary, can be pumped out using a special probe (can usually be borrowed at gas stations) through the probe guide tube.
Attention! Never dispose of used oil down the drain!
It is advisable to affix a label to the engine after changing the oil indicating the brand of oil filled and the date the procedure was performed.
The use of oils of various types adversely affects the operation of the engine. Under no circumstances should oils of different brands be mixed. In some situations (especially during the off-season) mixing of motor oils of different viscosities is allowed, provided that they match by type and brand.
Required tool
- Observation pit / flyover / hydraulic lift (if the oil is not pumped out through the top);
- Socket head for unscrewing the drain plug;
- Special nozzle for unscrewing the filter cover (103 589 02 09 00);
- Drainage tank (if the oil is not sucked out through the dipstick guide tube) with a volume of at least 6 liters.
Necessary spare parts and consumables:
- Aluminum or copper sealing washer for drain plug (if the oil is not pumped out through the top), - are sometimes supplied with a replaceable filter;
- Replaceable cartridge filter element;
- The required amount of motor oil approved by Mercedes-Benz.
Draining engine oil
1. Warm up the engine to normal operating temperature.
2. Jack up the vehicle and place it horizontally on jack stands.
3. Place a container under the oil pan to collect used oil.
4. Remove the drain plug from the oil pan (see resist. illustration a) and completely drain the oil - if the drain plug is not located at the lowest point of the engine sump, you should use a special device to pump out the oil (see resist. illustration b).
a.
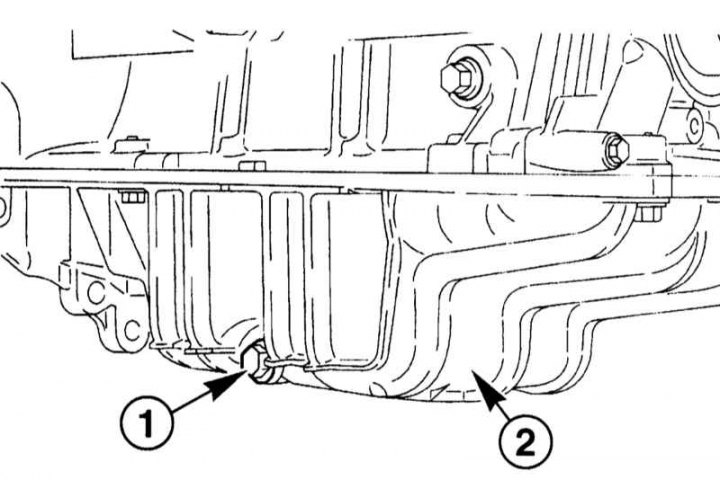
1 - drain plug
2 - oil pan
b.
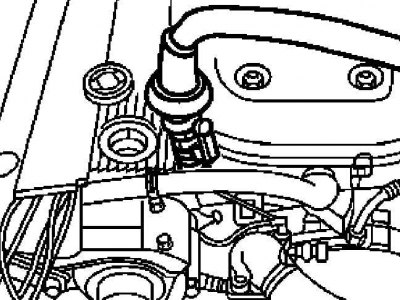
Attention! If there is a large amount of metal chips and wear products in the used oil, this indicates the presence of scoring, for example, in crankshaft bearings and connecting rod bearings. To prevent damage after the repair, it is necessary to thoroughly clean the oil channels and hoses. In addition, it is necessary, if any, to replace the oil cooler.
5. Wait for the oil to stop flowing through the drain hole, then screw the plug back into place, after replacing its sealing washer, - make sure that the plug is tightened with the required force, - excessively tight tightening of the drain plug is associated with a risk of damage to its tight fit.
6. Lower the car on wheels.
Oil filter replacement
Petrol models
1. Removing the working element of the oil filter (petrol models).
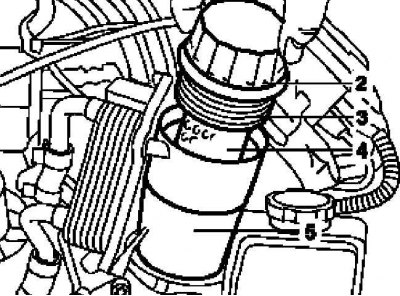
2. The cassette oil filter cover is placed on top of the engine, in the left front corner of the latter (see illustration Engine compartment of petrol models (on the example of the G55 AMG)).
3. Using a special nozzle (103 589 02 09 00) release screw cap (2) casing (5) oil filter and remove it complete with a working element (4).
4. With short blows applied to the central rod, knock out the working element from the cover into the prepared drain container.
5. Replace O-ring (3) lids (2).
6. Fill in the casing (5) assembly interchangeable work item (4), then put the cover back in place and tighten it with a special tool (see paragraph 3).
Diesel models
1. Relevant illustrative material is presented on Ref. illustrations
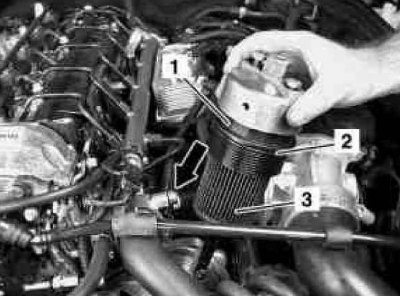
A - Removing the working element of the oil filter (G270 CDI models with M612 engine)
1 - Cover
2 - O-ring
3 - Work item
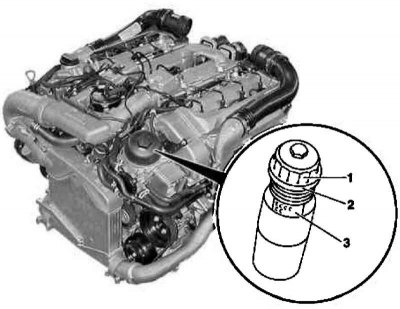
b - Removing the working element of the oil filter (G400 CDI models with M628 engine)
2. The procedure is the same as described above for gasoline engines. On models equipped with the 612 series engine, the cylinder head trim panel/air cleaner assembly must first be removed to gain access to the filter.
Filling with fresh engine oil
Attention! When starting the turbodiesel for the first time after an oil change, make sure that the engine first runs at idle until the oil pressure warning lamp goes out. Increasing the engine speed when the control lamp is on is associated with the risk of failure of the turbocharger!
1. Oil is filled through a special filler neck in the cylinder head cover equipped with a cap (see illustrations Engine compartment of petrol models (on the example of the G55 AMG), Engine compartment of G270 CDI diesel models and Engine compartment for G400 CDI diesel models).
2. When changing the oil, use new oil of the same type and, if possible, the same brand as that drained from the engine. Use a funnel to minimize splashing. At each oil change, affix a label to the engine indicating the type and grade of oil filled, and the date the change was made.
3. At the first stage, fill the engine with approximately 0.5 liters of oil less than indicated in Specifications, then warm up the engine and, after a few minutes, check the level - if necessary, make the appropriate correction by bringing the level to the MAX mark on the dipstick blade.
Note. Excess oil must be pumped out of the engine to avoid the risk of damaging the engine seals and failure of the catalytic converter.
4. After a test drive, check the tightness of the drain plug and oil filter cover.
5. Approximately 2 minutes after the engine has stopped, check the oil level again and correct if necessary.