



Warning! Prolonged skin contact with used engine oil is quite dangerous. Use a protective cream and wear gloves during this procedure. Change oil-soaked clothing immediately.
Recommendations:
Frequent engine oil changes are the most important preventative maintenance procedure available to the amateur mechanic. Over time, oil is susceptible to dilution and contamination, which leads to premature engine wear.
Engine oil can be pumped out using a special probe (available at gas stations) through the dipstick tube. After this, it is usually necessary to fill the system with oil.
Do not dispose of used oil with household waste or in any other way. This may cause environmental pollution.
When changing the oil, it is advisable to attach a tag to the engine with the oil brand and its viscosity.
The use of oils of different types has an adverse effect on engine operation. It is also not recommended to mix different brands of oils. Engine oils of the same type and brand, but of different viscosity, can be mixed if necessary, particularly in the off-season.
Necessary tool:
- Inspection pit or hydraulic lift with supports (if the oil is not sucked out).
- Head for unscrewing the drain plug.
- Special tool for unscrewing the filter (filter wrench, strap wrench or HAZET 2172 tool).
- Oil collection container (if the oil is not sucked out) with a capacity of at least 6 liters.
Necessary spare parts and consumables:
- Only if oil is not sucked out: aluminum or copper sealing ring for drain plug (sometimes supplied with an oil filter).
- Oil filter.
- The required amount of engine oil. Use the oil approved by the manufacturer, refer to Specifications.
Removal engine oil
Engine oil can be removed by suction, through the dipstick hole, or drained from the oil pan.
A suitable pump is required for suction, and care must be taken to ensure that the hose fits the opening and is long enough.
Caution: If oil is sucked out, please see the special notes at the end of the section.
Note: The volumes given in the Specifications are approximate. In any case, it is necessary to check the oil level using the gauge or indicator on the instrument panel. The description below applies primarily to the gasoline engine. Differences for the diesel engine are given at the end of the Section.
1. Warm up the engine to operating temperature. To do this, start the engine and wait until the coolant temperature on the dashboard reaches the normal value or until the radiator hose warms up. Then drive at least 5 km until the engine oil temperature reaches the specified value.
2. Remove the top engine cover.
Article was obtained from the portal MercedesMan
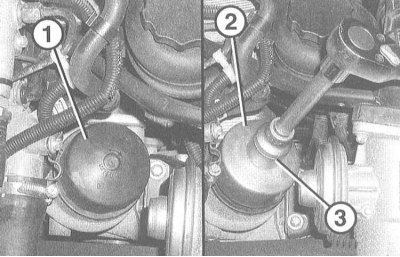
3. Unscrew the oil filter cover (1) using the HAZET 2169 key (2) and a 27 mm socket. The illustration shows the 611 engine.
4. Remove the oil filter cover with the filter element.
5. Suck out the oil using a special device through the hole for the level indicator.
Attention! For engine 111.955, notes are provided at the end of the Section.
6. If there is no oil suction device available, drain the oil. To do this, place the car horizontally on stands or over an inspection ditch.
Attention! The operation of lifting and installing the car on stands is associated with danger! Therefore, before carrying out the operation, read the Section Jacking and towing Introduction to the manual.
7. Remove the lower engine compartment cover, refer to Section Removal and installation the engine compartment cover from the bottom side.
Caution: Be careful not to let hot engine oil get on your hands when removing the drain plug.
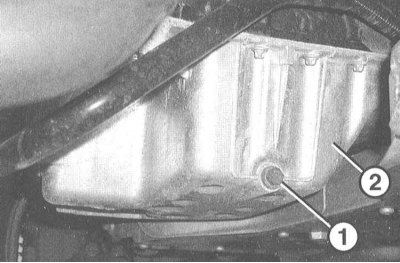
8 Remove the drain plug (1) from the oil pan (2) and allow the oil to drain completely.
9. Screw in the plug with a new sealing gasket and tighten to a torque of 30 Nm.
10. Remove the container with the drained oil from under the engine.
Caution! If large amounts of metal shavings and wear products are found in the engine oil, this indicates the possibility of scoring, such as damage to the crankshaft bearings and connecting rods. To eliminate the consequences of damage after engine repair, it is necessary to thoroughly clean the oil channels and hoses. In addition, if there is an oil radiator, it must be replaced.
11. Reinstall the lower engine compartment cover, refer to Section Removal and installation the engine compartment cover from the bottom side.
12. Lower the car onto its wheels.
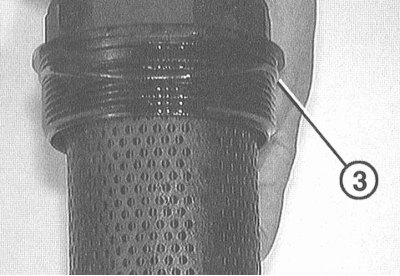
13. Replace the sealing ring (3).
14. Insert a new filter element into the cover.
15. Screw in the screw cap with a new sealing ring and tighten to a torque of 25 Nm.
Oil filling
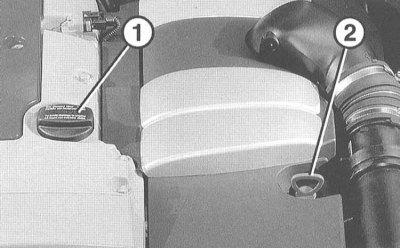
1. Open the cover (1) and fill in new oil through the cylinder head cover pipe. (2) – oil level indicator.
Attention! It is recommended to first pour in ½ liter of oil less than necessary, warm up the engine and after a few minutes check the oil level using the dipstick (2), top up if necessary. Excess oil must be sucked out, otherwise the gaskets or seals of the engine and the catalytic converter may be damaged.
2. Replace the top engine cover.
3. Drive the car and check the drain plug for leaks. If necessary, carefully tighten the plug.
4. After 2 minutes of stopping the engine, check the oil level again and adjust it if necessary.
Engine 111.955: When sucking out oil, keep the following in mind:
5. Before suction, disconnect the hose between the oil separator and the level indicator guide pipe using a clamp such as HAZET-4590.
6. Suck out the oil.
7. Remove the clamp.
Caution! Do not forget to remove the clamp, otherwise the separated oil will not drain into the oil pan, will be sucked in by the engine and will clog the air mass meter.