



Contents: Checking the frost resistance of the…↡ Examination ↡ Liquid removal ↡ Adding antifreeze ↡ Air locks ↡
1. Many serious engine malfunctions are related to cooling system malfunctions. If the car is equipped with an automatic transmission, its operation and service life are also directly related to the operation of the cooling system.
2. The cooling system should be checked when the engine is cold, so it is best to do this before the first trip of the day or no earlier than three hours after turning off the engine.
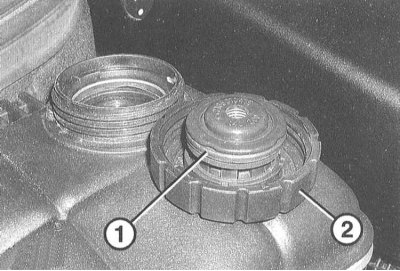
3. Slowly, being careful in case the engine is not yet completely cool, remove the expansion tank cap. Rinse it thoroughly inside and out with clean water. Check the sealing gasket (1) of the cap (2). A low coolant level may be due to the cap not being screwed on correctly.
Also flush the filler neck. The presence of traces of corrosion in the filler neck means that the coolant should be replaced. The coolant inside the radiator should be relatively clean and transparent. If it is brownish in color, drain the system and fill it with new coolant.
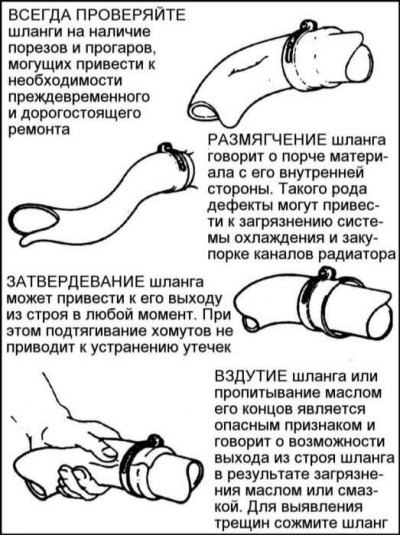
4. Carefully inspect the radiator hoses, as well as the heater hoses, which have a smaller diameter. Check the entire length of the coolant hoses, replacing any cracked, bulging or worn hoses. Cracks are easier to spot if you squeeze the hose with your hand. Pay special attention to the clamps that hold the hoses to the cooling system components. These clamps can cut or puncture the hoses, causing coolant to leak.
5. Make sure all hose connections are securely fastened. Coolant leaks usually show up as white or rusty deposits in the area of the leak. If your vehicle uses wire-type clamps, it may make sense to replace them with screw-type clamps.
6. Using compressed air or a soft brush, clean the front of the radiator (and also the air conditioner condenser, where available). Remove any insects, leaves, or other foreign objects that may have gotten onto the radiator fins. Be very careful not to damage the fins or cut your fingers on them.
7. If the coolant level is constantly dropping and you have not found any leaks, you should pressure test the radiator cap and the entire cooling system.
Noticeable coolant leakage and/or oil in the coolant, as well as white clouds in the exhaust gases, indicate a defect in the cylinder head gasket.
Checking the frost resistance of the coolant
Warning! Do not allow antifreeze to come into contact with your skin or painted surfaces of your vehicle. If it does come into contact with your skin, rinse immediately with plenty of water. Antifreeze is extremely toxic and can be fatal if ingested. Do not leave antifreeze in an open container or spilled on the floor; its sweet smell can easily attract children or pets.
Check your local regulations for disposal of used antifreeze. Many areas have special collection centers for it.
Before the start of the winter season, it is necessary to check the concentration of antifreeze in the coolant, especially if clean water was poured into the system during operation.
You will need a special hydrometer with a graduation for the frost resistance of the antifreeze.
Examination
1. Warm up the engine slightly until the upper radiator hose is warm. When measuring the concentration of antifreeze, the liquid temperature should be about +20°C.
Caution! When the engine is hot, open the expansion tank cap carefully. There is a risk of burns! Place a rag on the cap. Open the cap only when the liquid temperature is no more than + 90°C.
2. Carefully unscrew the expansion tank cap.
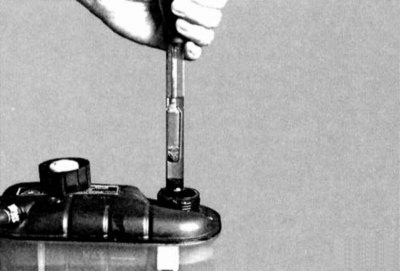
3. Draw up the liquid using the hydrometer bulb.
4. Usually, the concentration of antifreeze is sufficient to provide protection for the system down to a temperature of –25°C, and in particularly cold climates down to –35°C.
Liquid removal
1. To drain the coolant, place a drain pan under the radiator and remove the radiator drain plug.
2. It is impossible to completely remove old fluid from the system (without complete disassembly of the engine), therefore all volumes given in the Specifications are conditional. In practice, you will be able to fill the system with about 2/3 of the prescribed amount of liquid.
3. After filling the system with fresh antifreeze, place a label on the expansion tank indicating the concentration, brand of antifreeze and replacement date. Any subsequent refill of the system (before the scheduled replacement) must be carried out only with the specified liquid.
Adding antifreeze
Please refer to the Specifications materials at the beginning of the Chapter.
If engine protection is required down to a temperature of –25°C, the concentration of antifreeze in the coolant should be 40%. If protection is required down to a temperature of –35°C, the concentration of antifreeze should be 50%.
Note: If a higher degree of protection against freezing is required, the concentration level of antifreeze can be increased to 60%. This concentration will provide protection down to -40°C. If the concentration is increased to a higher level, the degree of engine protection begins to decrease and, in addition, the heat-dissipating properties of the coolant are deteriorated.
Air locks
1. If the engine overheats after changing the fluid, the cause is most likely the presence of air locks in the system. These locks do not allow the fluid to circulate throughout the system. They appear as a result of filling the system too quickly.
2. If you think there are air locks in the system, first try squeezing all the visible hoses one by one. You will immediately determine whether the hose is filled with liquid or air. As a rule, all air locks disappear after the first (after replacing the fluid) engine start.
3. With the engine running and warm, turn on the heater and its fan. Warm air should flow into the passenger compartment in sufficient quantity. If the temperature of the supplied air is low, the cause may be an air lock.
4. The consequences of air locks in the system can be quite serious (not just a decrease in the efficiency of the heater). A large plug can stop the circulation of fluid inside the engine. To make sure there are no plugs inside the engine, touch the upper radiator hose with the engine running - it should be hot. If the hose is cold, this indicates an air lock in the engine or a faulty thermostat.
5. If you are unable to get rid of air locks, allow the engine to cool down completely, remove the expansion tank cap, try squeezing the system hoses. If this does not help, drain all the coolant into a clean container and refill the system with the same liquid, following the recommendations above.