
Release models from 06.1993 to 05.1997
The oil level control system consists of an oil level sensor, which is screwed through the oil drain hole, and a warning lamp on the instrument panel. The oil level in the sump begins to be monitored at an oil temperature of +60°C.
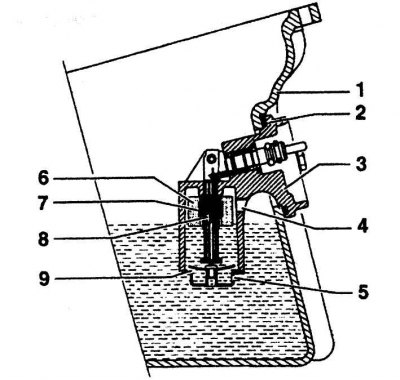
Pic. 5.19. Oil level sensor: 1 - oil pan; 2 - sealing ring; 3 – oil level sensor; 4 - ventilation hole with a diameter of 8 mm; 5 - drain hole with a diameter of 4 mm; 6 - float; 7 - magnet; 8 – sensor contact; 9 - bimetallic washer-valve
The oil level in the sump is determined by a float. When the oil level is low, contact 8 closes under the action of a magnet in the float chamber (pic. 5.19), the indicator lamp on the instrument panel comes on. When the oil level drops due to driving conditions, the control lamp first flashes, then lights up constantly.
In order to avoid unnecessary warnings related to driving modes, for example when turning sharply, a deceleration relay is installed in the control unit. It switches on the warning lamp if a low oil level signal is given for 60 seconds.
To avoid incorrect readings when the engine is cold, when cold oil drains into the oil pan for a long time, the oil level sensor is equipped with a bimetallic valve that prevents oil from draining from the float chamber. The oil level sensor ensures that the control lamp on the instrument panel turns on shortly before the oil level reaches the minimum.
Models from 07.1997 with ASSYST maintenance system
The oil level sensor sends readings to the ASSYST active service system unit. Based on information received from various sensors, such as oil level and temperature, coolant temperature, engine speed, speed and engine load, the microcomputer records the actual condition of the engine oil and makes a plan for caring for the engine. One of the indicators «aging» oil - the content of iron particles in it, which increases sharply already after 5000 km when driving over short distances. Mercedes-Benz has developed a special touch sensor. It heats up when the oil level is too high or too low, detects when an oil change is due, and changes in the oil structure such as metal, fuel or coolant additives, and alerts the driver. Information about high or low oil level is displayed on the instrument panel display.
Automatic indication
Automatic indication begins to operate no earlier than 60 s after the engine is started and at an oil temperature of more than +60°C.
If the oil level exceeds the norm, then the symbol is displayed on the instrument panel «butter dish» with an inscription «OLSTAND UBER MAX» accompanied by a sound signal. Excess oil must be removed.
If the oil level in the sump is low, the instrument panel displays the symbol «butter dish» with an inscription «OLSTAND UNTER MIN» accompanied by a sound signal. In this case, it is necessary to replenish the oil level to normal as soon as possible.
If the amount of oil is too low, the symbol appears in the instrument cluster «butter dish» with an inscription «OLSTAND MINIMUM» (oil level below acceptable) accompanied by a sound signal. In this case, the oil level must be topped up immediately.
Note. For vehicles that do not have a multifunction indicator, next to the symbol «butter dish» indication is displayed «-2L».
Attention! The oil level information does not change during the filling process. The amount of oil received in the engine must be manually requested from the system.
Retrieving Information Manually
Switch off the ignition. Set the ignition key to position «2». After 10 seconds, the instrument cluster will display the message «OLSTAND ANZEEIGEN?» («Show oil level?») and symbols will light up «butter dish» And «watch».
At this time, press the trip meter reset button twice within one second. After a while, a message will appear, for example, «1,0 L OI einfullen» («Pour in 1.0 liters of oil»). The message will not appear immediately: at an oil temperature of +60°C, the waiting time will be 1 minute.
Removal and installation of the oil level sensor
Removing
1. Remove the engine compartment shield from below.
2. Drain or vacuum out the engine oil.
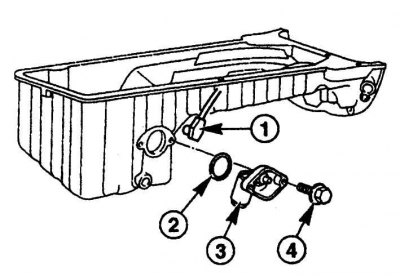
Pic. 5.20. Removing the oil level sensor: 1 - contact connector; 2 - sealing ring; 3 – oil level sensor; 4 - bolt
3. Disconnect from the oil level sensor connector 1 (pic. 5.20).
4. Remove bolt 4.
5. Tilt the oil level sensor 3 and remove it from the oil pan.
Installation
6. Install the oil level sensor 3 with a new sealing ring 2 and tighten the bolt 4 with a torque of 10 Nm.
7. Connect connector 1 to the sensor.
8. Establish from below a board of a motor compartment.
9. Fill the engine with engine oil.
10. Warm up the engine during a test drive and check the sensor for leaks.
Addition for 6-cylinder V-engine:
1. Remove the lower part of the oil pan.
2. Unscrew the fixing screws from below (Torx) oil level sensor next to the oil drain pipe.
3. Bolts of fastening of the gauge of level of oil wrap the moment of 10 Н·м.
Checking the oil level sensor
The oil level warning lamp lights up when the oil level is normal and the engine is running
1. Disconnect the oil level sensor connector.
2. Using an ohmmeter, check the contact between the sensor and «weight».
3. If there is no contact, remove and replace the sensor.
4. If there is contact on the sensor, check the circuit from the sensor to the instrument cluster.
5. If the circuit is OK, then a defect in the instrument cluster may be the cause of the malfunction.
The control lamp does not light up when the ignition is switched on
6. The lamp may have burned out. Replace it.
The control lamp does not light up when the engine is running, the oil temperature is more than +60°C and the oil level is below the minimum mark
7. Disconnect the wire from the sensor.
8. Check the contact between the sensor connector and «weight».
9. Under the conditions described above, there should be no contact on the sensor. Possible circuit break.
10. If the lamp does not turn on, if there is a contact on the sensor, then the lamp has burned out.
11. If there is no contact on the sensor, remove, check and, if necessary, replace the sensor.