
The transition to the selected temperature mode is always made with the maximum possible speed.
Note. Slight fluctuations in temperature around the setpoint are due to solar radiation and fluctuations in outdoor temperature.
A plug-in filter integrated into the system's air inlet protects the interior from dust and pollen.
General notes on the functioning of the A/C system
The functioning of the A/C system can lead to the formation of condensation under the bottom of the car - the formation of a small puddle under a parked car in hot weather should not cause concern.
In hot sunny weather, before driving, you should ventilate the interior of the car heated by the sun.
Keep the air vents in the space between the rear shelf and the rear window of the vehicle open.
In winter, before driving, clear the air intake grille in front of the windshield of the car from snow.
In the event of a refrigerant leak, A/C operation is automatically suspended and the system switches to economy mode.
Governing bodies
Air is supplied to the car interior through a network of ventilation system air ducts ending in nozzles equipped with deflectors.
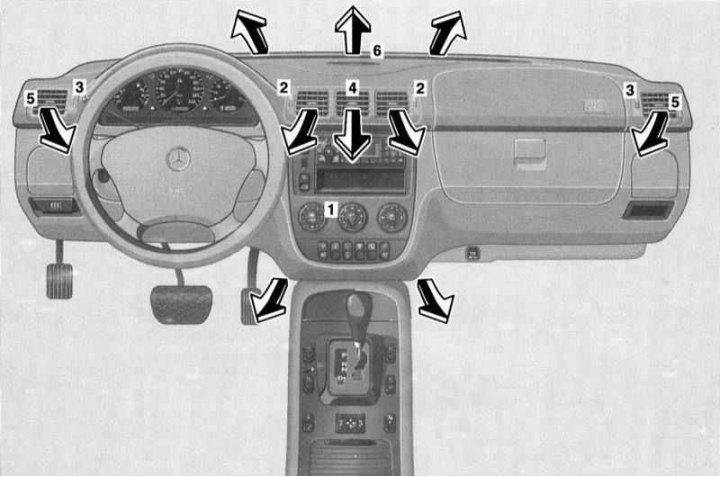
Air distribution pattern and front air path outlet controls
1 - System operation control panel; 2 - Regulators of flow sections of the central nozzles of the instrument panel; 3 - Regulators of flow sections of the side nozzles of the instrument panel; 4 - Rotary deflectors of the central nozzles of the instrument panel; 5 - Rotary deflectors of the side nozzles of the instrument panel; 6 - Deflector of the air supply nozzle for blowing the windshield
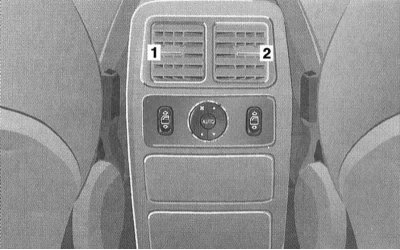
Nozzle deflectors (1 and 2) air duct for air supply to the rear
Air is supplied to the front of the cabin in four main directions: to the front level of the driver and front passenger (instrument panel center and side vents), for blowing the windshield (instrument panel front deflectors), for blowing side windows (side deflectors) and into the footwells (lower air ducts).
The outlet nozzles of the front air ducts are located on the instrument panel and in the footwells of the passenger compartment.
The design of the louvered deflectors of the outlet nozzles of the air ducts of the front level allows you to control the intensity (full overlapping of the nozzle is done by turning the regulator all the way up) and direction of outgoing streams (the turning element is the nozzle assembly).
The front A/C operation control assembly is placed at the top of the console section of the instrument panel.
The louvre deflectors of the nozzles of the air supply path to the rear part of the passenger compartment have a rotary design, adjustments of the air pressure and distribution of the flow in the vertical direction are carried out from the control switch located directly under the assembly of the deflectors.
Front control panel for the functioning of the automated A/C system
The design of the A/C system control panel is shown in the illustration.
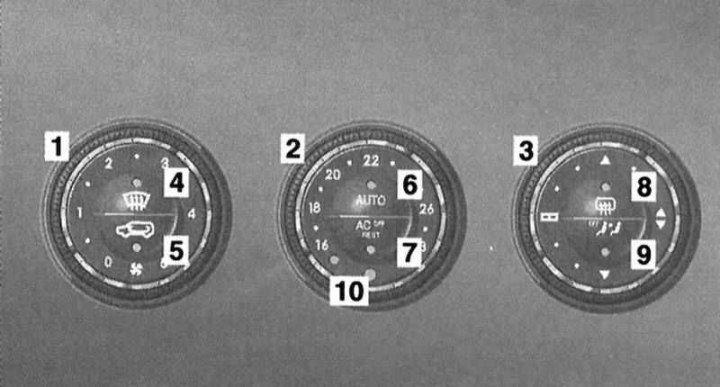
Front control panel for the functioning of the automated A/C system
1 - Rotary regulator for setting the speed mode of the fan operation; 2 - Rotary regulator for selecting the temperature mode; 3 - Rotary regulator for selecting the direction of air distribution; 4 - Button for activating the mode of removing condensate from the windows; 5 - Button for switching air circulation modes; 6 - Buttons for turning on the AUTO mode; 7 - Button for turning on the economy mode; 8 - Button for activating the electric heating of the rear window; 9 - Button to turn off the air supply to the rear of the cabin; 10 - Cabin air temperature sensor
Automatic operation mode
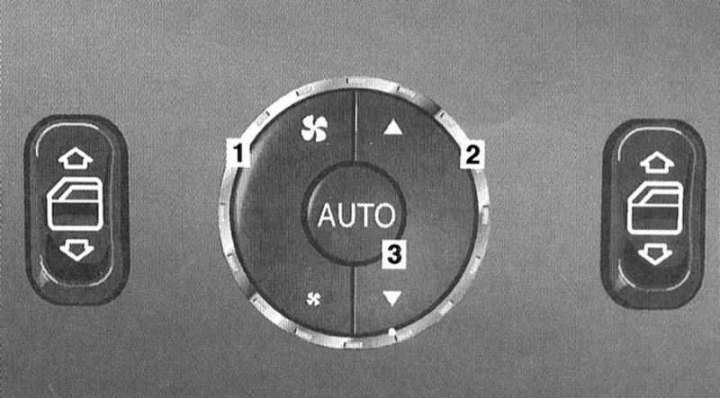
The mode of automatic operation of the system is basic. To activate the mode, press the AUTO button of the central switch of the control panel - the LED built into the button should light up. The choice of the required temperature mode is carried out by turning the rotary knob of the central switch (the luminous segment built into the ring of the regulator serves to indicate the selected value).
Note. When the regulator is turned to the extreme positions marked with blue and red dots on the switch assembly, the temperature control function is disabled.
Having assigned a comfortable temperature mode, press the AUTO button and hold it down for at least 3 seconds, the system will switch to the mode of automatically maintaining the selected setting.
Note. The rear window heating can be activated manually if necessary.
The design of the control system provides for the possibility of programming the basic temperature regime. Turn the rotary control of the central switch to the position of your choice (e.g. 21°C), then press and hold the AUTO button for about 10 seconds.
Note. Adjustment of the set temperature should be done in small steps.
Manual adjustment of the intensity and directions of air distribution
The intensity and direction of the air distribution can be set manually using the rotary controls of the side switches (the AUTO mode control LED will turn off), - the selected temperature mode does not change.
The intensity of the air supply can be changed within 5 steps of the fan speed modes.
Attention! When the air flow rate is set to zero, the system is switched off! This setting should only be selected for a short time.
The choice of air distribution direction provides the following options:
 Air supply for blowing glass, to the front level and to the foot wells
Return to automatic mode can be done by pressing the AUTO button (the luminous segments built into the rings of the regulators should go out), - make sure that the control LED of the automatic mode is properly activated.
Window condensate removal mode
To quickly remove condensate from the windows, press the
Adjustment of all other settings, with the exception of the heated rear window function, is blocked for the duration of the activation of the mode.
To turn off the mode, just press the same button again, or the AUTO button.
Note. To remove condensate from the outer surface of the windshield, select the air supply mode for blowing glass () and activate the windshield wipers.
Closed air circulation mode
The activation of the closed air circulation mode is carried out using the lower button of the left switch of the front A/C control panel, - the control LED built into the button should light up. In this mode, the supply of fresh air to the passenger compartment is turned off. This function helps prevent gassed or foul-smelling air from entering the vehicle interior.
Note. Prolonged use of closed circulation leads to fogging of the windows and an increase in the stuffiness of the air, therefore it is recommended to turn on this mode only if necessary and for a relatively short time, for example, when driving through areas with a smoky or polluted atmosphere. As soon as it is no longer necessary to isolate the passenger compartment, the fresh air supply must be restored.
Pressing the switch button again restores the air supply.
It is also provided for automatic shutdown of the closed circulation mode by a timer signal: after approximately 30 minutes with the A/C turned on, or after 5 minutes with the A/C turned off.
Note. At high outside temperatures, the activation of the closed circulation mode is automatic and is not accompanied by the switching on of the control LED of the switch button.
Economy mode
When the economy mode is selected, the A/C compressor is switched off.
To activate the economy mode, press the ACoff button of the central switch - the control LED built into the button should light up.
Eco mode disables system functions such as cooling and dehumidification.
The mode is turned off by pressing the same button again.
Engine residual heat utilization mode
The passenger compartment can be heated for some time after the engine has stopped by using the residual heat accumulated by the mass of the power unit. The mode is activated using the ACoff / REST button of the central switch of the front control panel - the control LED built into the button should light up.
Before activating the engine residual heat mode (REST) turn the ignition key to position 1.
When the mode is activated, the intensity and directions of air supply are adjusted automatically.
Note. A prerequisite for using the REST mode is that the battery has sufficient charge.
The mode is turned off automatically by a timer signal after approximately 30 minutes, when the key is turned in the ignition switch to position 2, and also when the battery charge level is noticeably reduced.
Shut off the air supply to the rear
Turning off the air supply to the rear of the passenger compartment can be done using the lower button of the right switch of the front control panel - the control LED mounted in the button should light up, and control from the rear panel is blocked.
To restore the air supply back, press the same button again - the control LED should go out, and the rear control panel will switch to automatic operation mode (nozzle passages open).
Rear window heating
The heated rear window only functions in key position 2 in the ignition switch. The rear window heating element is activated using the upper button of the right switch of the front A/C control panel - the control LED built into the button should light up.
Note. In winter, before turning on the heating, remove frost and snow from the glass.
Attention! The heated rear window heating element consumes a lot of electricity, so you should not activate it for a long time.
Heating is automatically turned off by a timer signal after approximately 6-17 minutes, depending on the outside temperature and vehicle speed.
Note. The rear window heating can also be turned off when a large number of electricity consumers are activated at the same time, as well as when the battery charge level is noticeably reduced - the control LED built into the button starts flashing. With the restoration of the voltage level, the heating element is activated automatically.
The back switch of management of functioning of the automated system К/В
The rear switch is mounted in the central part of the control panel located on the rear end wall of the center console directly below the rear air duct deflectors. On both sides of the A/C switch, individual switches for the rear window regulators are placed.
Rear air conditioning control switch
1 - Key for adjusting the intensity of the air supply
2 - Key for selecting the direction of air flow in the vertical plane
4 - Automatic mode activation button
Automatic operation mode
Activation of the automatic mode is carried out using the AUTO button on the rear derailleur equipped with a built-in control LED.
When automatic mode is on, the air conditioning system automatically maintains the temperature in the rear of the cabin in accordance with the setting selected using the knob on the front A/C control panel.
Manual adjustment of the intensity and directions of air distribution
The intensity and direction of air distribution can be set manually using the rear derailleur's side rocker controls (the AUTO mode control LED will turn off). The temperature mode selected from the front panel remains unchanged.
The speed mode of the fan operation is regulated by the left key controller, the distribution direction in the vertical plane - by the right one.
Returning to automatic mode can be done by pressing the AUTO button - make sure that the automatic mode control LED is activated properly.