



Control panel for the functioning of the automated K/V system
The design of the control panel of the air conditioning system is shown in the illustration.
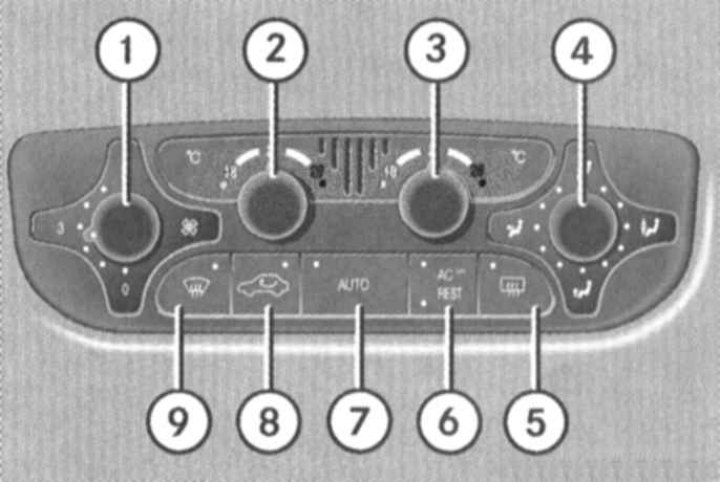
1 - Rotary control for setting the fan speed mode/Termatic system switch; 2 - Rotary temperature control on the left side of the cabin; 3 - Rotary temperature control on the right side of the cabin; 4 - Rotary control for selecting the air distribution direction; 5 - Rear window heating activation button; 6 - Economy mode button; 7 - AUTO mode activation buttons; 8 - Air circulation mode switch; 9 - Button for activating the condensation removal mode from the glass
Activation/deactivation of the Termatic system
To activate the system, turn the fan speed selector knob out of position 0. Returning the regulator to the zero position allows you to turn off the system.
Attention! When the system is switched off, the supply and circulation of interior air also stops, which can lead to rapid fogging of the windows - try not to switch off the system for a long time when using the car!
Automatic operation mode
The AUTO mode, when the intensity and direction of air distribution are selected automatically by the system based on the temperature settings specified by the user, is the basic one. To activate the mode, press the AUTO button on the control panel - the control LED built into the button should light up. The required temperature mode in the right or left part of the cabin is selected by turning the corresponding rotary control - try to adjust the temperature modes in small steps.
Note: The rear window heating can be activated manually if necessary.
Manual adjustment of intensity and direction of air distribution
The intensity and direction of air distribution can be set manually using the side rotary controls on the control panel after first disabling the automatic mode using the corresponding button - the built-in control LED of the AUTO mode should go out - the previously selected temperature settings will change.
The air supply intensity can be changed within 5 stages of fan speed modes.
Attention! When setting the air supply intensity to zero, the Termatic system is switched off! This setting should only be selected for a short time.
The choice of air distribution direction provides the following possible options:
 — Air supply for blowing windshield and side windows
 — Air supply for glass blowing, to the front level and to the footwells
 - Air supply to the front and rear footwells
 — Air supply to the facial level
Return to automatic mode can be done by pressing the AUTO button again - make sure that the control LED is activated properly.
Glass condensation removal mode
To quickly remove condensation from the glass, press the button
 , - the control LED built into the button should light up. The system automatically switches the heater and fan to maximum performance, and the entire flow of air supplied to the passenger compartment is redirected to blowing the windshield and side windows, with its supply to the rear of the passenger compartment switched off. If equipped, the windshield heating is automatically activated. Adjustment of all other settings, with the exception of the rear window heating function, is blocked for the duration of the mode activation.
Original published on the website (MercedesMAN)
Attention! The heating element of the windshield heater consumes a lot of electricity, so it should not be activated for a long time - there is no provision for switching off the heating by timer!
To turn off the mode, simply press the same button again, or the AUTO button.
Note: To remove condensation from the outer surface of the windshield, select the air supply mode for blowing the glass () and activate the windshield wipers.
Air circulation mode
The air circulation mode is activated using the button
 on the K/V control panel, - the control LED built into the button should light up. In this mode, the supply of fresh air to the passenger compartment is turned off, which prevents exhaust gases and unpleasant odors from entering the passenger compartment.
Note. Long-term use of the recirculation mode leads to fogging of the windows and increased air tightness, so it is recommended to activate this mode only if really necessary and for a relatively short time, for example, when driving in a smoky or polluted area. As soon as the need for interior insulation disappears, the supply of fresh air should be resumed.
Pressing the switch button again restores the air supply.
Automatic switching off of the circulation mode is also provided by the timer signal: after approximately 30 minutes at an outside air temperature of 5°C and above, or after 5 minutes at an outside air temperature below 5°C. The five-minute setting is also activated when the economy mode of the system is selected (see below).
Note: At high outside temperatures, the 30-minute recirculation mode may be activated automatically and will not be accompanied by the pushbutton switch control LED turning on.
Economy mode
When selecting the economy mode, the air conditioning compressor is switched off.
To activate the mode, press the AC buttonoff/REST on the control panel, - the control LED built into the button should light up.
Note: On models with the corresponding configuration, the additional heater is also automatically switched off.
In economy mode, Termatic system functions such as cooling and dehumidification are switched off.
The mode is disabled by pressing the same button again.
Engine residual heat utilization mode
The interior can be heated for some time after the engine has stopped by using the residual heat accumulated by the mass of the power unit. The mode is activated using the AC buttonoff/REST on the control panel, - the control LED built into the button should light up.
Before activating the residual engine heat (REST) mode, turn the ignition key to the position 1.
When the mode is activated, the intensity and direction of air flow are adjusted automatically (usually the minimum fan speed is selected). The duration of system operation depends on the selected temperature settings and the initial temperature of the engine coolant.
Note: A prerequisite for using REST mode is that the battery level is sufficient.
The mode is switched off automatically by a timer signal after approximately 30 minutes, when the key in the ignition switch is turned to the position 2, as well as when the battery charge level noticeably decreases.
Rear window heating
The rear window heating only functions in position 2 of the ignition key. The rear window heating element is activated using the corresponding button on the system control panel - the control LED built into the button should light up.
Note: In winter, remove ice and snow from the glass before turning on the heating.
Caution: The rear window heating element consumes a lot of electricity, so do not activate it for a long time.
The heating is automatically switched off by a timer signal after approximately 6-17 minutes, depending on the outside air temperature and the vehicle speed.
Note. The rear window heating may also be switched off if a large number of power consumers are activated simultaneously, or if the battery charge level drops significantly - the control LED built into the button will start flashing. When the voltage level is restored, the heating element is automatically activated.