
The design of the instrument cluster
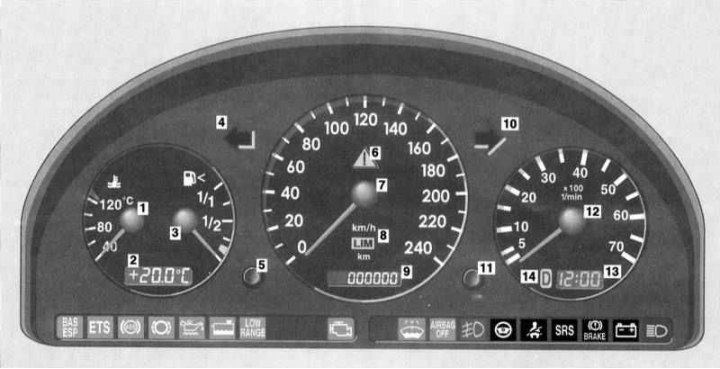
1 - Coolant temperature meter; 2 - Outdoor air temperature indicator; 3 - Fuel gauge with a minimum reserve control lamp; 4 - Control lamp for activating left turn indicators; 4 - Engine oil pressure gauge; 5 - Dashboard illumination intensity control / button for resetting the current mileage counter / activating the instrument cluster / switching modes of the active maintenance system (ASSYST); 6 - Control lamp systems ETS / ESP; 7 - Speedometer; 8 - LIM indicator of the Speedtronic system; 9 - Indicator of the current mileage counter / engine oil level / TO indicator / variable speed limiter; 10 - Control lamp for activating right turn indicators; 11 - Handle for setting the clock readings; 12 - Tachometer; 13 - Clock; 14 - Indicator of the selected AT range
Instrument cluster
The design of the instrument cluster is shown in the illustration.
Instrumentation
Instrument cluster activation
The instrument cluster is activated when the door is opened, by pressing one of the pushbutton switches mounted in the instrument cluster to the right and left of the speedometer, as well as when the ignition is turned on / the driver's door is opened. The board turns off automatically.
Adjusting the intensity of instrument lighting
Adjusting the intensity of instrument lighting (with running lights on - see Section Controls and interior equipment) is carried out using a turn-and-push handle mounted in the instrument panel on the left under the speedometer dial, - using the same handle, the instrument cluster can be activated (see above) and switching the operating modes of the digital display built into the speedometer / resetting the current mileage counter (see below).
Combined fuel/coolant temperature meter
The meter is located in the left corner of the instrument cluster and is equipped with two indicators, one of which (right) registers the amount of fuel remaining in the tank, the second (left) serves to indicate the temperature of the engine coolant. A display for outputting outdoor temperature readings is mounted in the lower part of the meter's dial.
Fuel gauge
The error in readings of the fuel gauge is minimal when the car is in a strictly horizontal position. When driving on winding or hilly roads, the error of the instrument increases. The functioning of the meter does not depend on the position of the ignition key. Label 1/1 corresponds to the state of full refueling, 0 - to an empty tank. The control lamp built into the dial of the meter with the image of a filling column notifies the driver of the need to refuel the car as soon as possible.
Coolant temperature meter
Under normal conditions, the boiling point of the coolant (antifreeze with added anti-corrosion additives), charged into the system tract designed for operation at overpressure is about 130°C. Under severe operating conditions, such as very hot weather or long uphill climbs, the pointer may rise to the upper red mark on the scale. If the engine temperature has increased so much that the pointer needle enters the red range of the meter scale, you should immediately stop driving, pull over to the side of the road, park and check the condition of the cooling system to determine the causes of engine overheating (see chapter Cooling system).
Outside temperature indicator
The display of indication of indications of the temperature of external air is built in the dial of the left combined measuring instrument of a combination of devices. Temperature is in degrees Celsius (°С).
Changing the display readings after leaving the garage occurs with a certain delay due to sensor adaptation.
In addition, there is a forced delay in the rise of the display readings in accordance with the increase in ambient temperature when the engine coolant temperature is over 60°C, which helps prevent interference from a hot engine during stops and when the vehicle is moving at low speeds.
Speedometer
The speedometer is mounted in the central part of the instrument cluster and shows the vehicle speed in km/h.
Display of odometer readings / current mileage counter / engine oil level indicator / due date of scheduled maintenance
The display of odometer readings, current mileage counter and scheduled maintenance due date indicator is built into the speedometer dial. Resetting the current mileage counter / switching display modes is done using the button switch located on the left under the speedometer dial (see ibid).
Odometer and current mileage counter
The odometer records the total mileage of the vehicle since it was put into service, the resettable meter allows you to track the current mileage of the vehicle since the last time it was reset (in kilometers). Switching between the odometer / counter modes is carried out using the button located to the left of the speedometer.
To reset the counter, activate the instrument cluster (see above), then press and hold the reset button for about 1 second.
Engine oil level indicator
When checking the engine oil level, the vehicle must be in a horizontal position. Readings should be taken approximately 5 minutes after the engine has warmed up to normal operating temperature.
Turn the ignition key to position 2 and wait until
or
If the correct level measurement is not possible, the
Note. If necessary, the oil level can be checked manually using a dipstick (see chapter Maintenance).
Scheduled maintenance due date indicator (TO-Assyst system)
See Section Active warning system about the timing of scheduled maintenance (ASSYST).
Tachometer
The tachometer is located to the right of the speedometer and shows the engine speed in thousands of revolutions per minute (arrow reading should be multiplied by 100). In order to avoid engine failure, it is forbidden to exceed the maximum permissible speed of the crankshaft (the tachometer needle should never enter the red zone of the scale).
Note. In order to protect the engine, when the crankshaft speed reaches the red marking range, the fuel supply is cut off.
Watch
The dial of the onboard clock is built into the dial of the tachometer. The clock setting knob is located on the left under the tachometer dial (see ibid). Turning the regulator pulled out of the panel clockwise leads to an increase in readings, counter-clockwise to a decrease.
Control lamps and indicator lights
A whole complex of control lamps and indicators is built into the assembly of the car's instrument cluster, with the help of which the driver receives important information about the serviceability / violation of the functioning of the main units and systems of the car. The layout of the control lamps on the instrument panel is shown in the illustration. Below is information on the principle of operation of each of the provided indicator lights separately.
List of control lamps and indicator lights included in the instrument cluster
 (yellow) Anti-slip control warning lamp (4-ETS) /anti-skid (ESP); «Adapt your driving style to the road conditions!»
 (yellow) Control lamp of failures of system of strengthening of emergency braking (BAS) / anti-skid system (ESP)
 (Green) Fog lamp activation indicator light
 (Red) indicator light «Fasten your seat belt»
Anti-slip control warning lamp (ETS) and anti-skid (ESP) systems
This warning lamp comes on briefly when the ignition is switched on and should go out as soon as the engine is started. The activation of this warning lamp is accompanied by the forced shutdown of the anti-skid (ESP) systems (see Sections Anti-slip system (4-ETS) and Electronic anti-skid system (ESP)). Activating the flashing light while the vehicle is moving alerts the driver that the vehicle's wheels are at the limit of traction and must slow down to a safe level.
Attention! When towing a car with the rear wheels off the ground, as well as when checking the proper functioning of the brake mechanisms on the stand, the engine must be turned off, because. Otherwise, the active braking action of the ESP system can lead to failure of the rear wheel brakes!
Control lamp of failures of the amplifier of emergency braking (BAS) / anti-skid system (ESP)

The control lamp is briefly activated when the ignition is switched on and should go out immediately after the engine is started. Failure of the lamp to turn off, as well as its activation while driving, indicates a malfunction of the BAS or ESP system.
Note. If the BAS system fails, the vehicle's braking system continues to function normally (unenhanced) mode.
A malfunction of the ESP system can lead to a noticeable reduction in the power developed by the engine. The vehicle should be taken to a Mercedes-Benz workshop without delay for diagnosis and necessary repairs.
To turn off the control lamp, which is activated when the engine is running, after turning off the on-board power, turn the steering wheel from lock to lock. When the voltage level drops below 10 V, the BAS system will automatically shut down. Accompanied by the operation of this control lamp. The return of the system to the operating state also occurs automatically when the voltage level is restored - the lamp should go out.
Control lamp of antiskidding system (4-ETS)
The control lamp is briefly activated when the ignition is switched on and should go out immediately after the engine is started. Failure of the lamp to turn off, as well as its activation while driving, indicates a malfunction of the 4-ETS system, - the car should be immediately driven to a Mercedes-Benz service station for diagnostics and the necessary remedial repairs.
Note. In the event of a high brake load, the 4-ETS system is automatically switched off for a short time to prevent overheating of the brakes - this switch-off is accompanied by the activation of the warning lamp.
The 4-ETS system is activated at speeds from 40 to 80 km/h when one of the wheels reaches the tire grip limit (for example, with one-sided ice). The corresponding wheel is then braked to ensure reliable traction.
Warning lamp of the ABS anti-lock braking system
This warning lamp is used to monitor the correct functioning of the ABS, it works briefly when the ignition is turned on and should go out a few seconds after the engine is started. Failure of the lamp to turn off, as well as its activation while driving, indicates a malfunction of the ABS, - the car should be immediately driven to a Mercedes-Benz service station for diagnostics and necessary remedial repairs.
Note. At the same time as the ABS, the 4-ETS, BAS and ESP systems are also deactivated), which must be confirmed by the operation of the corresponding control lamps (see above).
Brake pad wear warning lamp
The control lamp is briefly activated when the ignition is switched on and should go out immediately after the engine is started. Activation of the lamp during braking indicates wear of the friction linings of the brake pads to the maximum permissible value and the need for urgent replacement.
Control lamp of level of motive oil
The engine oil level indicator light comes on briefly when the ignition is switched on and should go out after the engine is started. The activation of the warning lamp with the engine running indicates a dangerous decrease in the level of impellent oil. Check the oil level as soon as possible and correct if necessary (see chapter Maintenance), check for signs of leak development.
Control lamp of level/temperature of a cooling liquid
This warning lamp comes on briefly when the ignition is switched on and should go out as soon as the engine is started. Activation of the warning lamp while driving indicates that the coolant level in the expansion tank has dropped to a dangerous limit and an appropriate correction must be urgently made, or the coolant temperature has reached the upper limit of the permissible range (129°С). Stop the engine, let it cool down a little, check the fluid level in the expansion tank, if necessary, make the appropriate adjustment (see chapter Checking the cooling system and frost resistance of the coolant, changing the fluid).
Off-road mode warning lamp
This indicator lamp is used to confirm that the switch to off-road mode is working properly (see Section Controls and interior equipment), - during the switching process, the lamp should blink three times, then switch to the constant glow mode. A rapid flashing of the lamp when the ignition is turned on indicates a malfunction in the LOW RANGE switching system and the vehicle should be driven to a Mercedes-Benz service station for diagnosis and necessary remedial repairs.
MIL failure warning lamp («Check engine»)
This warning lamp comes on briefly when the ignition is switched on and should go out a few seconds after the engine is started. Failure of the lamp to turn off, as well as its activation while driving, indicates a malfunction of the engine control systems / reducing the toxicity of exhaust gases - the car should be immediately driven to a Mercedes-Benz service station for diagnostics and necessary remedial repairs.
Note. To turn off the warning lamp activated after refueling a completely empty fuel tank, repeat the procedure for starting the engine three or four times.
Control lamp of deactivation of the front passenger airbag when installing a child seat on the right front seat (AIRBAG OFF)
This warning lamp should come on when this special child seat is attached to the front passenger seat to confirm that the passenger airbag has been deactivated. Failure of the warning lamp to work indicates that the airbag has not been turned off and the child seat should be moved back - contact a Mercedes-Benz service station for help.
Fog lamp activation indicator light

The operation of this indicator light confirms the correct activation of the fog light (both front and rear - see Section Controls and interior equipment).
Control lamp of blocking of a clamp of the mechanism of adjustment of a steering column
Activation of this warning lamp warns the driver that the steering column height adjustment mechanism is not blocked (see Section Controls and interior equipment) and driving is dangerous.
Additional security warning lamp (SRS)
This warning lamp comes on for approximately 4 seconds when the ignition is switched on and should go out as soon as the engine is started. If the lamp continues to burn while the engine is running (in continuous or flashing mode), this indicates a malfunction of the SRS system components. If equipped, the operation of this warning lamp may indicate a malfunction in the circuits of the side and head airbags, or the devices of the automatic emergency seat belt tensioners.
Control lamp of level of a brake liquid / failures of electronic system of distribution of brake forces (EBV) / parking brake setting indicator
The warning lamp illuminates continuously when the parking brake is applied, reminding the driver to release it before driving off. Driving with the parking brake applied leads to rapid overheating and failure of the brake mechanisms of the rear wheels of the car, as well as to premature wear of the rear wheel tire treads, and in addition, it can cause a malfunction of the anti-lock brake system (ABS).
If the warning light stays on after the parking brake is released, or comes on while driving, this usually indicates an excessive drop in the brake fluid level - one of the possible reasons for the gradual decrease in the brake fluid level is normal wear of the friction linings of the brake pads.
Another reason for the activation of this warning lamp is a malfunction of the electronic brake force distribution system (EBV), - the car should be driven to the nearest service station to assess the condition of the pads and check the tightness of the hydraulic path of the brake system.
Note. A short-term operation of the control lamp also occurs when the ignition is switched on (even with the parking brake released).
Control lamp of a charge of the rechargeable battery
The charge control lamp should light up when the ignition is switched on and go out immediately after starting the engine. Activation of the lamp while the engine is running warns the driver of a malfunction in the charging system when the battery enters the discharge mode. You should immediately turn off all consumers of electricity, the operation of which does not affect road safety and try not to stop the engine, as an attempt to start it can lead to the final discharge of the battery. Check the condition and tension of the alternator drive belt, if necessary, make appropriate adjustments. If the belt is in order, the vehicle should be immediately driven to the nearest service station to diagnose the failure and perform the necessary remedial repairs.
High Beam Activation Indicator Light
This indicator serves to confirm the activation of the high beam headlights.
Diesel engine preheat warning lamp
The preheating indicator lamp lights up when the ignition is switched on and indicates that the preheating system has been activated. The engine must not be started before the warning lamp turns off.
Control lamp of electronic control system of power of the diesel engine (EPC)
This warning lamp should come on when the ignition is switched on and go out as soon as the engine is started. The operation of the lamp while driving indicates a failure in the fuel injection control system of the diesel engine - the system switches to the emergency operation mode, when driving in which you should not depress the gas pedal to the stop and exceed the crankshaft speed of 2500 per minute. The power developed by the engine in such a situation can be noticeably reduced and the car should be driven to the nearest Mercedes-Benz workshop.
Indicator light «Fasten your seat belt»

This indicator has an amber glow and briefly (for about 6 seconds) is activated when the ignition is switched on, reminding the driver and passengers to fasten their seat belts.
Fluid level/frost resistance warning light in windshield washer/headlight lens reservoir
This warning lamp comes on briefly when the ignition is switched on and should go out as soon as the engine is started. The activation of the warning light while driving indicates that the washer fluid level has fallen to approximately 1/4 of the volume of the respective reservoir.
At temperatures below 0°C, this warning light can also warn the driver that the washer fluid has frozen and that the concentration of antifreeze ingredient in the washer fluid needs to be increased.
Direction indicator lights
Light indicators in the form of arrows have a green glow and serve to monitor the proper functioning of the corresponding direction indicators. The direction of the indicator arrows coincides with the selected direction of change of the vehicle's course. The indicators work in a flashing mode with a frequency corresponding to the frequency of blinking of the direction indicators. The rapid blinking of one of the indicators usually indicates a burnout of the lamp of one of the indicators of the corresponding turn. It is necessary to replace the burned-out lamp as soon as possible so as not to create emergency situations on the roads.
Simultaneous flashing of the indicator lights of both directions is usually accompanied by the activation of the alarm.